Creating a powerful, professional resume is a crucial step in the job-hunting journey. More than a mere document, your resume acts as your personal marketing tool. It serves as your first impression to potential employers, providing them with a snapshot of your skills, experiences, and competencies. Consequently, the way your resume is designed and formatted can significantly influence its overall impact, potentially determining whether you’re selected by the hiring manager for an interview or passed over.
TABLE OF CONTENTS
One powerful tool that can help you create an impressive resume is Microsoft Word. Word is not just a text editor but a potent instrument that, when fully harnessed, can assist you in creating well-structured, attractive, and impactful resumes and cover letters. In fact, Microsoft Word (.DOCX) is considered the standard, best file format for resumes.
Learning some simple Microsoft Word tips and tricks can save you immense time and stress when writing a resume. With just a few shortcuts and formatting commands, you can dramatically reduce the hours spent on aligning text, adjusting fonts, and reformatting sections. You’ll gain the ability to focus more on the content of your resume— your skills, experiences, and achievements—rather than laboring over the technical aspects of formatting it.
So, dive in to learn how to leverage Microsoft Word to craft impressive resumes and cover letters, with simple Microsoft Word tips to learn not only new features but also advanced uses of familiar ones.
Which Version of MS Word
This guide will cover Microsoft Word tips for desktop computers – for both Windows or Mac users. Most will not work on the simpler versions of Word you might use on your phone or online in your browser.
Most or all of these Word tips and tricks should work with any Office version you might be using, from 2016 forward to Office 365. Some will also work with 2013 and earlier versions, but not all. The MS Word tips are written from the perspective of a PC user, so there are two small differences you should know if you are working on a Mac version of MS Word.
- 1
If you are asked to right-click on something, on a Mac you should use Cmd-click instead
- 2
If you are asked to press Alt and another key, on a Mac you should click Option and the same key
Setting Up MS Word for Productivity
Boosting your productivity in Microsoft Word doesn’t require special skills. Here are some ways to tweak your Microsoft Word settings to enhance your resume-writing efficiency:
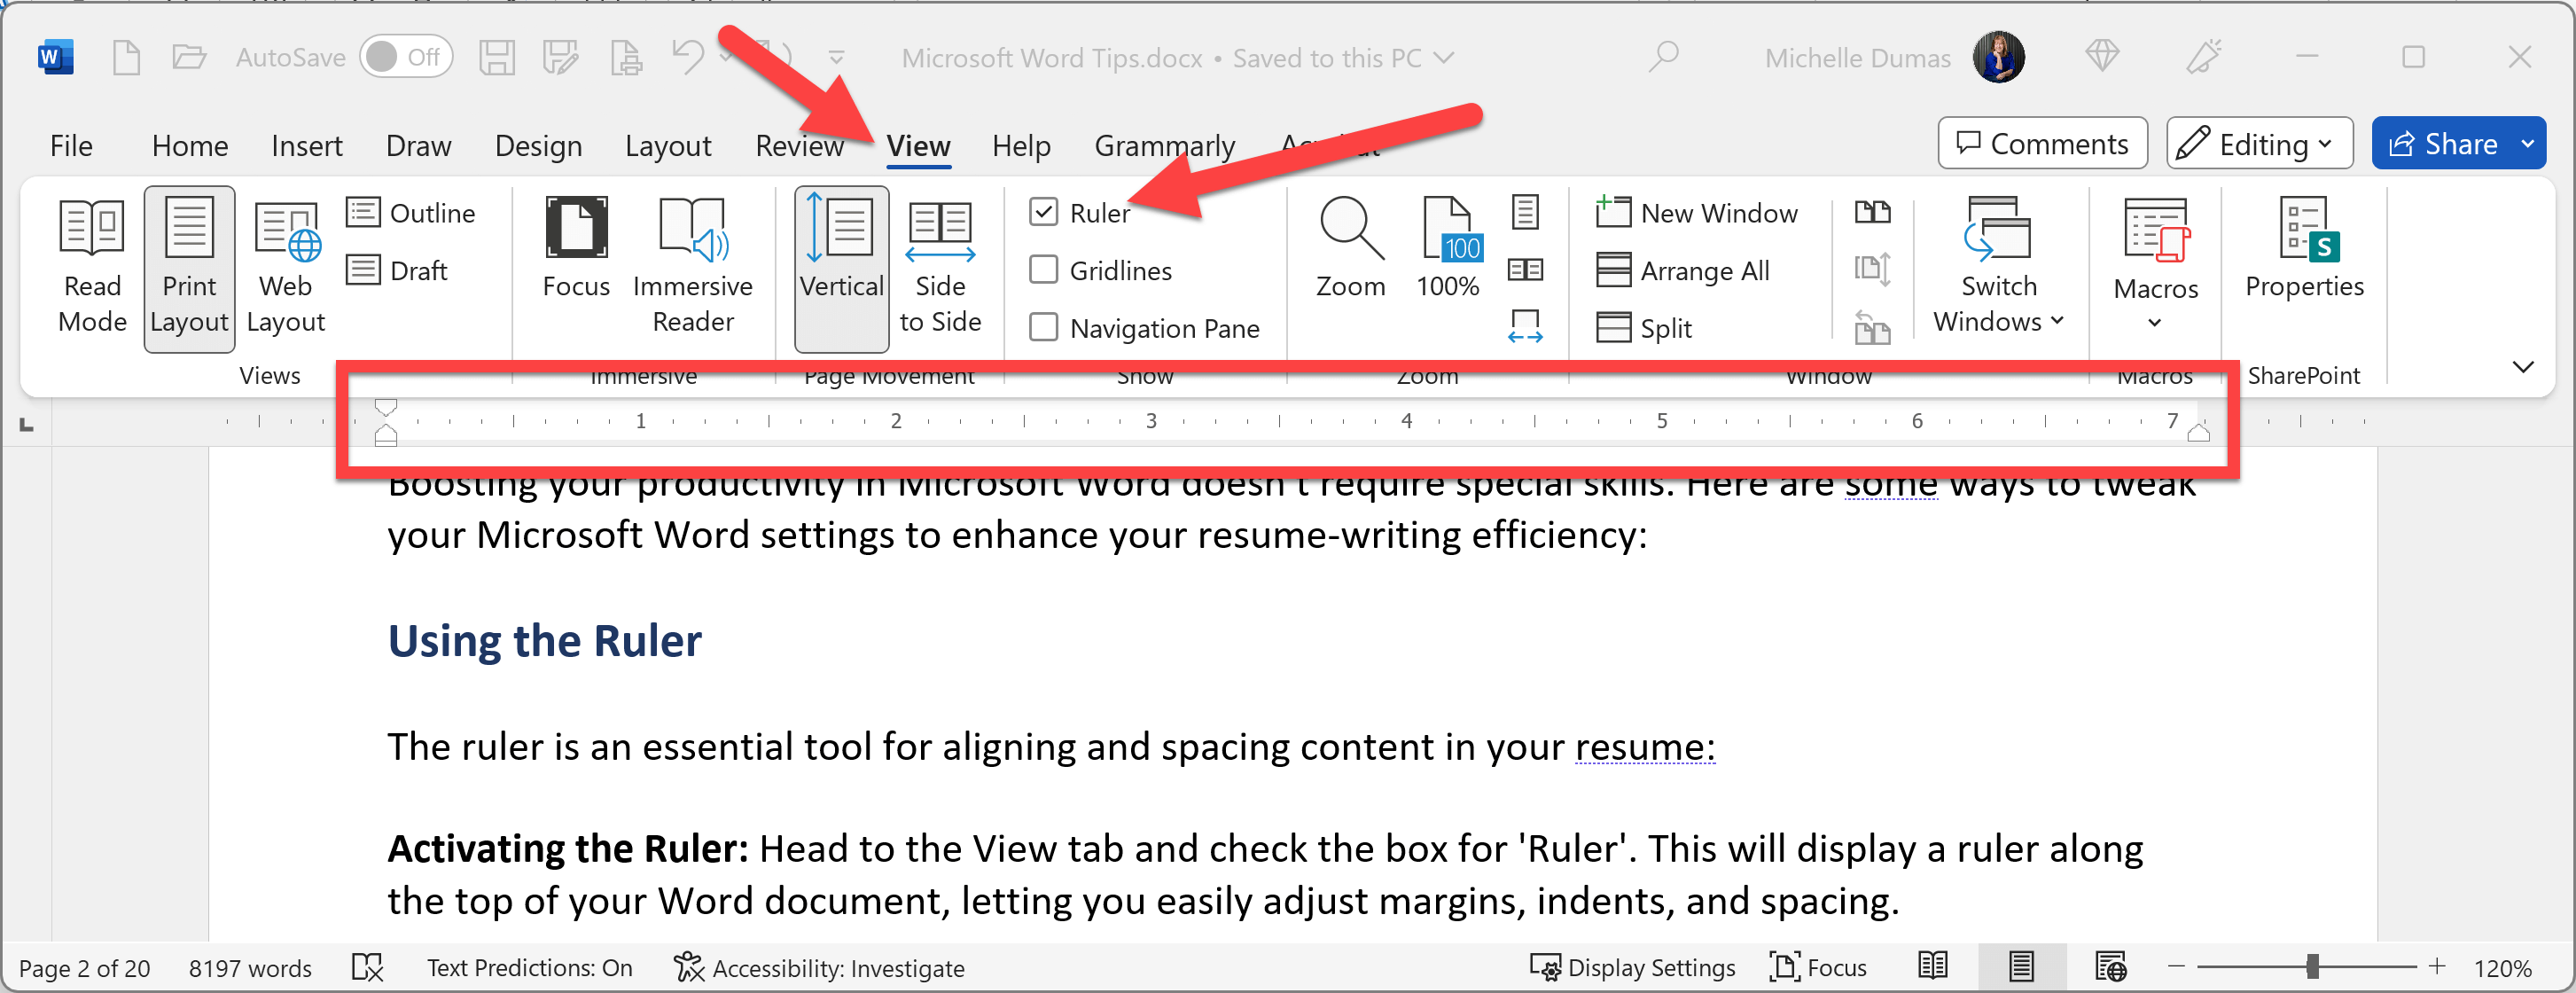
Using the Ruler
For more than just creating a resume, the MS Word ruler will be helpful in formatting any document. It is recommended that you activate it and then leave it on.
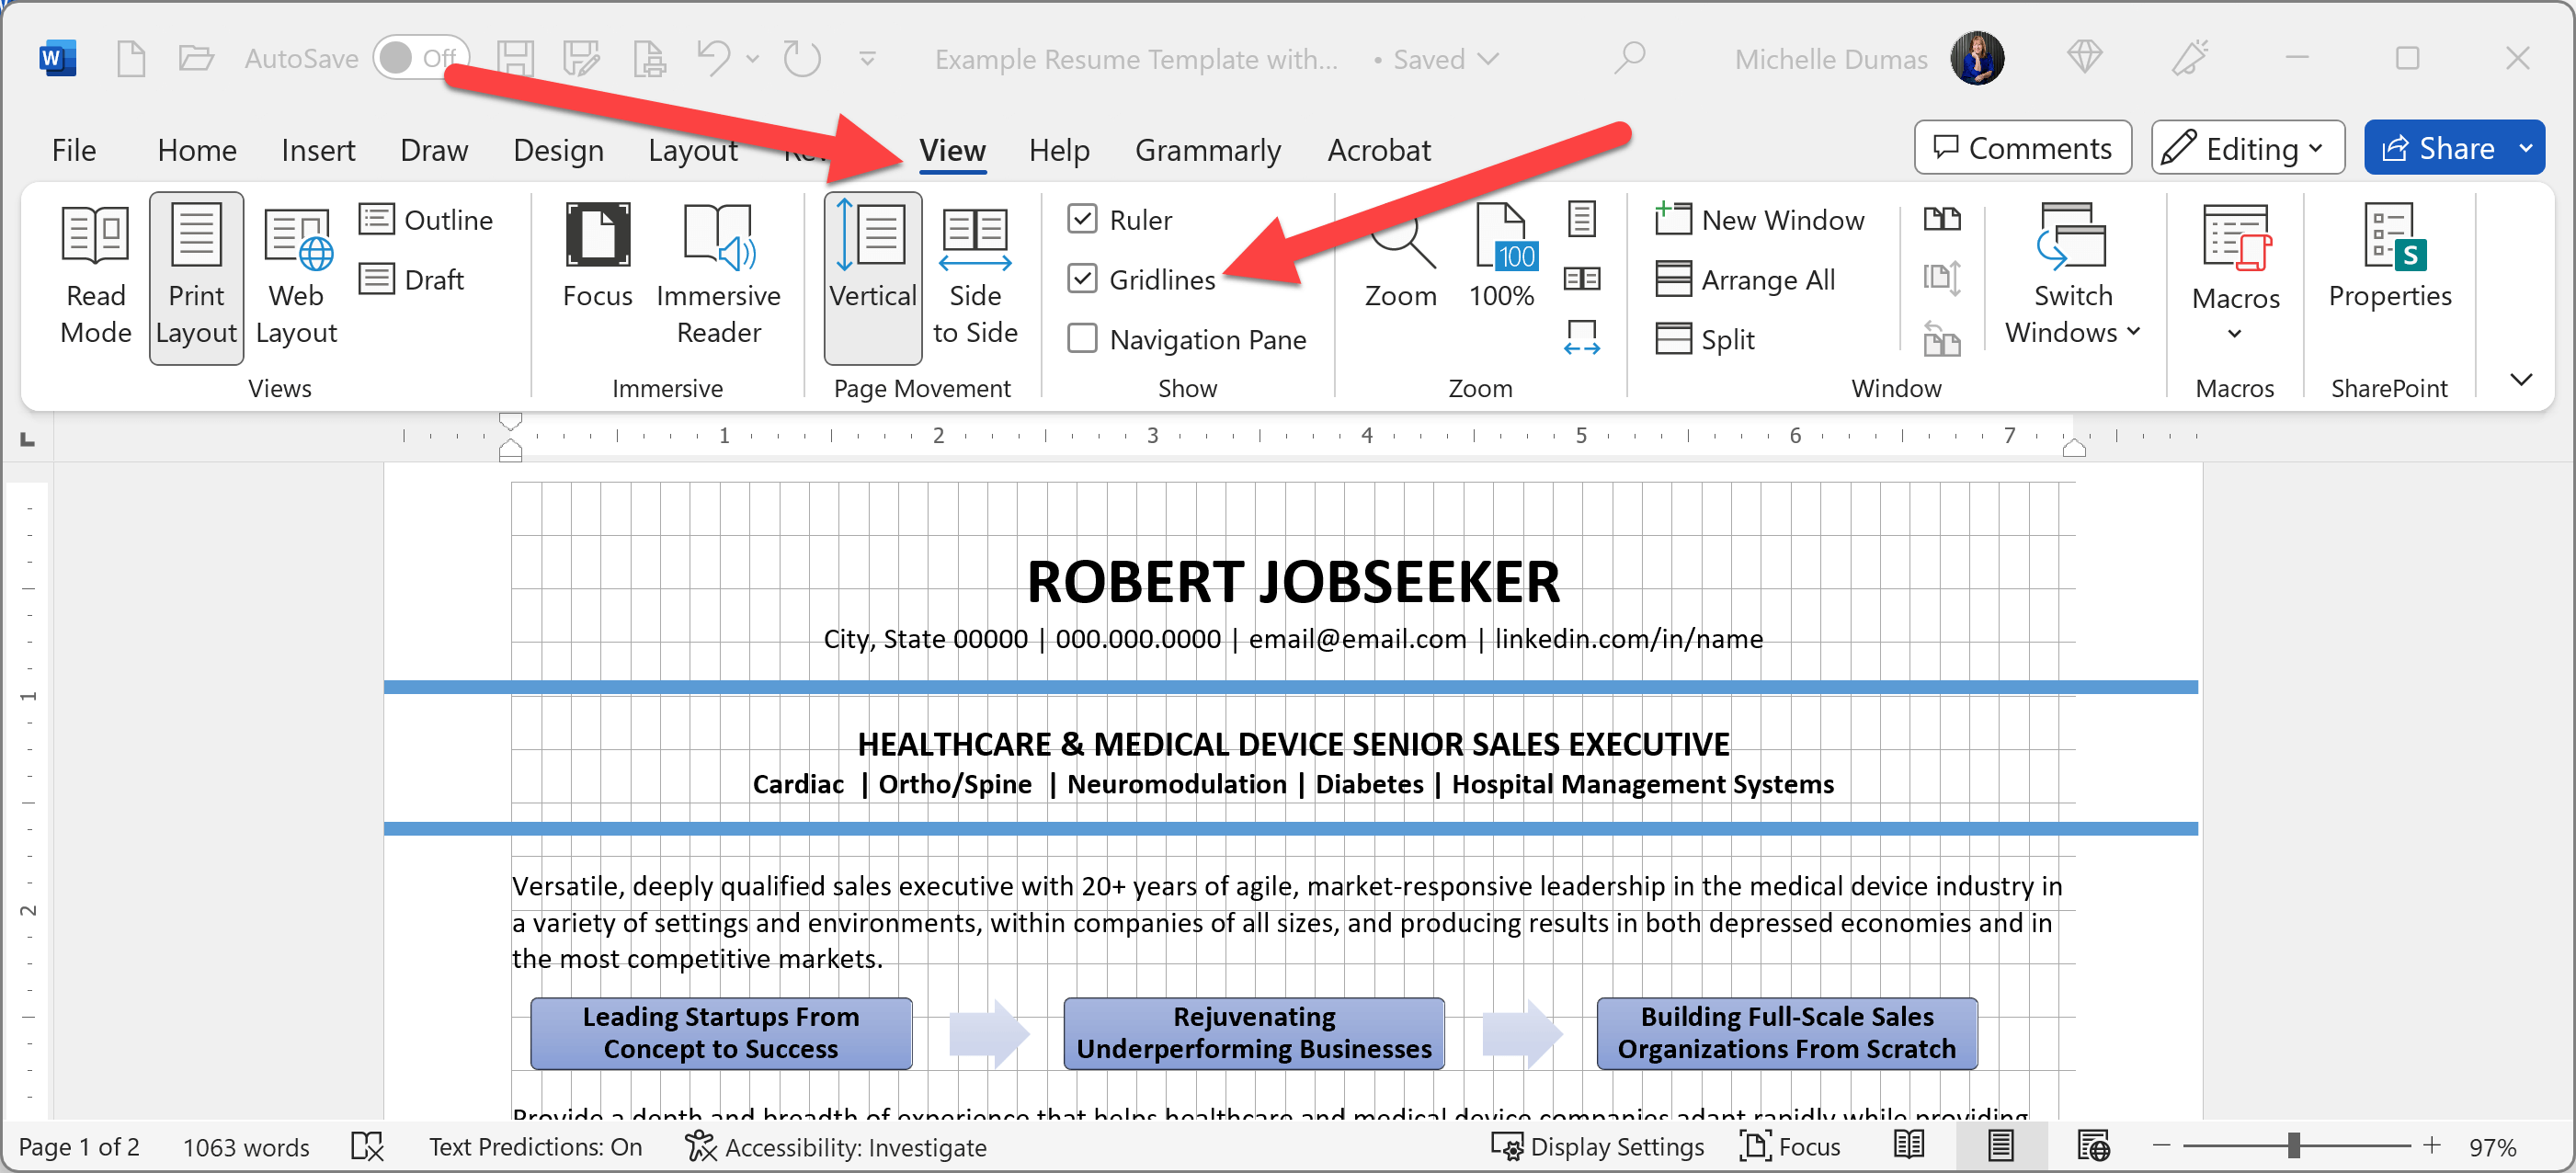
Activating the Ruler: Head to the View tab and check the box for ‘Ruler.’ This will display a ruler along the top of your resume, letting you easily adjust margins, indents, and spacing.
Using the Show/Hide Tool for Non-Printing Characters
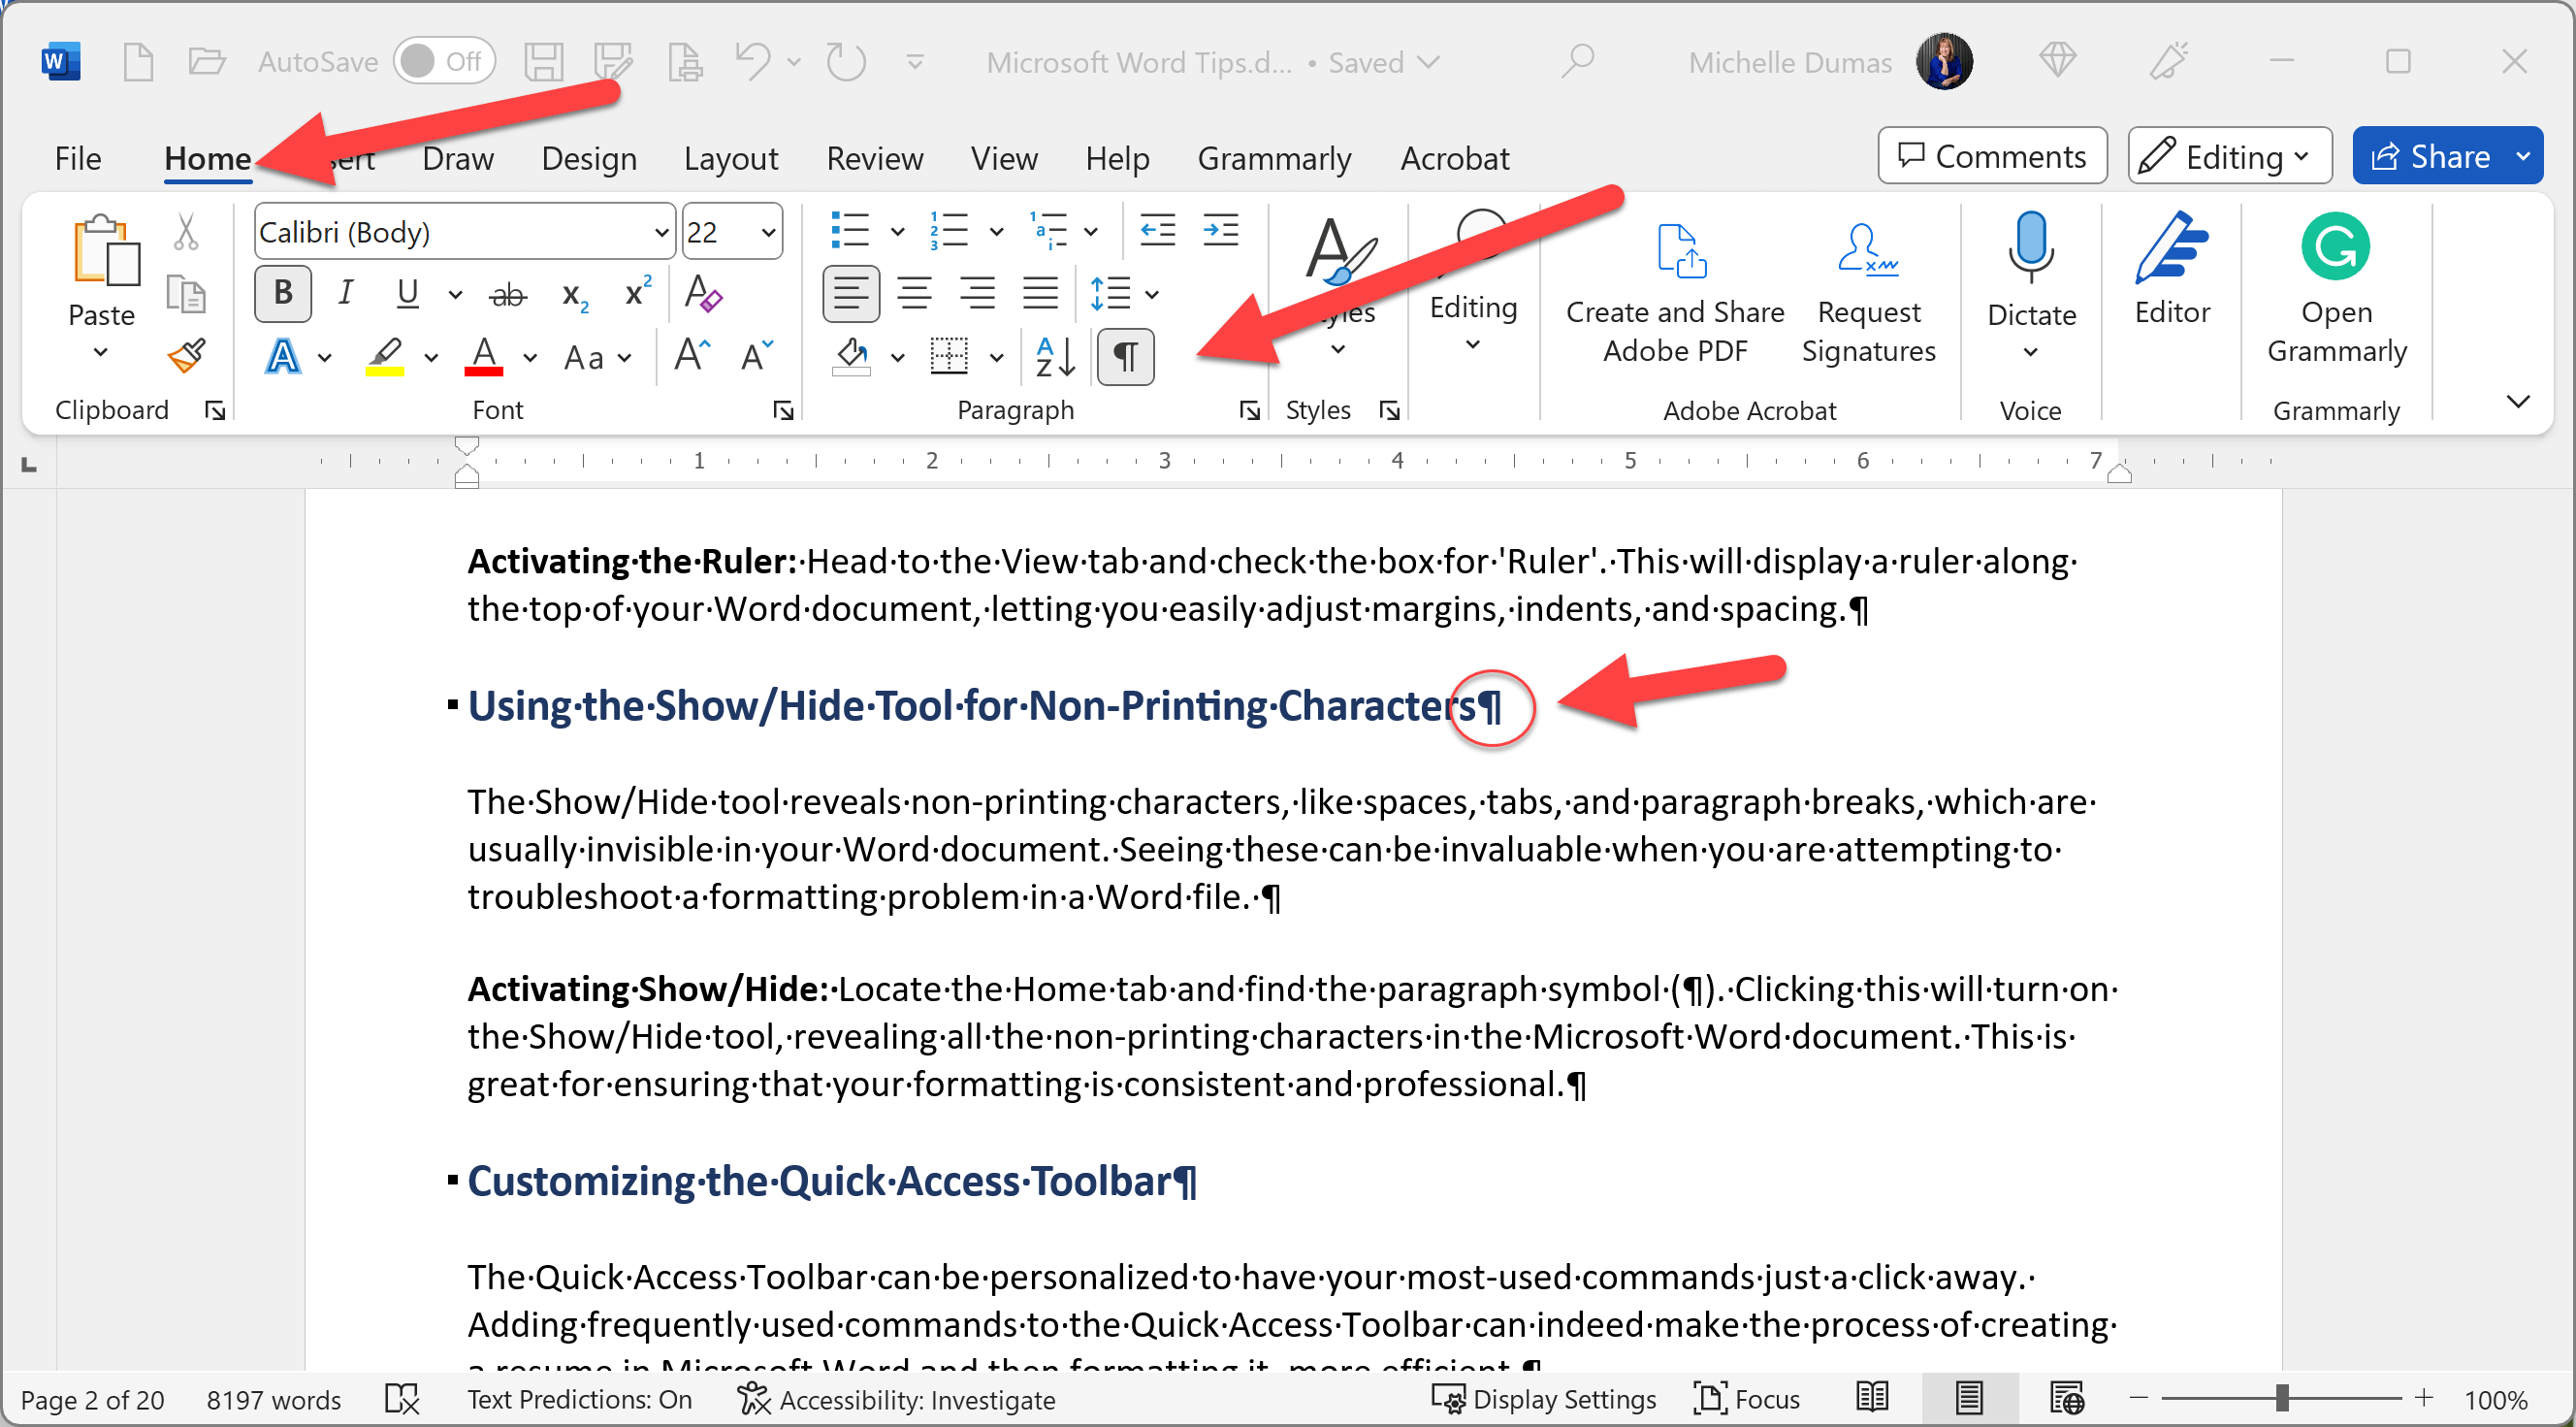
The Show/Hide tool reveals non-printing characters, like spaces, tabs, and paragraph breaks, which are usually invisible in your resume. Seeing these can be invaluable when you are attempting to troubleshoot a formatting problem in any Word file.
Activating Show/Hide: Locate the Home tab and find the paragraph symbol (¶). Clicking this will turn on the Show/Hide tool, revealing all the non-printing characters in your resume. This is great for ensuring that your resume formatting is consistent and professional.
Microsoft Word Tips for Customizing the Quick Access Toolbar
The Quick Access Toolbar can be personalized to have your most-used commands just a click away. Adding frequently used commands to the Quick Access Toolbar can indeed make the process of creating a resume in Microsoft Word and then formatting it more efficient.
Customizing the Toolbar: Right-click on the toolbar and select “Customize Quick Access Toolbar.” From here, you can choose which commands to add, putting your most frequently used actions front and center.
Here are some commands you might consider adding:
Remember, the goal of customizing the Quick Access Toolbar is to reduce the time spent navigating menus for the commands you use in Microsoft Word most frequently. The commands that will be most useful to you will depend on your specific workflow.
Activating Gridlines for Precise Resume Design Alignment
Gridlines can act as your guide, helping you align text, images, and other resume elements perfectly:
Using Gridlines: You can activate gridlines in a Microsoft Word document by going to the View tab and selecting ‘Gridlines.’ This adds a faint grid overlay on your page, offering you a frame of reference for arranging elements.
Gridlines for Resumes: When creating a resume, every detail counts, including the alignment of your content. A misaligned bullet point or irregular spacing can disrupt the flow and presentation of the resume format. Using gridlines can prevent such inconsistencies. For example, if you’re adding images or aligning dates on the page, gridlines will help you line them up accurately.
Microsoft Word Tips for Using Dictation
Dictation can be a game-changer for creating professional resume content more naturally and efficiently in Microsoft Word:
Setting up Dictation: First, make sure your microphone is set up and functioning properly. Then, navigate to the Home tab and click on ‘Dictate.’ Word will start transcribing as you speak, turning your spoken words into written text.
Dictation for Resumes: Dictation can be especially useful when writing your resume as well as other documents, such as a cover letter. It allows you to speak out your experiences and qualifications, which can often be easier and faster than typing. For instance, you can narrate your job responsibilities and accomplishments or the resume summary section, and Word will type it out for you. This is also beneficial if you’re someone who finds it easier to articulate your thoughts aloud.
Harnessing the Power of Autocorrect
Autocorrect isn’t just about fixing typos—it can also create time-saving shortcuts in MS Word files to your frequently used words or phrases:
Setting Up Autocorrect: To access Autocorrect, go to File > Options > Proofing > AutoCorrect Options. Here, you can add your own entries.
Autocorrect for Resumes: As a job seeker, you might frequently use terms like your full name, address, professional certifications, or specific industry jargon. Autocorrect can create shortcuts for these. For example, you can set Autocorrect to replace “myaddr” with your full address, or “mycerts” with the full names of your certifications. This way, you’re not typing out these lengthy details every time.
Another use is to make sure the accents are added to the word résumé. You can set up entries to turn “resume” into résumé. But the unaccented word resume is a word, so it might be better to use a shortcut. Such as replacing “rz” with “résumé” and “rzs” with “résumés.”
Autocorrect can also be used to create shortcuts for phrases you frequently use in your cover letter. For instance, you could set it to replace “intro1” with a standard introduction for your cover letter. Or “closing1” with a standard cover letter closing.
Autocorrect can also correct formatting. If you consistently forget to capitalize certain acronyms, you can add them to your Autocorrect list to ensure they’re always in upper case. For example, ‘mba’ can automatically be corrected to ‘MBA’.
Maximizing Efficiency with QuickParts
QuickParts is a tool that allows you to create, store, and reuse content—a fantastic way to save time and ensure consistency in your Microsoft Word resume:
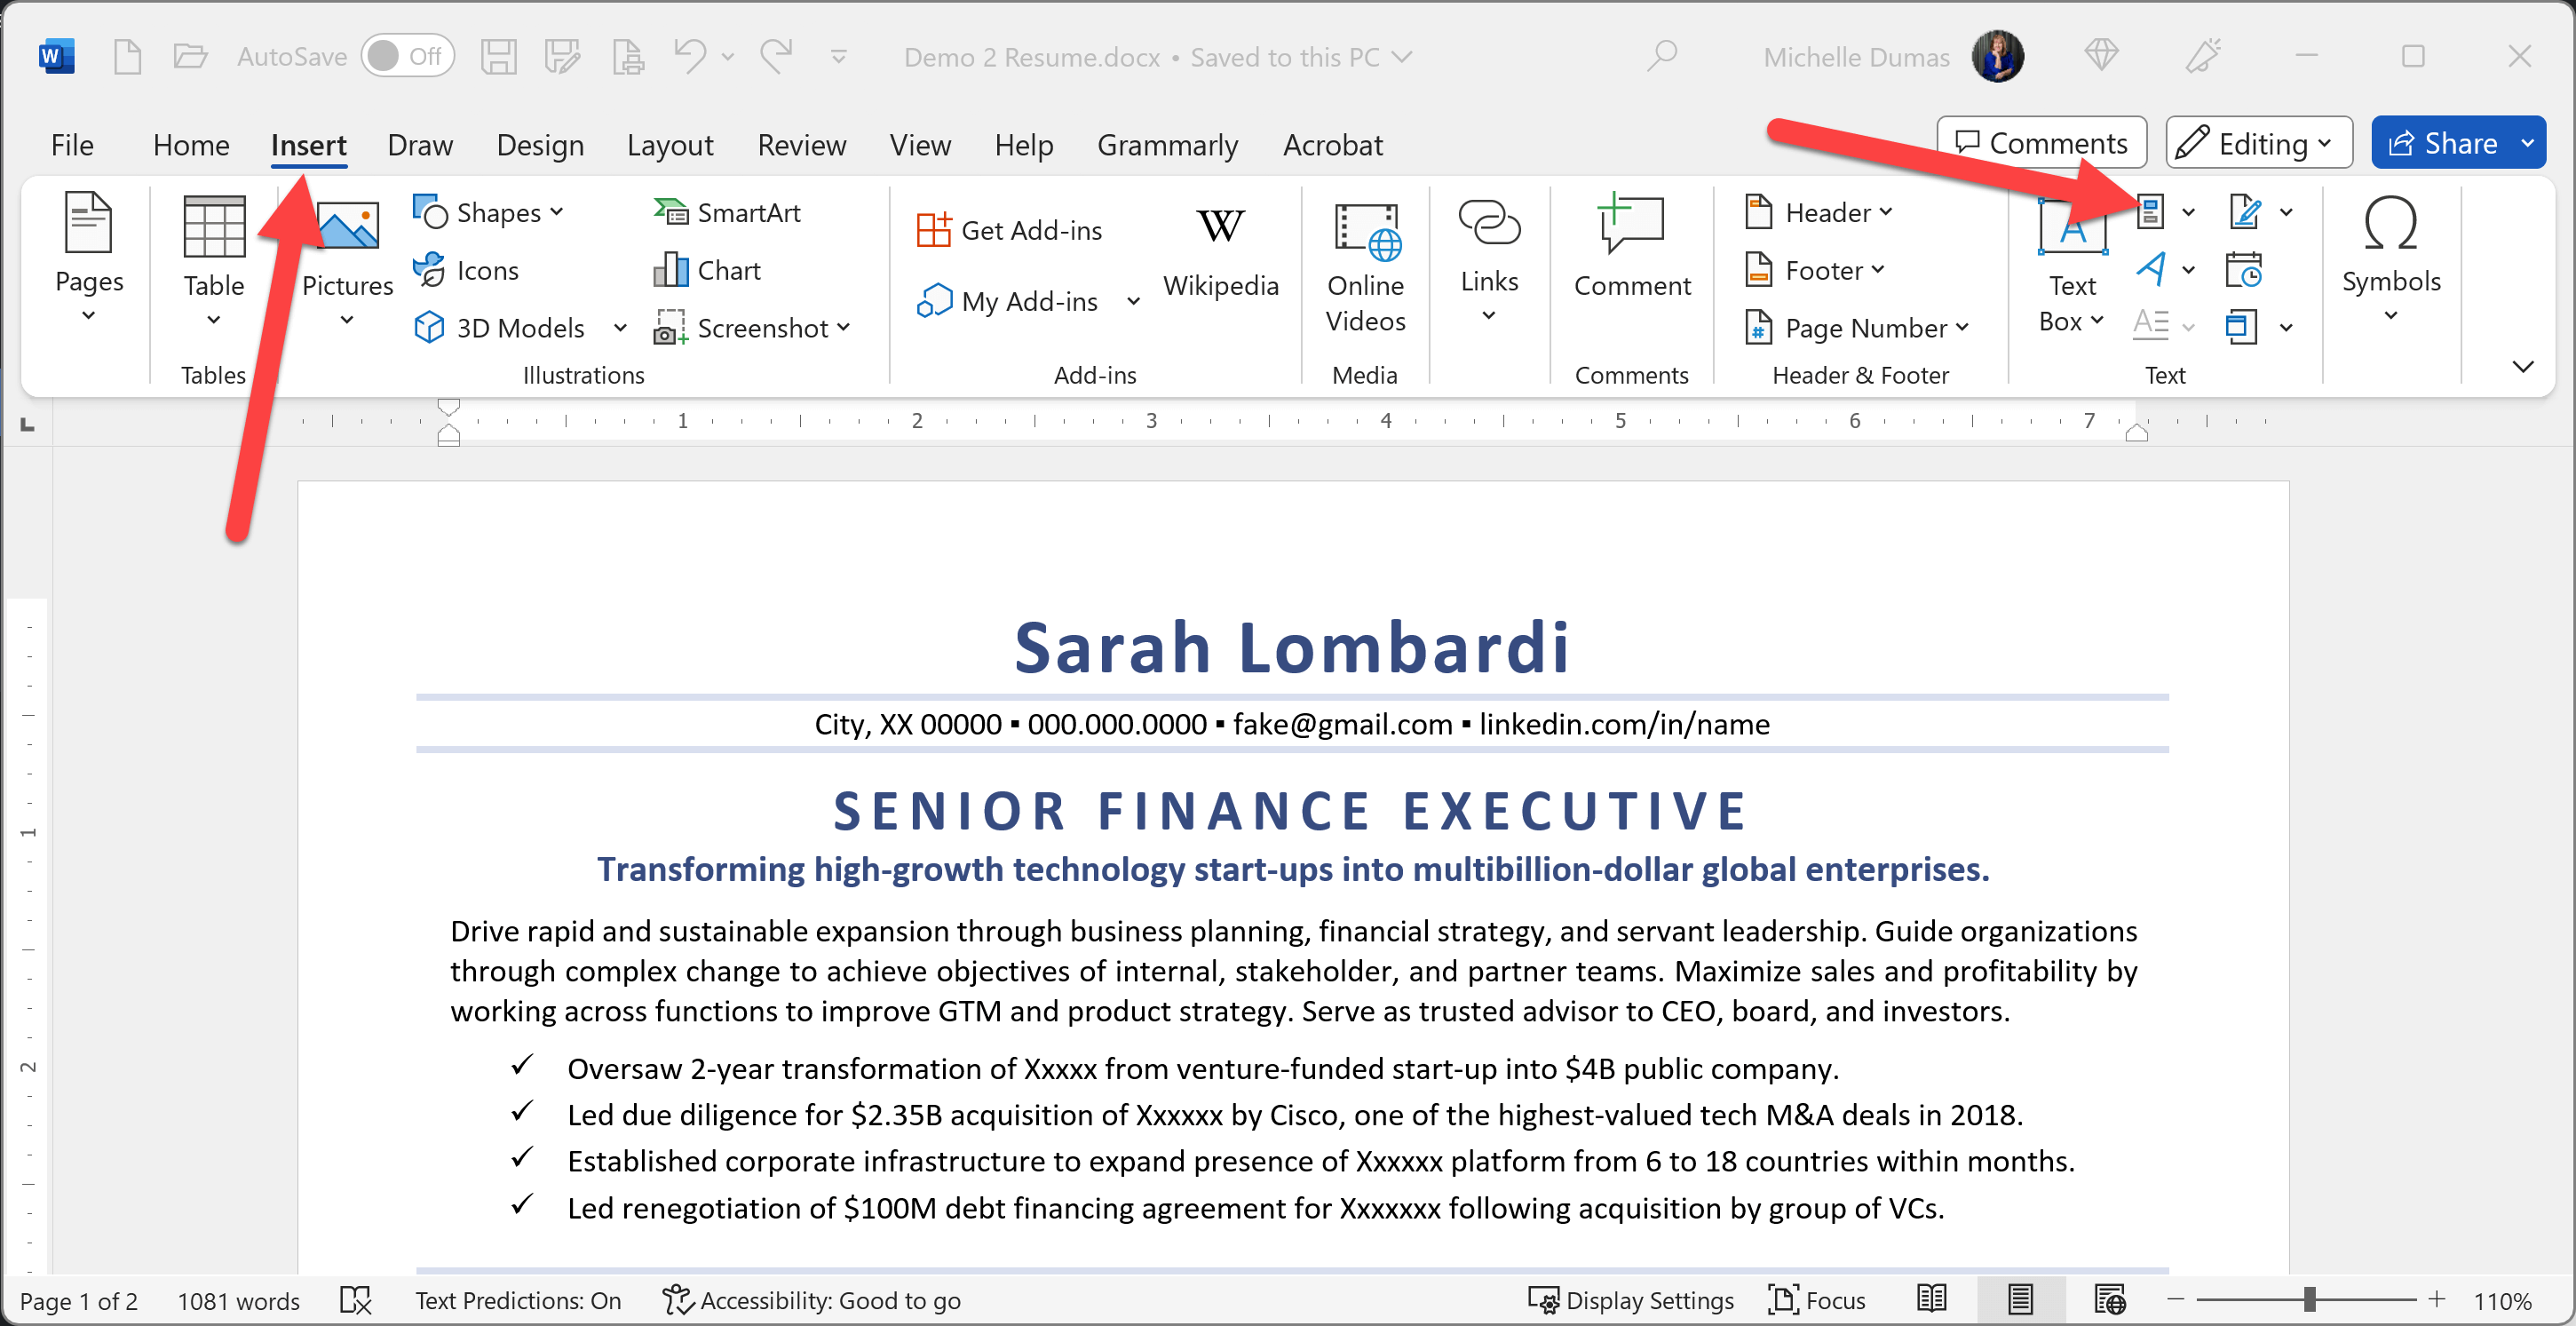
Setting Up QuickParts: You can find QuickParts under the Insert tab. Once you’ve selected some text that you want to save, go to Insert > QuickParts > Save Selection to Quick Part Gallery.
QuickParts for Resumes: QuickParts is perfect for storing sections of your resume that remain relatively static across applications, such as your contact information or a professional summary. You can even save bullet-pointed skills lists for various job types. For example, if you’re applying for both marketing and sales roles, you could have two separate QuickParts saved—one for marketing skills and another for sales skills. Then, you can just click to insert the relevant skills list into your resume.
Cover Letter Structures: You can also save the general structure of your cover letter as a QuickPart, including an introduction, body, and conclusion. When you start a new cover letter, simply insert these QuickParts and fill in the specifics for the job role you’re applying for.
By adjusting these settings, you can tailor Word to better suit your workflow and make the resume creation process smoother and more efficient.
Auto-Updating Date and Time in a Resume or Cover Letter
When creating a resume or a cover letter, you may want to include the current date. MS Word can insert a date that updates automatically. Go to Insert > Date & Time, select your preferred format, check the “Update Automatically” box, and click OK.
Microsoft Word Tips & Tricks for Text Formatting
Speedy Text Selection Tips
Among the too-often overlooked Microsoft Word tips are shortcuts for selecting text. As you are creating your resume, you will frequently have a need to select text in order to edit or format it. MS Word offers several quick methods for selecting text, making it a breeze to highlight the parts of your resume that you want to change:
Single Word: If you want to select a single word, simply double-click on it. This is perfect for when you need to change specific terms in your resume.
Whole Sentence: To select a whole sentence, hold down the CTRL key and then click anywhere within the sentence. It’s great when you need to rewrite or delete an entire sentence.
Entire Paragraph: To select a whole paragraph, just triple-click on any word within the paragraph. Handy when you want to move, remove, or completely rework a whole paragraph.
Whole Document: If you need to select all the text in your resume—for instance, to change the font or text size—just press CTRL+A. This can be a big time-saver when you need to format text across your whole resume.
Deleting Text in a Snap
Deleting text in Word documents is as straightforward as selecting it and hitting the delete or backspace key, but there are even faster ways:
Delete a Word: To delete a whole word, move your cursor to the beginning of the word and press CTRL+Delete. This is useful when you’re tweaking your word choices to make your resume more impactful.
Delete Word Behind the Cursor: To delete the word located behind the cursor, press CTRL+Backspace. This is especially handy for removing unnecessary words or information as you review and refine your resume content.
Capitalization Styles
Word provides several capitalization styles, such as ‘small caps,’ which turns lowercase letters into smaller capital letters, and ‘all caps,’ which transforms all text into uppercase. These styles can give your resume’s section headers a polished look. You can find these options in the ‘Font’ dialogue box under the ‘Font’ tab.
Changing the Text Case Effortlessly
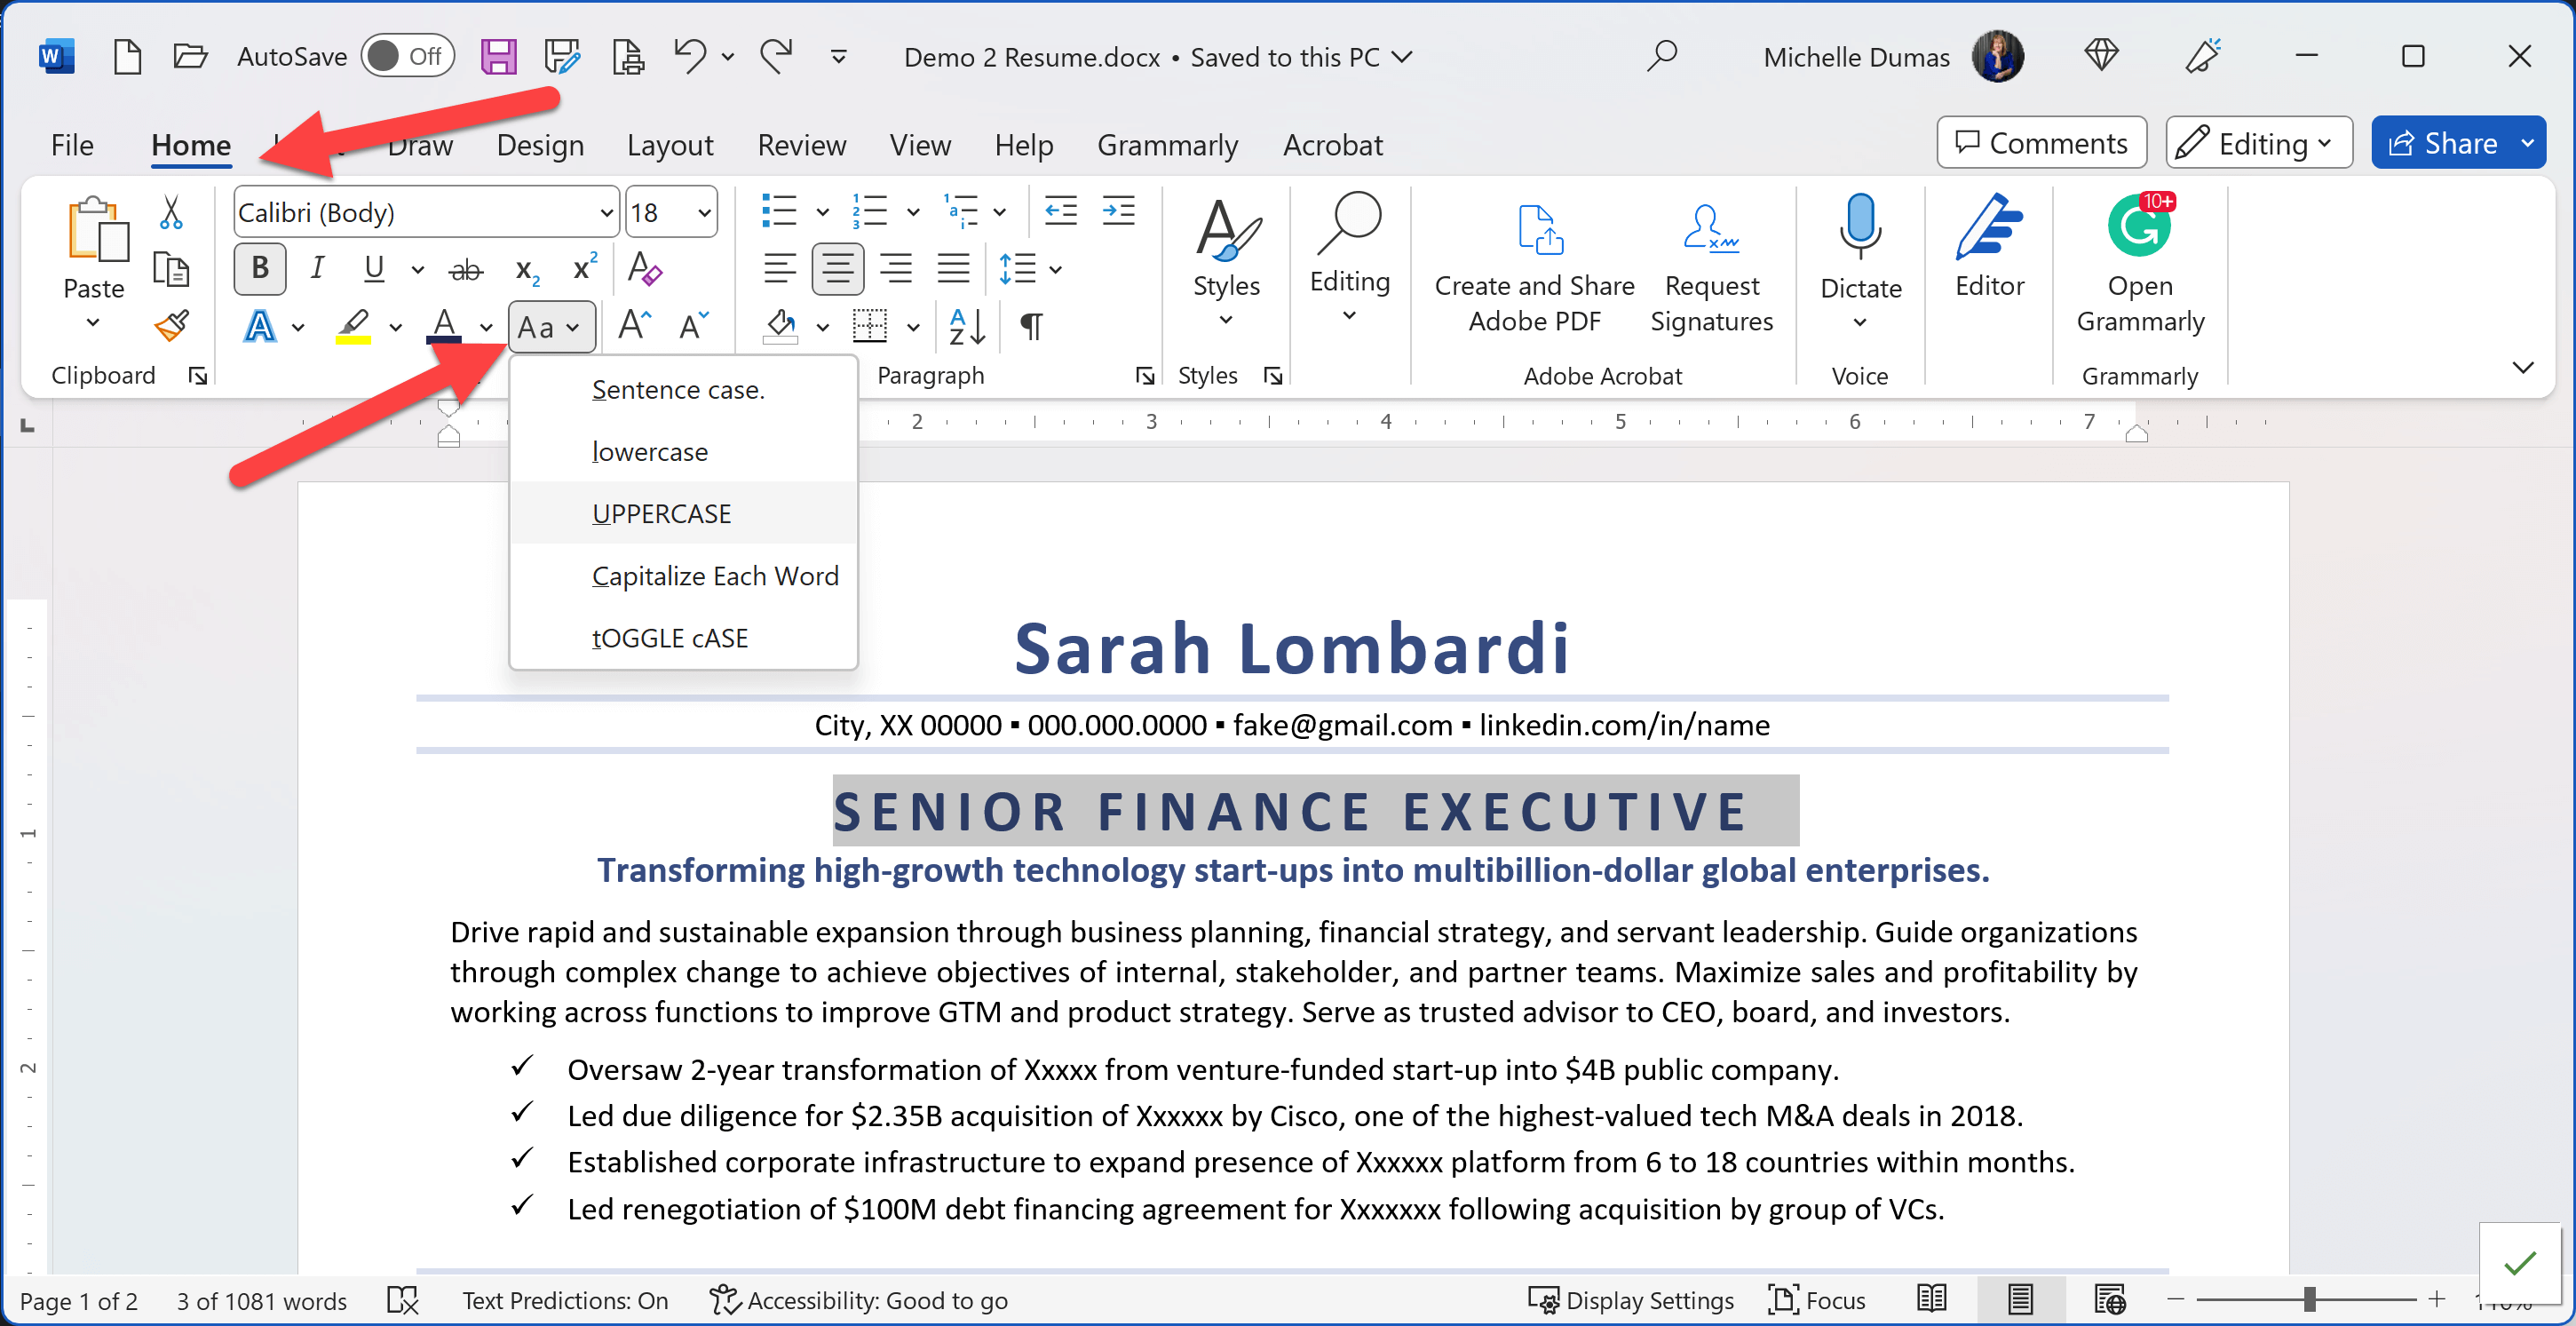
One of the most practical yet overlooked Microsoft Word tips is the ability to change the case of text without retyping it. For example, you may be working with a Microsoft Word resume template, and the section headings are in all caps, but you prefer them in sentence case. Here’s how you can easily change them:
Changing Case: Start by highlighting the text you want to change or click in a word within your resume. Then, just press Shift+F3 to cycle through lowercase, uppercase, and title case. This can be incredibly useful when you’re creating your resume and realize you need to switch between case styles for headings, titles, or company names.
Mastering the Format Painter
The Format Painter is a handy tool that allows you to duplicate the formatting from one piece of resume text and apply it to another. This can be a lifesaver for ensuring consistent design throughout your resume:
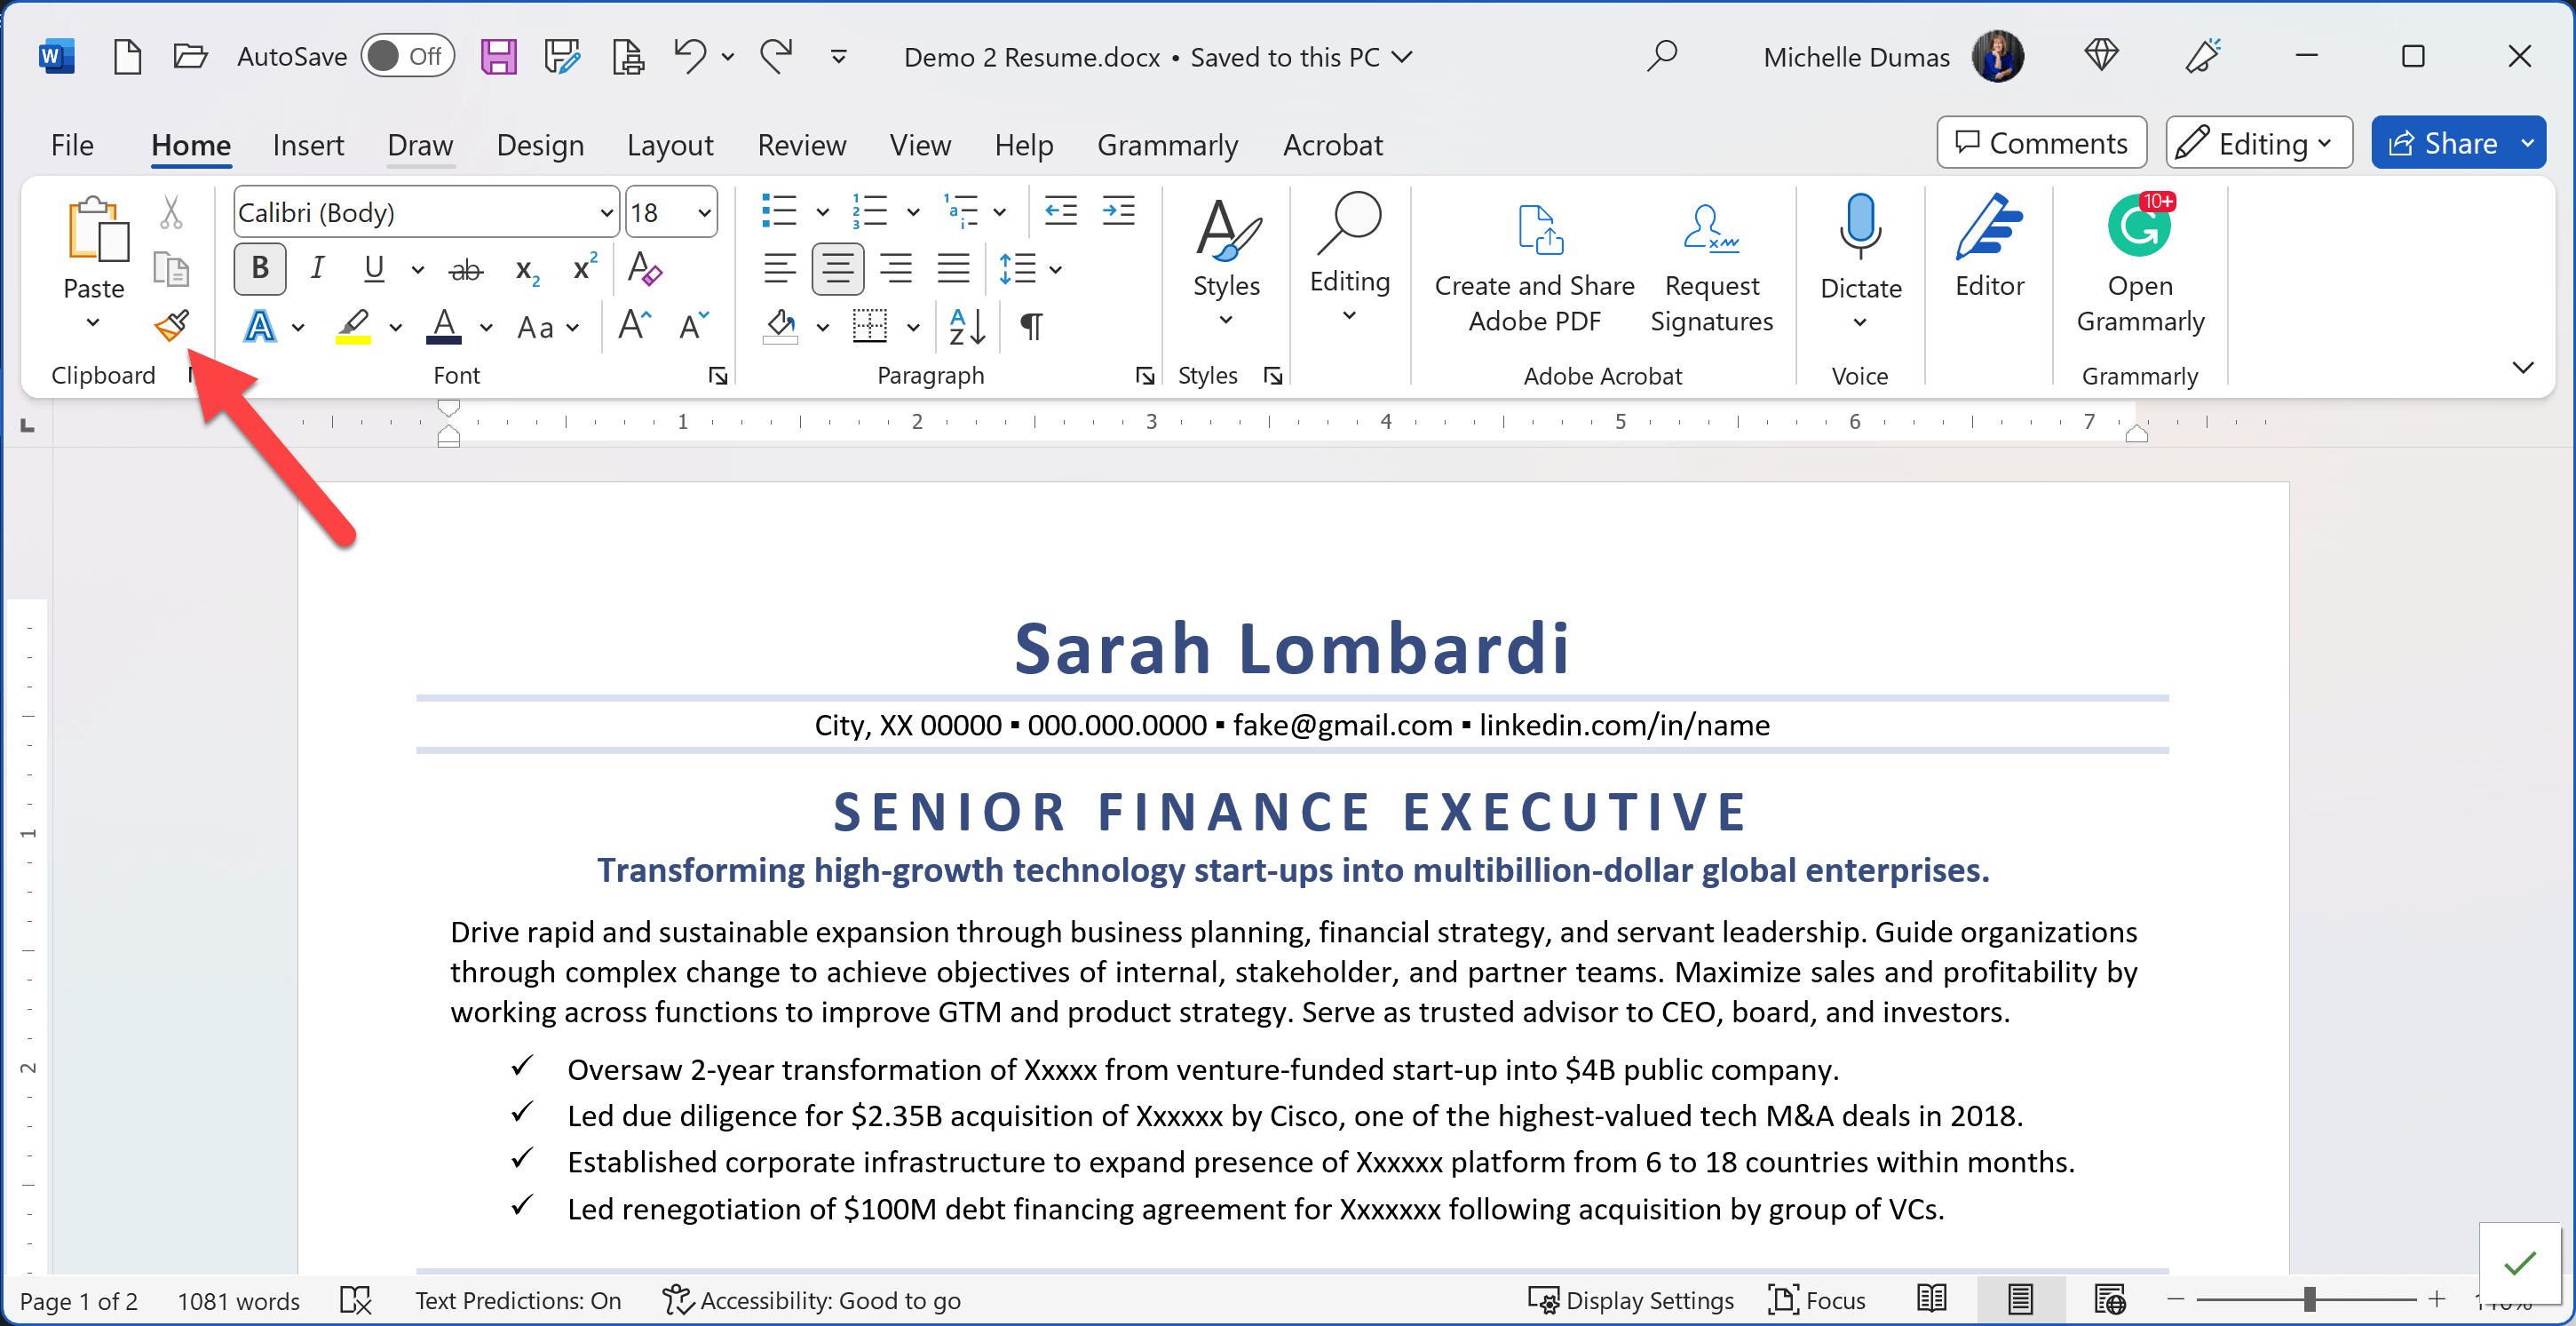
Using Format Painter: First, select the resume text with the formatting that you want to copy. Then, click on the Format Painter icon on the toolbar (it looks like a paintbrush). Finally, highlight the text where you want to apply the copied formatting. Voila, your resume design and formatting is consistent and professional.
Keeping Format Painter Active: Sometimes, you might want to apply the same formatting to several different parts of your resume. You can keep the Format Painter tool turned on by double-clicking the Format Painter icon. This way, you can click around your resume and apply the formatting to multiple text areas.
Turning Off Format Painter: When you’re finished using the Format Painter, you can turn it off and return to your regular cursor by clicking the Format Painter icon again or by pressing the ESC key on your keyboard. With the Format Painter off, you can go back to editing your resume as normal.
Advanced Microsoft Word Tips for Formatting Resumes
While most Microsoft Word users are familiar with basic text formatting features such as changing font styles and sizes, applying bold or italic styles, underlining, and adjusting text alignment, Word offers an array of more advanced formatting options that can help give your resume an edge. It’s important to use these features judiciously and always with the aim of enhancing the clarity and professionalism of your resume.
Character Spacing
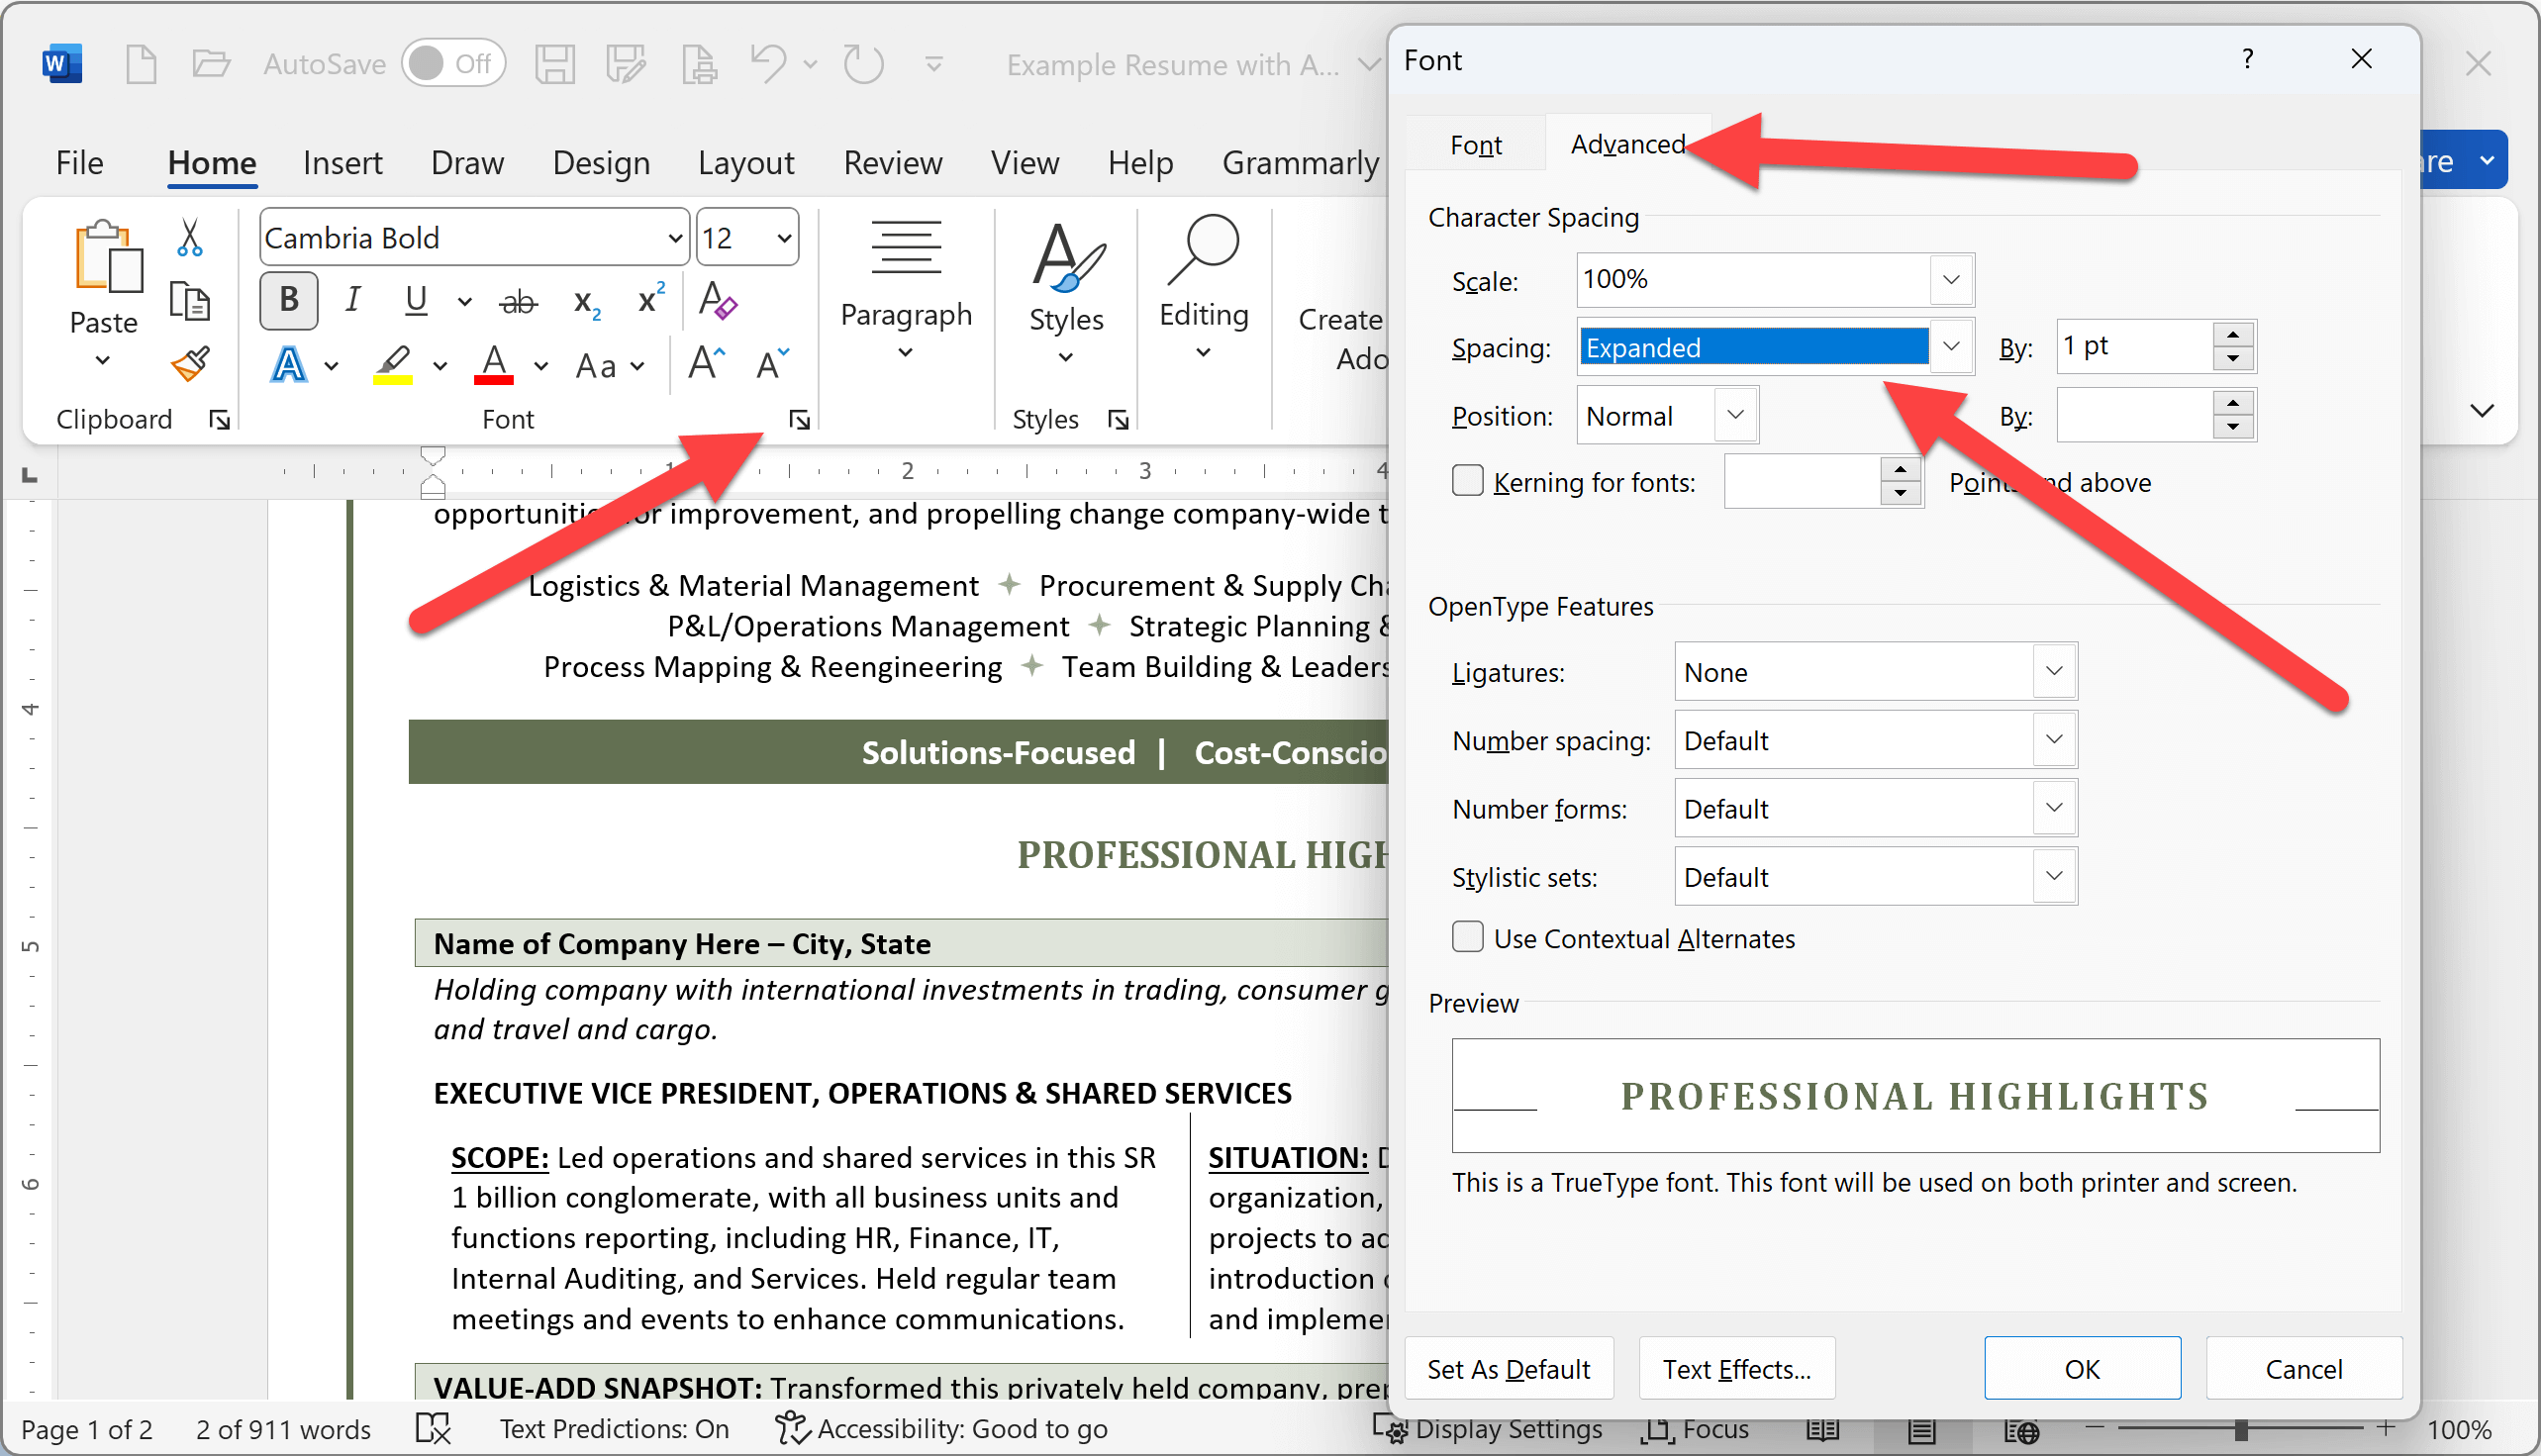
Character spacing, which adjusts the space between letters, is a feature that can be used to subtly alter the look of your resume, particularly in section headers. To access this feature, highlight your text, right-click and choose ‘Font.’ In the font dialogue box, go to the ‘Advanced’ tab, where you’ll find options for character spacing. You can choose to condense or expand the space between characters for a more compact or spacious appearance.
Text Effects
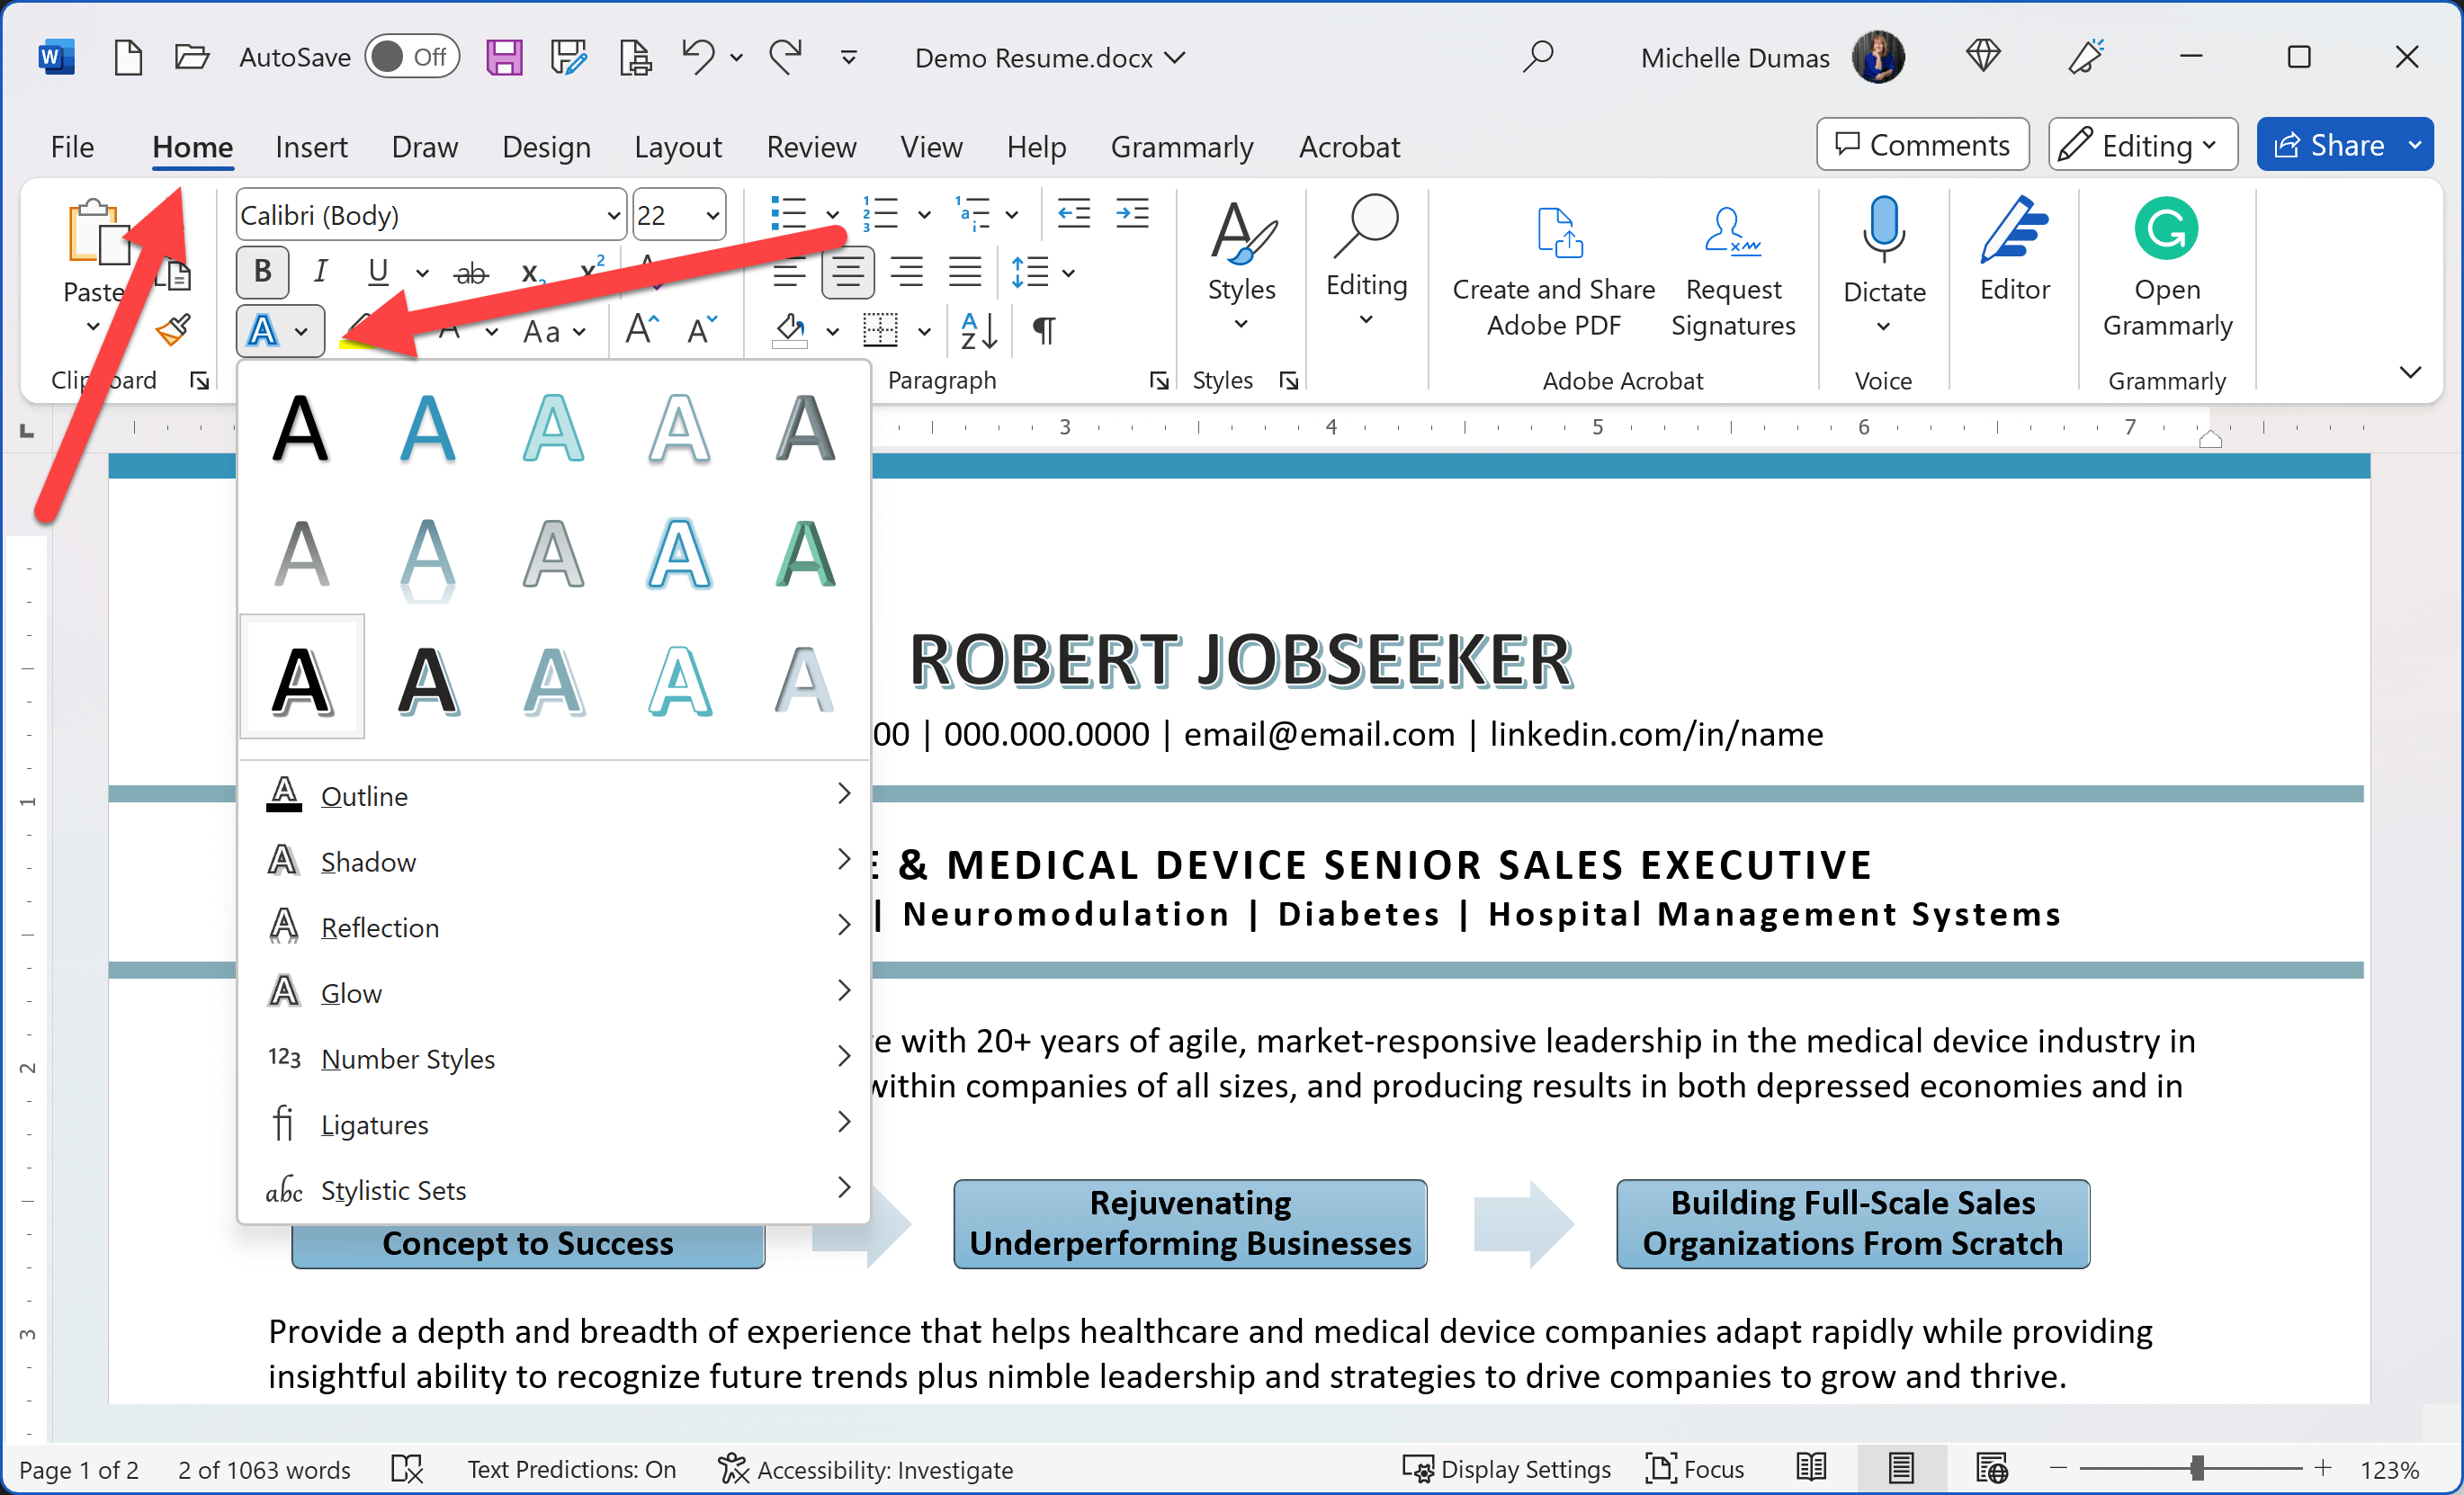
Word also offers a variety of text effects that can be applied to your resume headers or titles, such as shadow, outline, glow, and reflection. To apply text effects, highlight the text, and in the ‘Font’ section of the ‘Home’ tab, click on ‘Text Effects and Typography.’ From there, you can select the effect that suits your style best.
Text effects, if you use them at all, should not ever be used for large sections of body text within your resume. Instead, use them very sparingly, such as for section headings in your resume.
Again, remember that while these advanced options can make your resume more visually appealing, it’s important to use them sparingly when creating a resume. Overuse of text effects or character spacing can make your resume harder to read or appear unprofessional. Always prioritize resume readability over design and consider the resume expectations of your industry when deciding how much creativity to inject into your resume formatting.
Fine-Tuning Readability with Paragraph Spacing
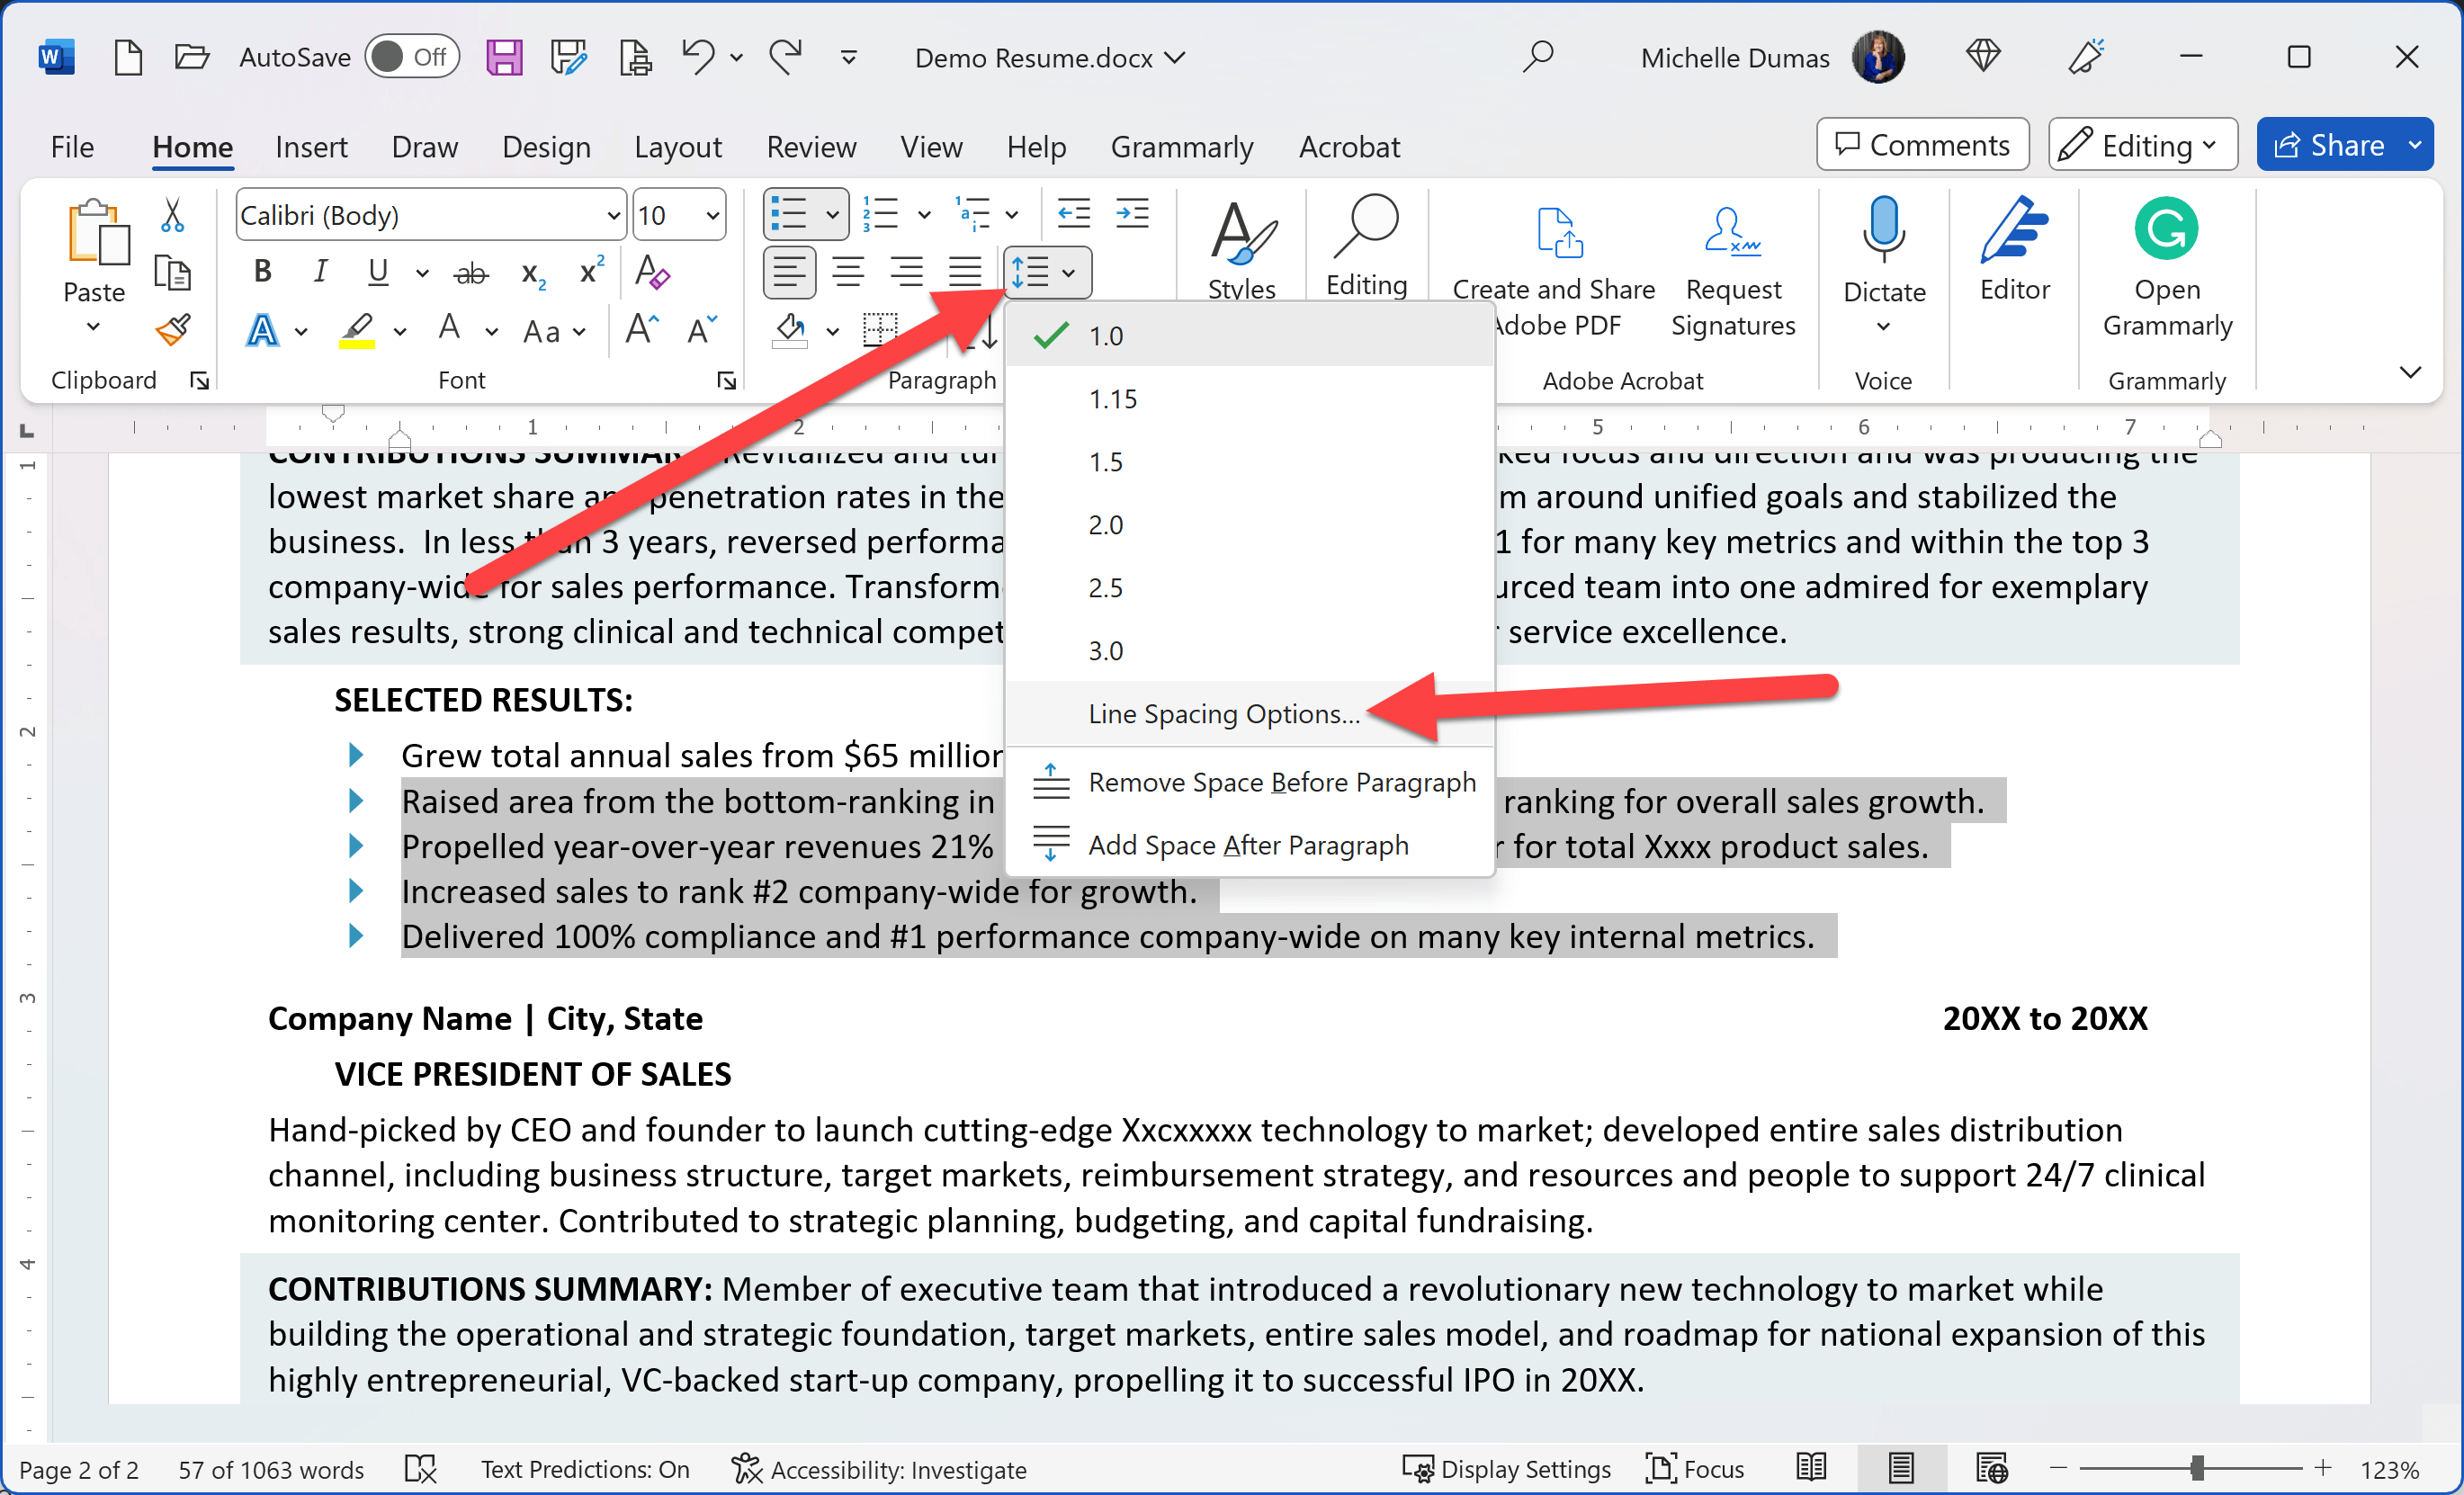
The judicious use of white space, the blank area around your text and images in the resume layout, is an effective way to increase your resume’s readability. While the most common way to create white space in Word documents is to hit the ‘Enter’ key for a line break or a new paragraph, Microsoft Word offers a more precise method – paragraph spacing. Here’s how:
- 1
Highlight the line of text after which you want to add extra space.
- 2
Right-click and choose ‘Paragraph’.
- 3
A dialog box will appear. Look for the ‘Spacing’ section.
- 4
Increase the ‘After’ value to add precise spacing after the highlighted text line.
For example, you might want a distinct separation between your job titles and their corresponding descriptions. Or, for lists of accomplishments or skills, you might want more space between each bullet point to make each item stand out more. By tweaking the ‘After’ value, you can set exactly how much space you want to appear between these sections.
Properly utilized paragraph spacing can improve your resume’s overall aesthetic and readability. Instead of large, uneven gaps from multiple line breaks or dense blocks of text that are hard to read, paragraph spacing gives you the power to create a well-organized, attractive Word resume. With each section and list neatly separated, hiring managers can easily navigate through your qualifications, increasing the chances they’ll appreciate the skills and experiences you bring to the table.
Microsoft Word Tips for Using Borders and Shading Options When Creating a Resume
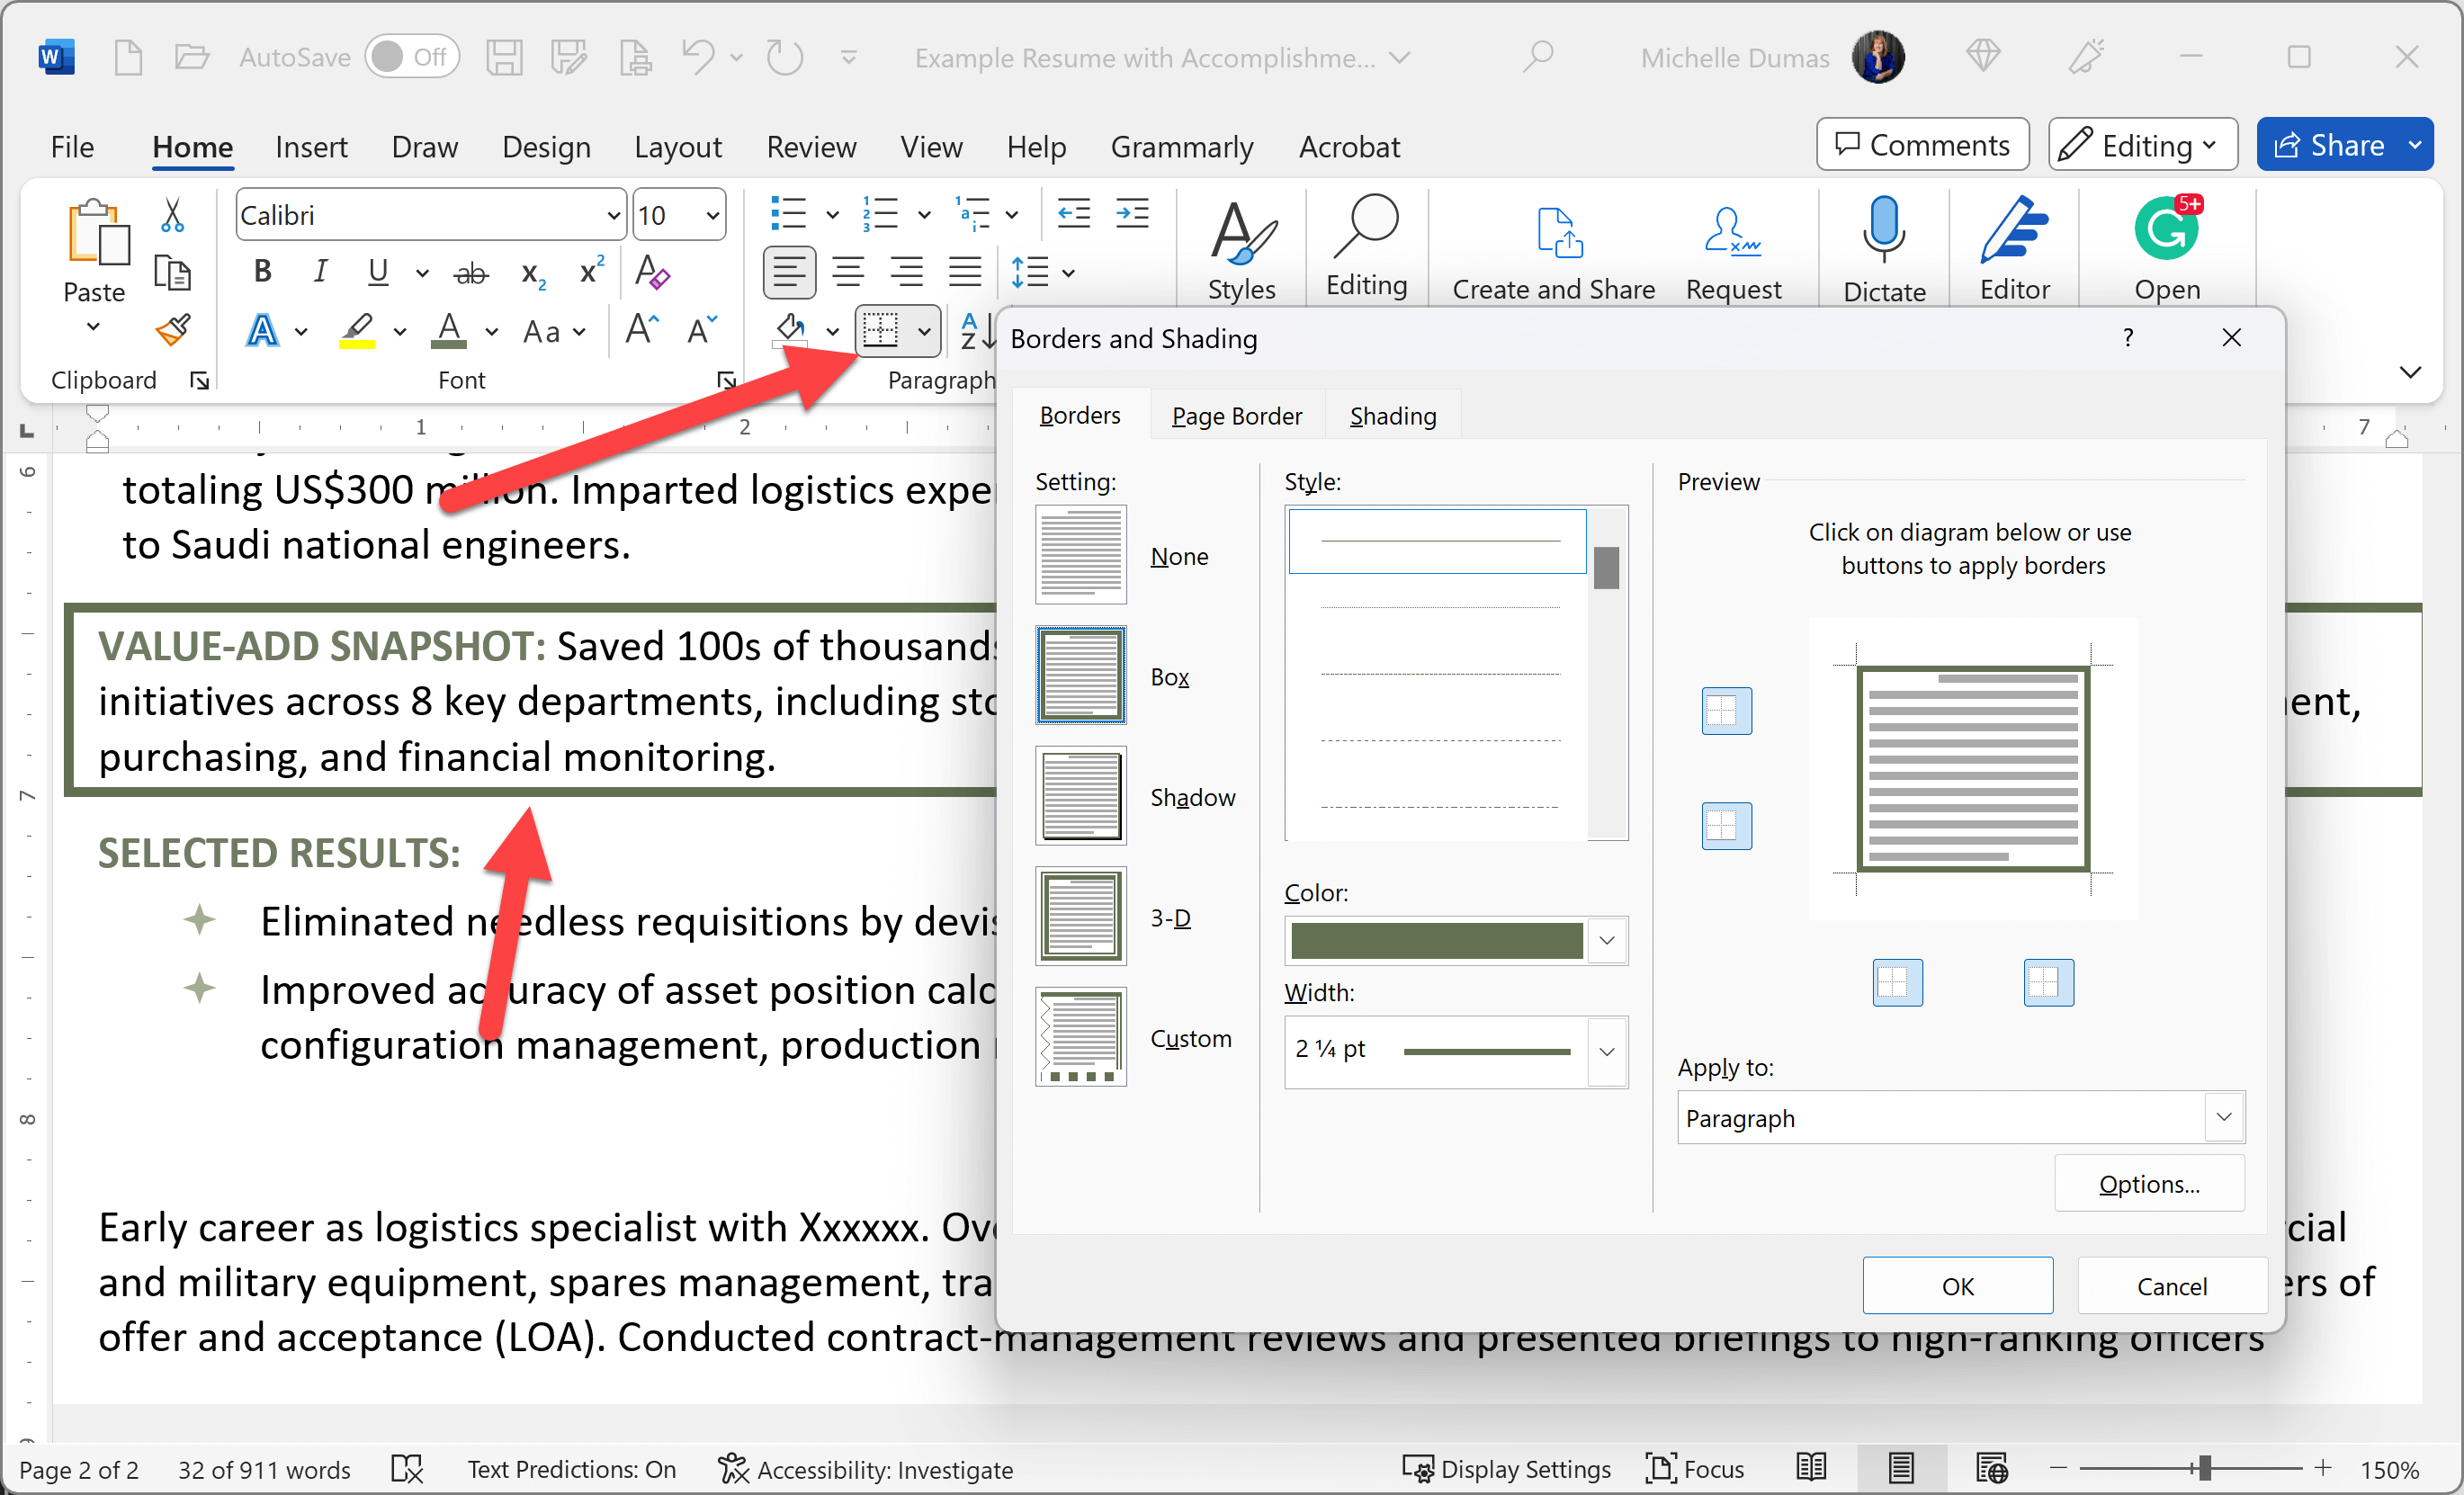
When creating a resume, you may want to highlight specific paragraphs or words to draw the reader’s attention to your key accomplishments or skills. Microsoft Word’s Borders and Shading options offer a simple way to achieve this effect.
How To Use Borders
When creating your resume, borders can frame paragraphs or single words, setting them apart visually. To add a border:
- 1
Select the paragraph or text you wish to highlight.
- 2
Go to the Home tab and click on the arrow next to the Borders icon in the Paragraph group.
- 3
Choose the type of border you want to apply from the dropdown menu.
- 4
You can select borders for the top, bottom, left, or right of your text, or create a box around it.
- 5
The options also allow you to select line styles, colors, and widths.
How To Use Shading
Shading fills the background of your selected text with a color, which can help emphasize key resume sections. Here’s how to add shading:
- 1
Select the paragraph or text you wish to highlight.
- 2
Go to the Home tab, then click on the arrow next to the Shading icon in the Paragraph group.
- 3
Pick the color you wish to use from the palette.
- 4
You can choose from theme colors or standard colors or even create a custom resume color. Remember to choose a shade that contrasts well with your text for readability.
Using borders and shading allows you to make specific portions of your resume stand out.
This is a good place to mention Applicant Tracking Systems (ATS). ATS are software tools used by many employers to streamline the hiring process. They automatically sort and analyze resumes, filtering out those that don’t meet specific criteria for job roles and allowing employers to search for applicants by resume keywords.
Understanding ATS is critical for job seekers because these systems can significantly influence whether your resume gets seen by a human reviewer. Thus, ensuring your resume is ATS-friendly can improve your chances of making it to the next stage of the selection process.
If you are concerned with whether your resume is ATS-compatible, you may worry about using features such as borders and shading in your resume. You’ll be happy to know that borders and shading are compatible with almost all modern ATS and should have no impact on the ability of the ATS to parse your resume.
However, moderation is still key. Overuse of these tools can make your resume look cluttered and divert attention from your content. Use these tools strategically to highlight only the most essential parts of your resume.
Microsoft Word Tips for Resume Layout & Organization
How to Insert Page Breaks and Section Breaks
Page breaks and section breaks are great tools for controlling the flow and formatting of your resume.
Page Breaks
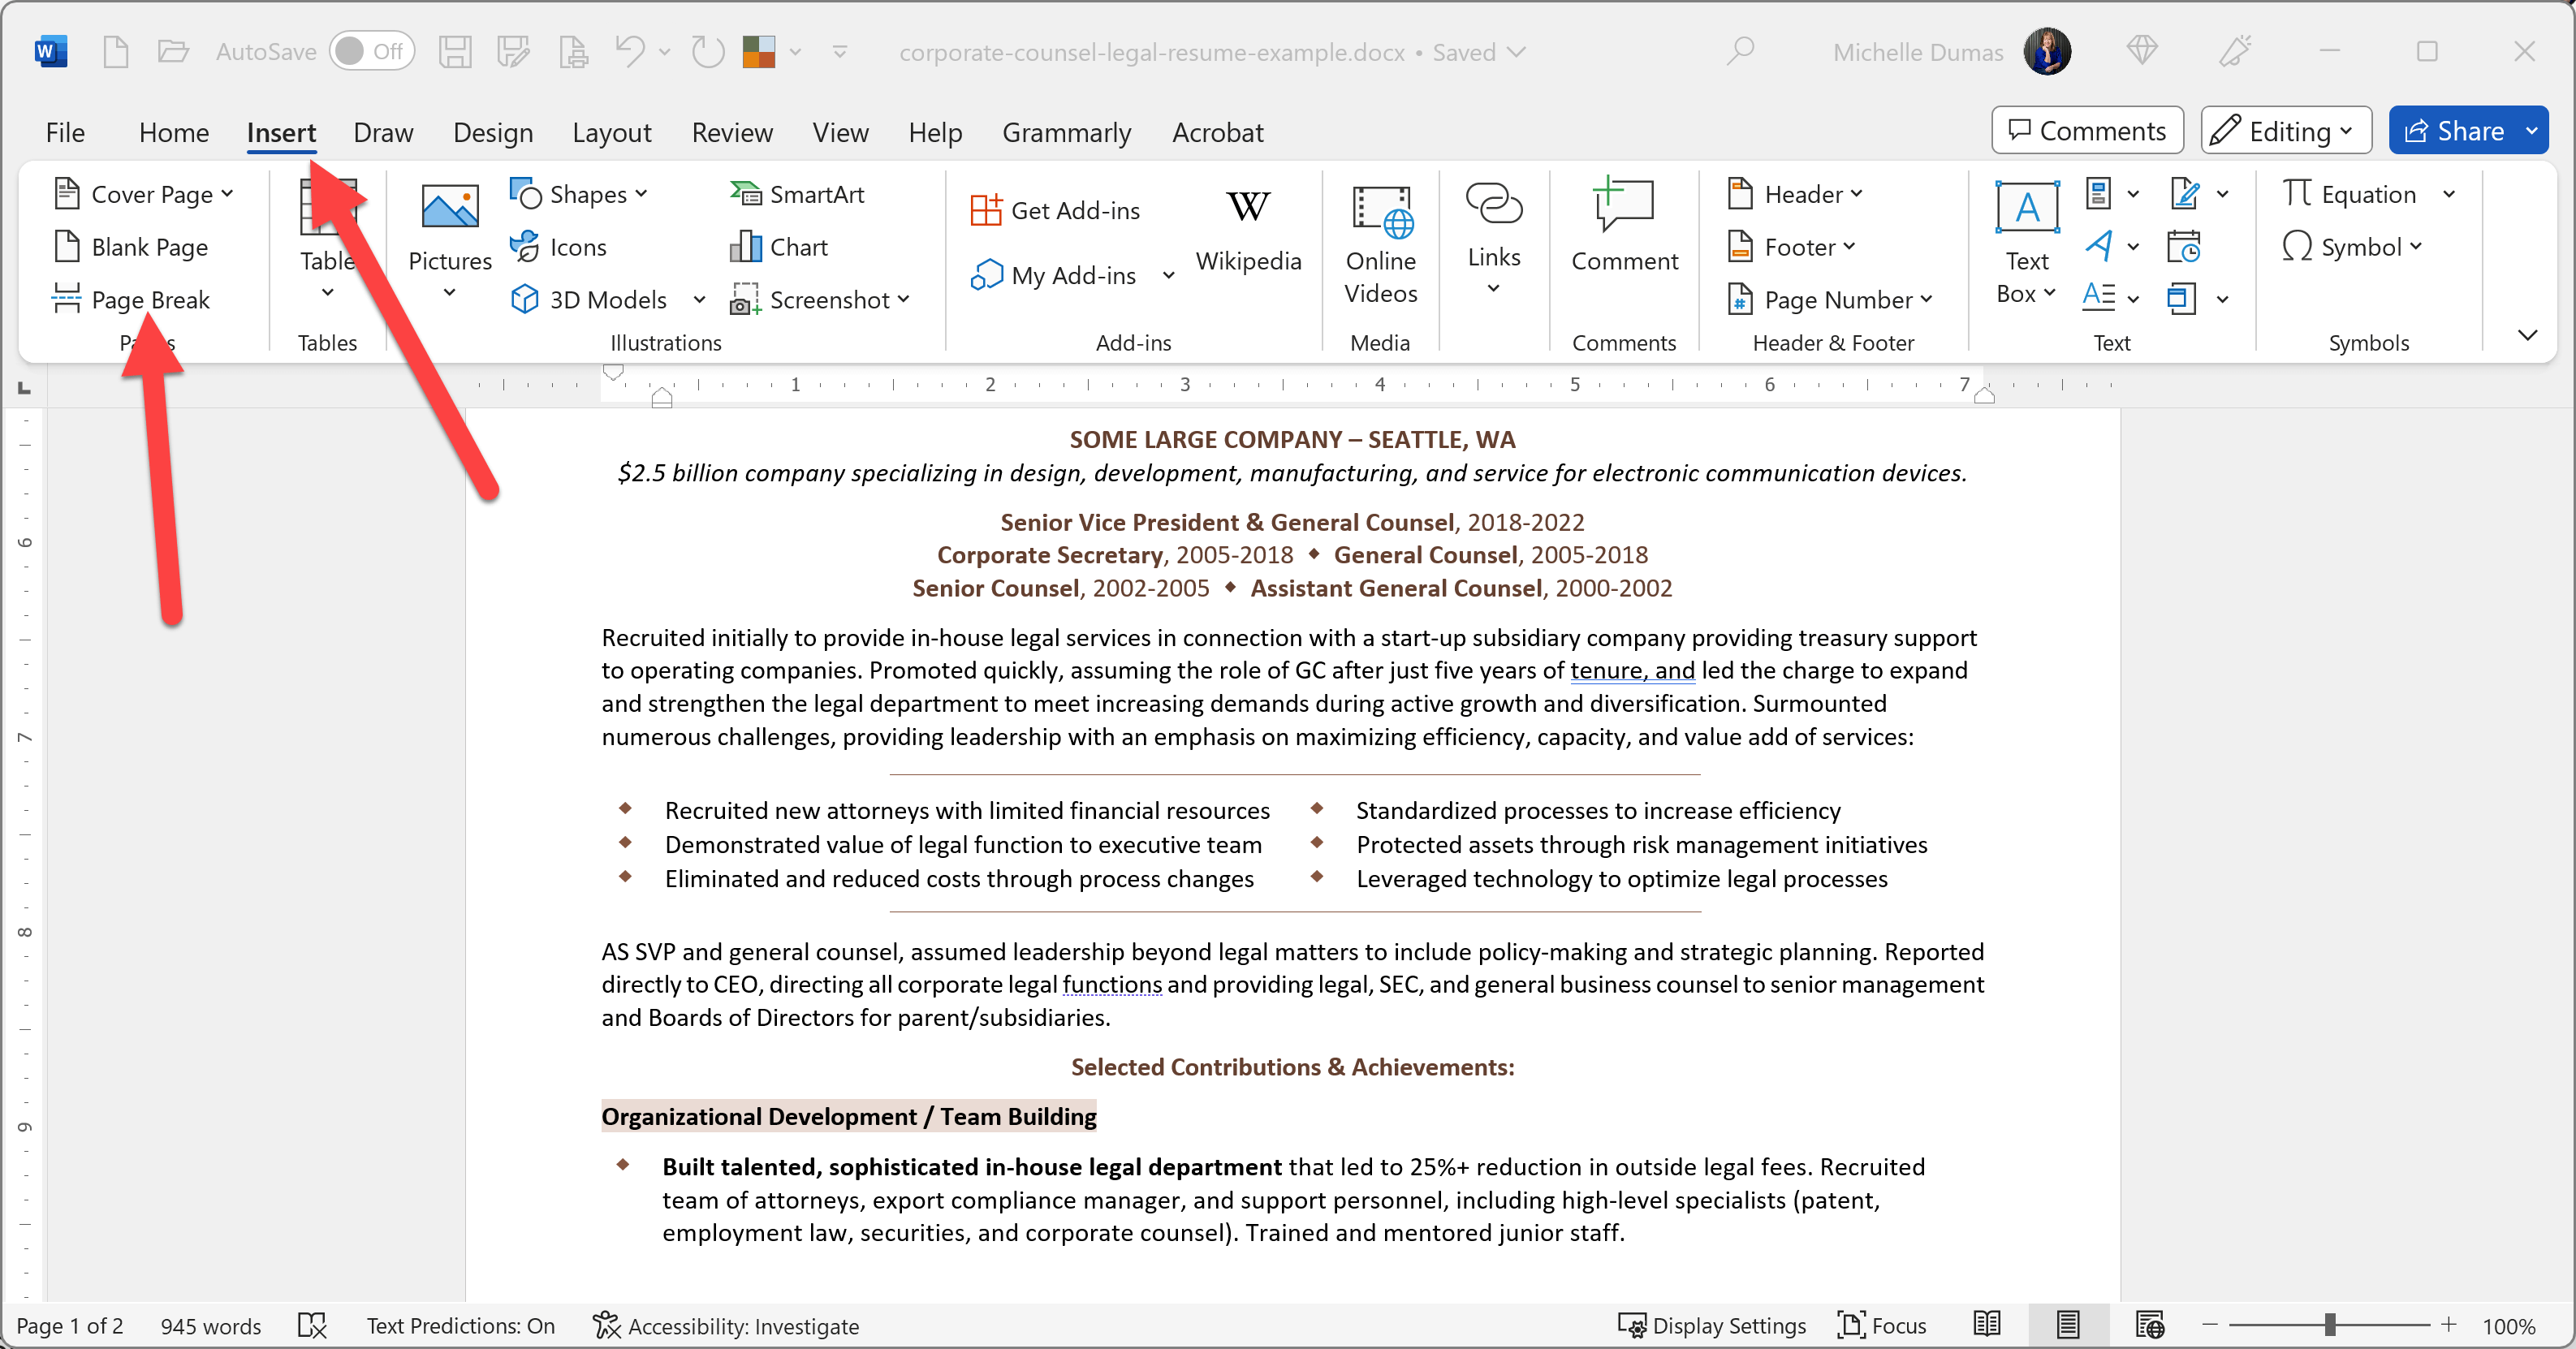
Page breaks allow you to start a new page instantly, which can be particularly useful if you want to begin each section of your resume on a fresh page. You might also insert a page break if you have included both a cover letter and your resume in a single document and want to be certain your resume starts on its own page. To insert a page break, place your cursor where you want the new page to start, go to the Insert tab, and click on ‘Page Break.’ Instantly, all text following the cursor will be moved to the next page.
Section Breaks
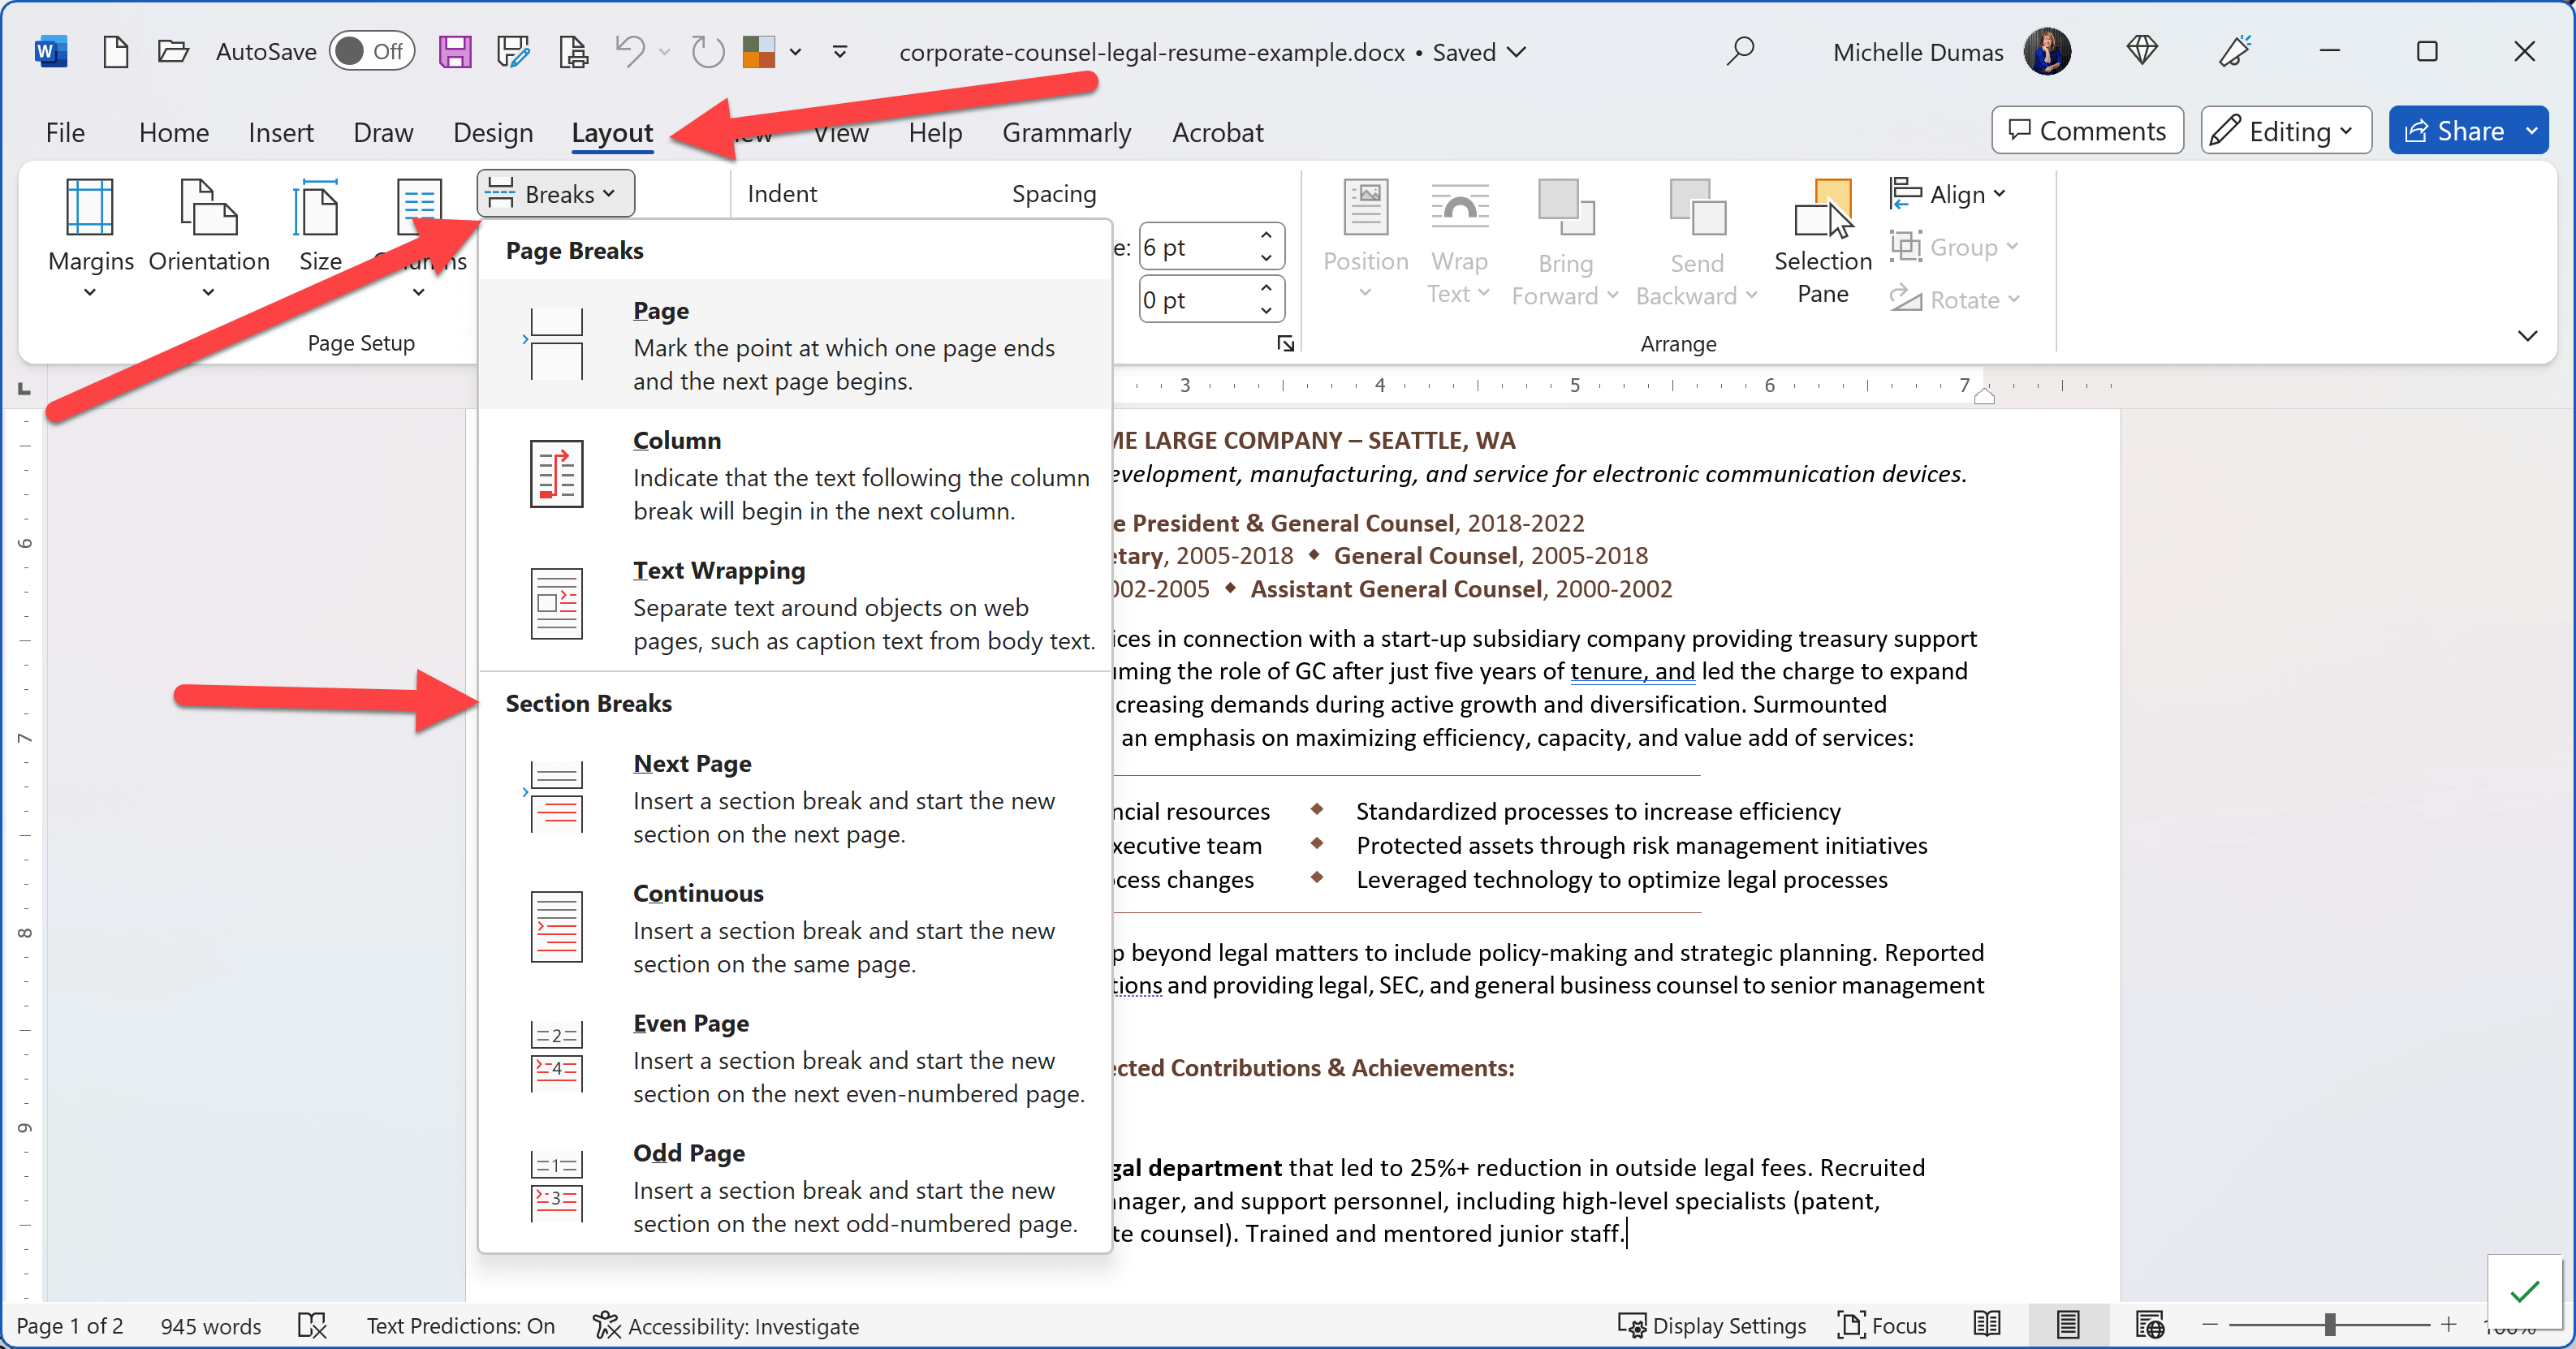
Section breaks are used when you want different sections of your document to have varying layouts or formatting. For example, if you want a section with a different margin size. Or if you want different headers or footers. To insert a section break, place your cursor at the desired location, click on the Layout tab, then the ‘Breaks’ drop-down menu, and choose the type of section break you need.
How to Insert Page Numbers
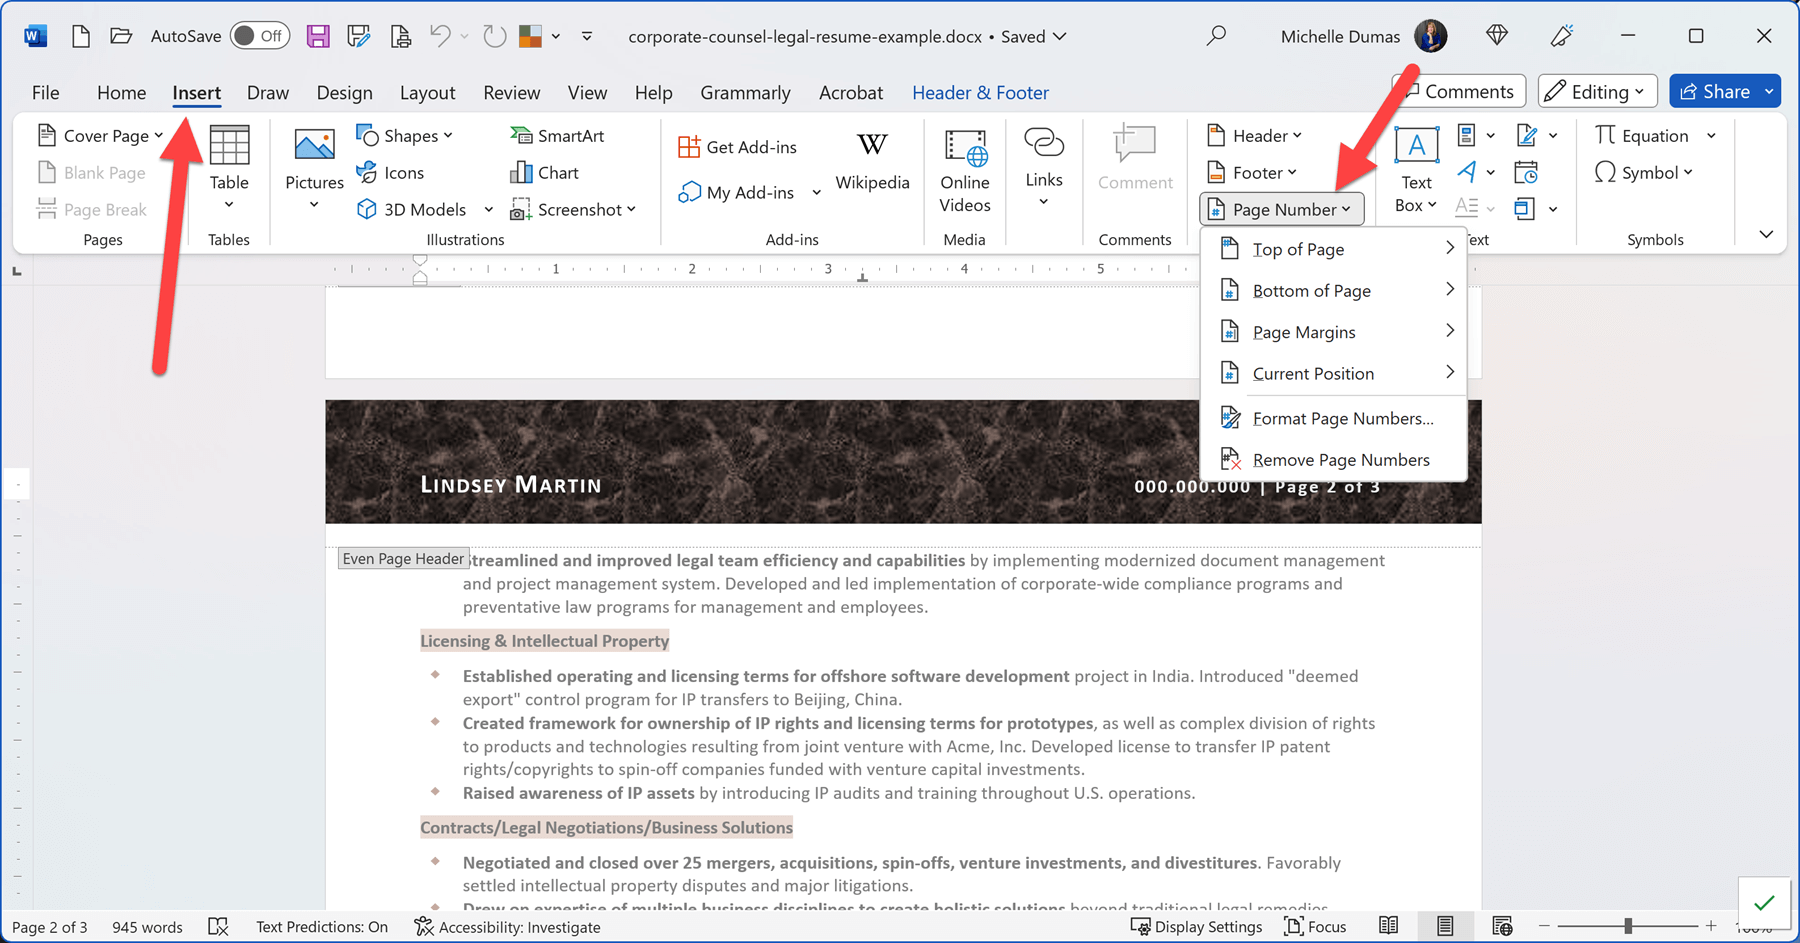
If your resume extends beyond one page, it’s professional and practical to use page numbers. This makes your resume easier to navigate and ensures pages stay in order if printed. To do this, go to the Insert tab, select ‘Page Number’ from the drop-down menu, choose the location of the page numbers (top of the page, bottom of the page, in the margin, or in the current position of the cursor), and finally choose the design you prefer.
Setting Up Headers and Footers
Headers and footers are sections at the top and bottom of your resume, respectively. They can be used to display consistent information on every page, like your name, contact information, and page number.
Headers
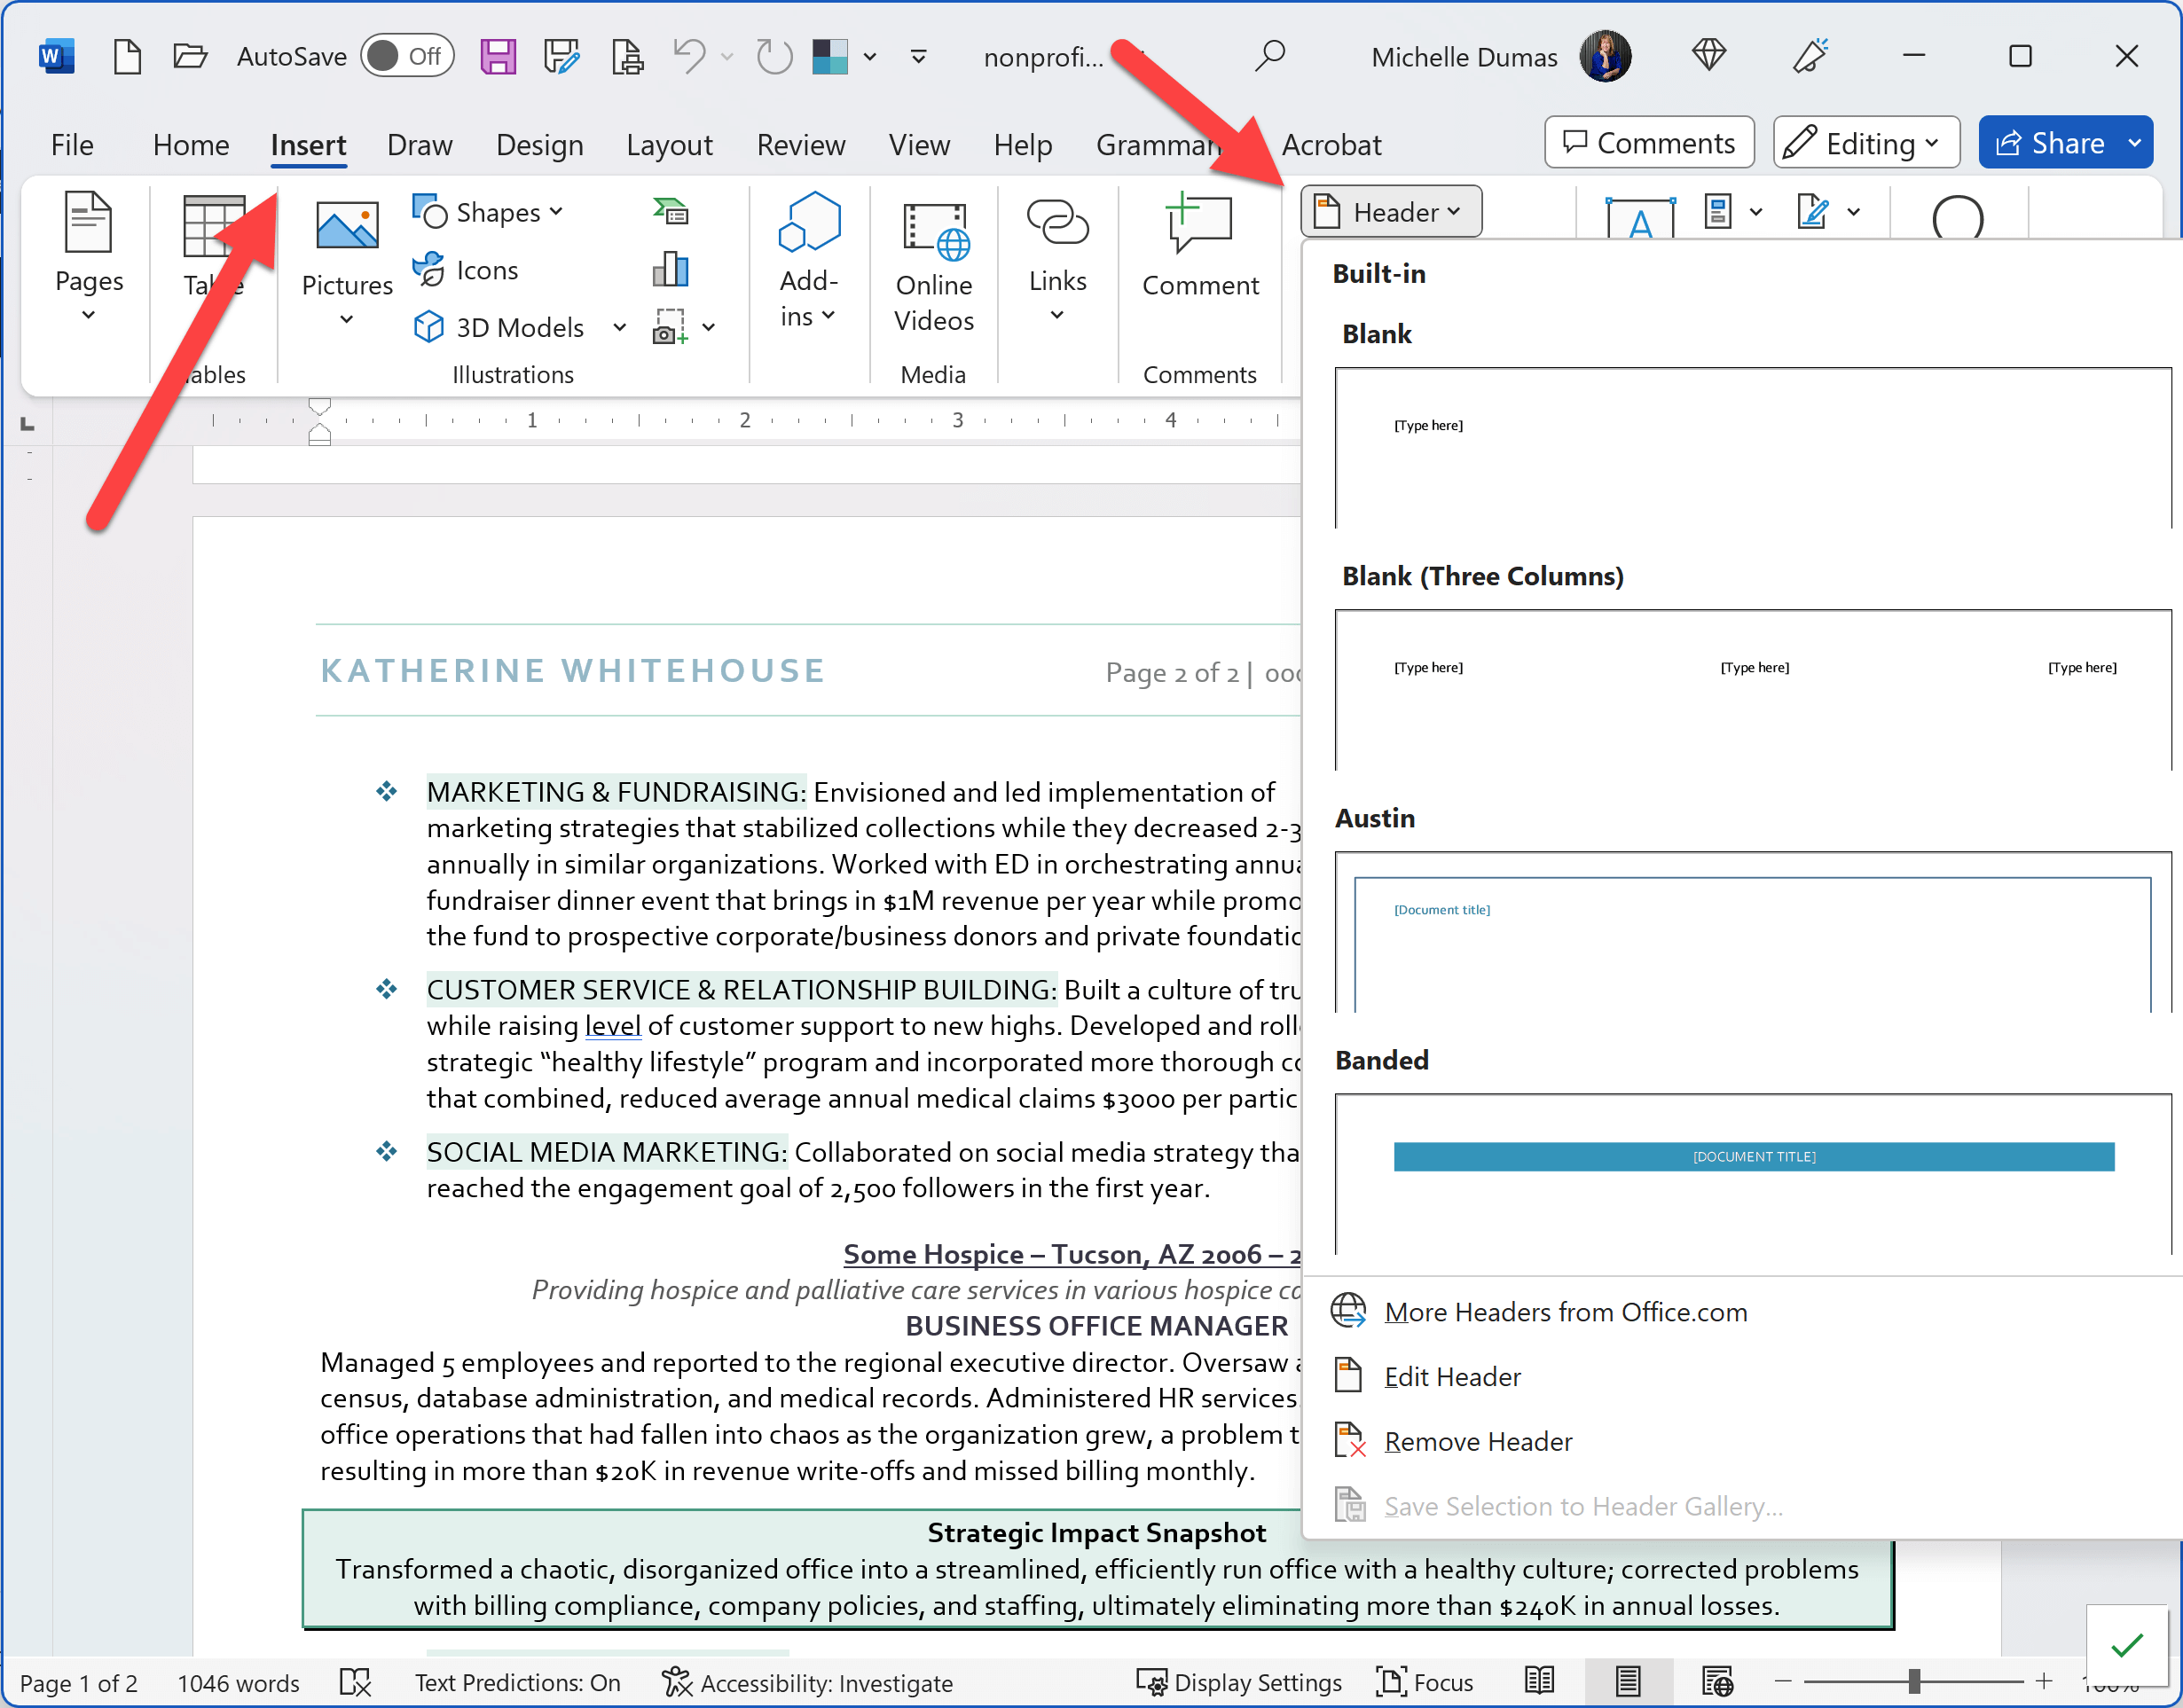
Go to Insert, click on ‘Header’ and select the style you want. You can then type in your desired text, such as your name and the position you’re applying for.
Footers
Footers are set up just like headers, but instead of going to Insert > Header, you would go to Insert > Footer. Here, you might include contact information or page numbers.
ATS Considerations
For ATS reasons, it is important that your name and contact information is entered in the body of the resume on the first page. But, on subsequent pages, you can include this information in the header of the resume.
The Headers and Footers options provide flexibility for how these sections appear across different pages of your resume. Key options include “Different First Page” and “Different Odd and Even Pages.”
For resumes, the “Different First Page” option is especially useful. By selecting this, you can maintain a clean, uncluttered first page while still including critical information like your name and page number on subsequent pages. Here’s how:
- 1
Click on the ‘Insert’ tab on the Ribbon and then select ‘Header’ or ‘Footer.’
- 2
In the ‘Header & Footer’ tab that appears, tick ‘Different First Page.’ The first page of your resume will now have no header or footer, but these will automatically appear on the following pages.
- 3
You can then enter your name and page number on the second page’s header, ensuring that if your resume extends beyond one page, your essential details will appear at the top of each subsequent page automatically.
This way, even if your resume spills onto extra pages, your name and page number will automatically be included, keeping your document professional and organized.
You can learn more about creating your resume headers in this blog post, which includes a video demonstrating how to add them and format them in your resume.
Using Bullets to Make Your Resume Easier to Read
Bullet points are an essential part of many resumes. They help break down information into digestible pieces, making your resume easier to read and understand. Furthermore, they highlight your skills, experiences, and achievements in a clear, concise manner.
Why Use Bullet Points in a Resume?
How to Insert and Customize Bullet Points in Word
To start a bullet point list, click the ‘Bullets’ button on the ‘Home’ tab in the Ribbon. You can also press the keyboard shortcut three keys, ‘Ctrl’ + ‘Shift’ + ‘L.’
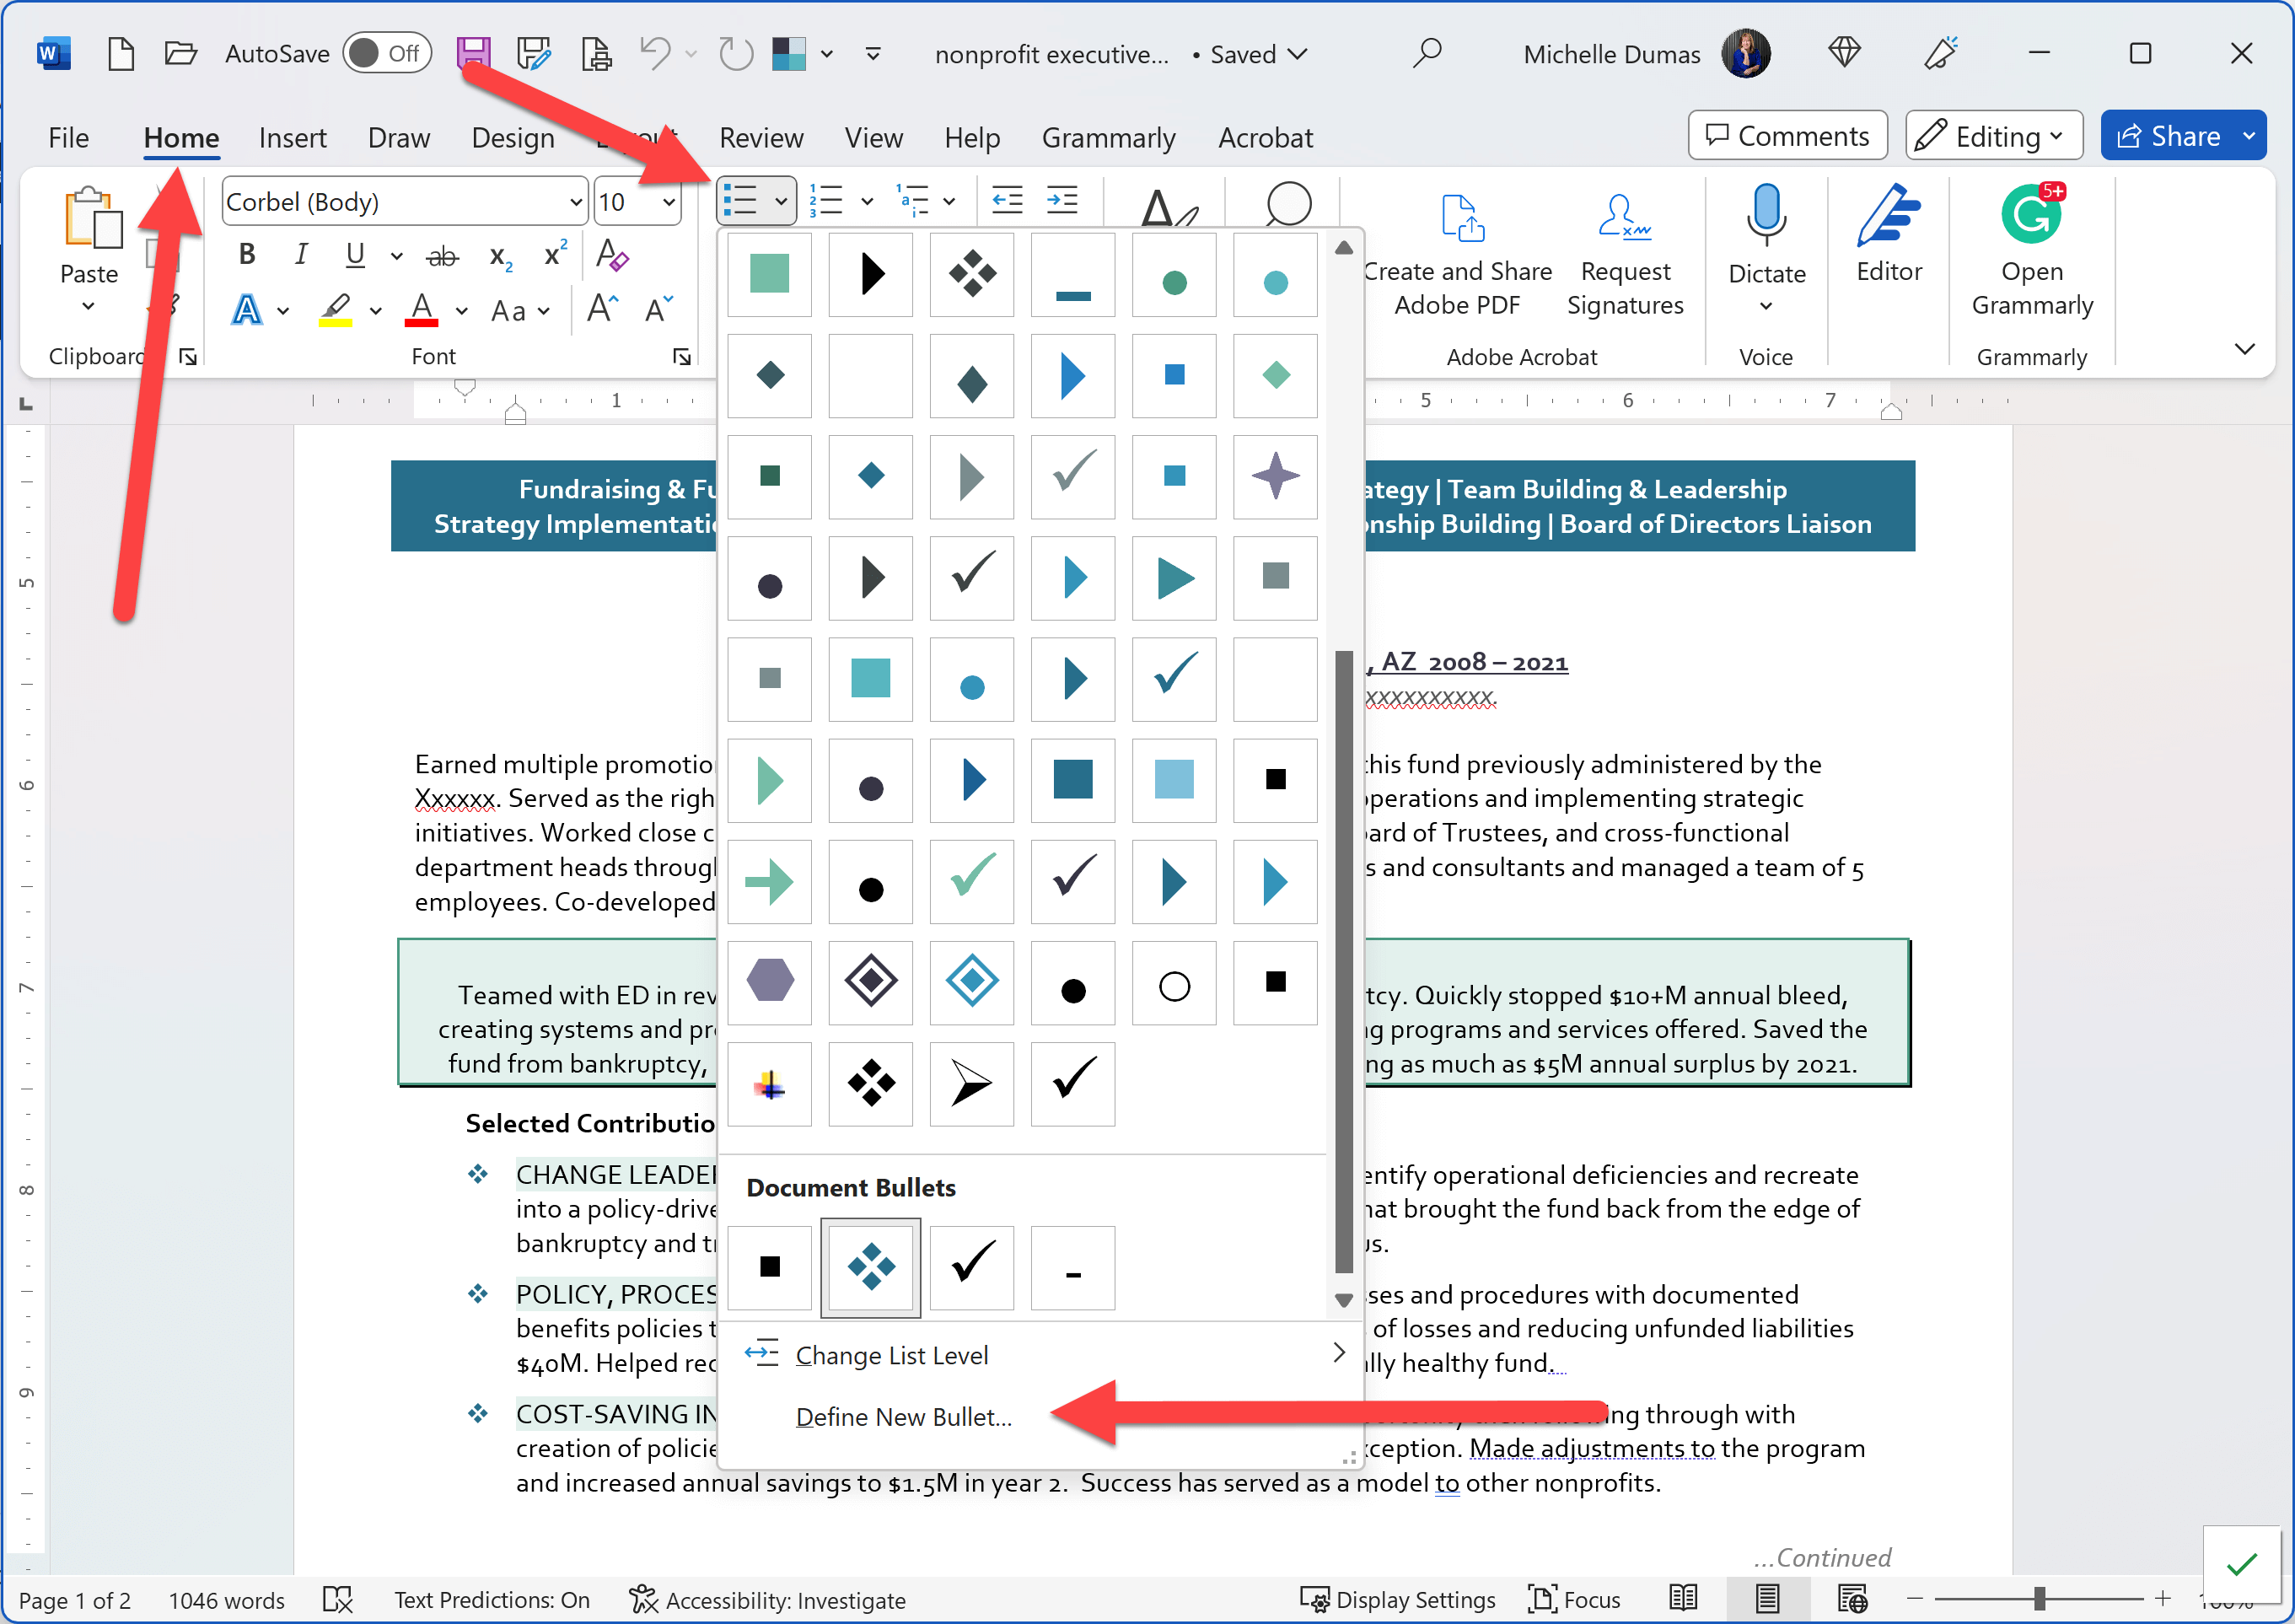
Remember to keep your bullet points concise and focused. Each one should highlight a specific achievement or task. Also, maintain consistency in your resume formatting. If you choose a specific bullet style or punctuation, use it throughout your resume.
Working in MS Word with Special Resume Content & Design Options
Working with Images in Your Resume and Using Text Wrapping Options
While traditionally, resumes have been text-centric, there’s an increasing trend toward including relevant images that can enhance your resume. For instance, you might want to add images associated with your work (e.g., for a real estate resume you might include a photo of a residential development, or a teacher might include a resume graphic that conveys the concept of education), infographics calling out your accomplishments, or even logos of your previous employers or certification bodies.
Let’s talk about how to add an image to your resume and work with text wrapping options:
Inserting an Image: Navigate to the ‘Insert’ tab in the Ribbon and select ‘Pictures.’ You’ll then choose the image you’d like to add to your resume from your computer or device. Once the image is inserted, it might disrupt your document’s formatting. This is where ‘Text Wrapping’ comes in handy. By right-clicking on the image and selecting ‘Wrap Text,’ you can choose how you want your text to flow around your image. There are several options like ‘Square,’ ‘Tight,’ and ‘Through,’ each providing a different aesthetic and functionality. Experiment with these until you find the one that suits your layout the best.
However, keep in mind the limitations of certain applicant tracking systems (ATS) when it comes to images. While it’s a common misconception that images will always cause problems with an ATS, the reality is more nuanced. In fact, most modern ATS systems will simply ignore the image and continue reading the text. This means your resume won’t be rejected just because it contains an image. But remember, the content skipped over won’t be considered by the ATS when it’s evaluating your resume.
So, while you can absolutely include images in your resume, ensure the most crucial information is also presented as text. This way, even if an ATS skips over the image, it will still pick up on the essential details, making your resume as effective as possible.
Ultimately, images can add a personal touch or visual flair to your resume, but they should be used judiciously, so that they complement, not overshadow, the textual content.
Microsoft Word Tips for Incorporating Shapes in Your Resume
Utilizing shapes in your resume is an innovative way to increase visual appeal and guide the reader’s eye to key information. From creating ruling lines with a simple line shape to encapsulating text within a rectangle, circle, or custom shape, these elements can be used to break up text-heavy documents and highlight your unique value proposition.
For job seekers concerned about ATS compatibility, rest assured: most modern ATS can handle both shapes and images. While the ATS won’t ‘read’ the shape itself, it will proceed to the next text section, leaving your document’s readability intact.
Microsoft Word’s suite of shapes can be accessed via the ‘Insert’ tab on the ribbon. To insert a shape:
- 1
Click on the ‘Shapes’ icon.
- 2
Select a shape from the drop-down menu.
- 3
Click and drag on your document to draw the shape.
Once you’ve inserted your shape, you can customize its look to match your resume’s overall style. Right-click the shape and choose ‘Format Shape’ to adjust color, line thickness, fill, and more.
To position a shape behind text:
- 1
Right-click on the shape.
- 2
Select ‘Wrap Text’ and then choose ‘Behind Text’.
This enables you to move your shape freely behind your text, creating a visually compelling background.
Adding shapes to your resume provides an opportunity to create a visually engaging document that stands out from the crowd. However, use them sparingly and strategically, ensuring your content remains the star of the show.
Incorporating Watermarks in Your Resume
A watermark is a faint design or text in the background of a page. Though they’re commonly used for branding purposes or to mark a document as confidential, there are creative ways to utilize watermarks on a resume as well.
A watermark could be a way to subtly incorporate a personal logo or branding element, demonstrating your attention to detail and design skills. Alternatively, a light watermark of a field-related image could serve as a visual reference to your industry, adding a unique and personal touch.
However, there are a few things to remember. First, ensure that your watermark doesn’t distract from the readability of your text. It should be subtle and light enough to provide a nice aesthetic without detracting from the content.
Secondly, as with images, remember that an Applicant Tracking System (ATS) won’t “read” a watermark, so make sure it’s not essential information.
If you look carefully at the image below, a screenshot of this accounting resume template, you will see the creative use of a graph paper-looking background used as a watermark
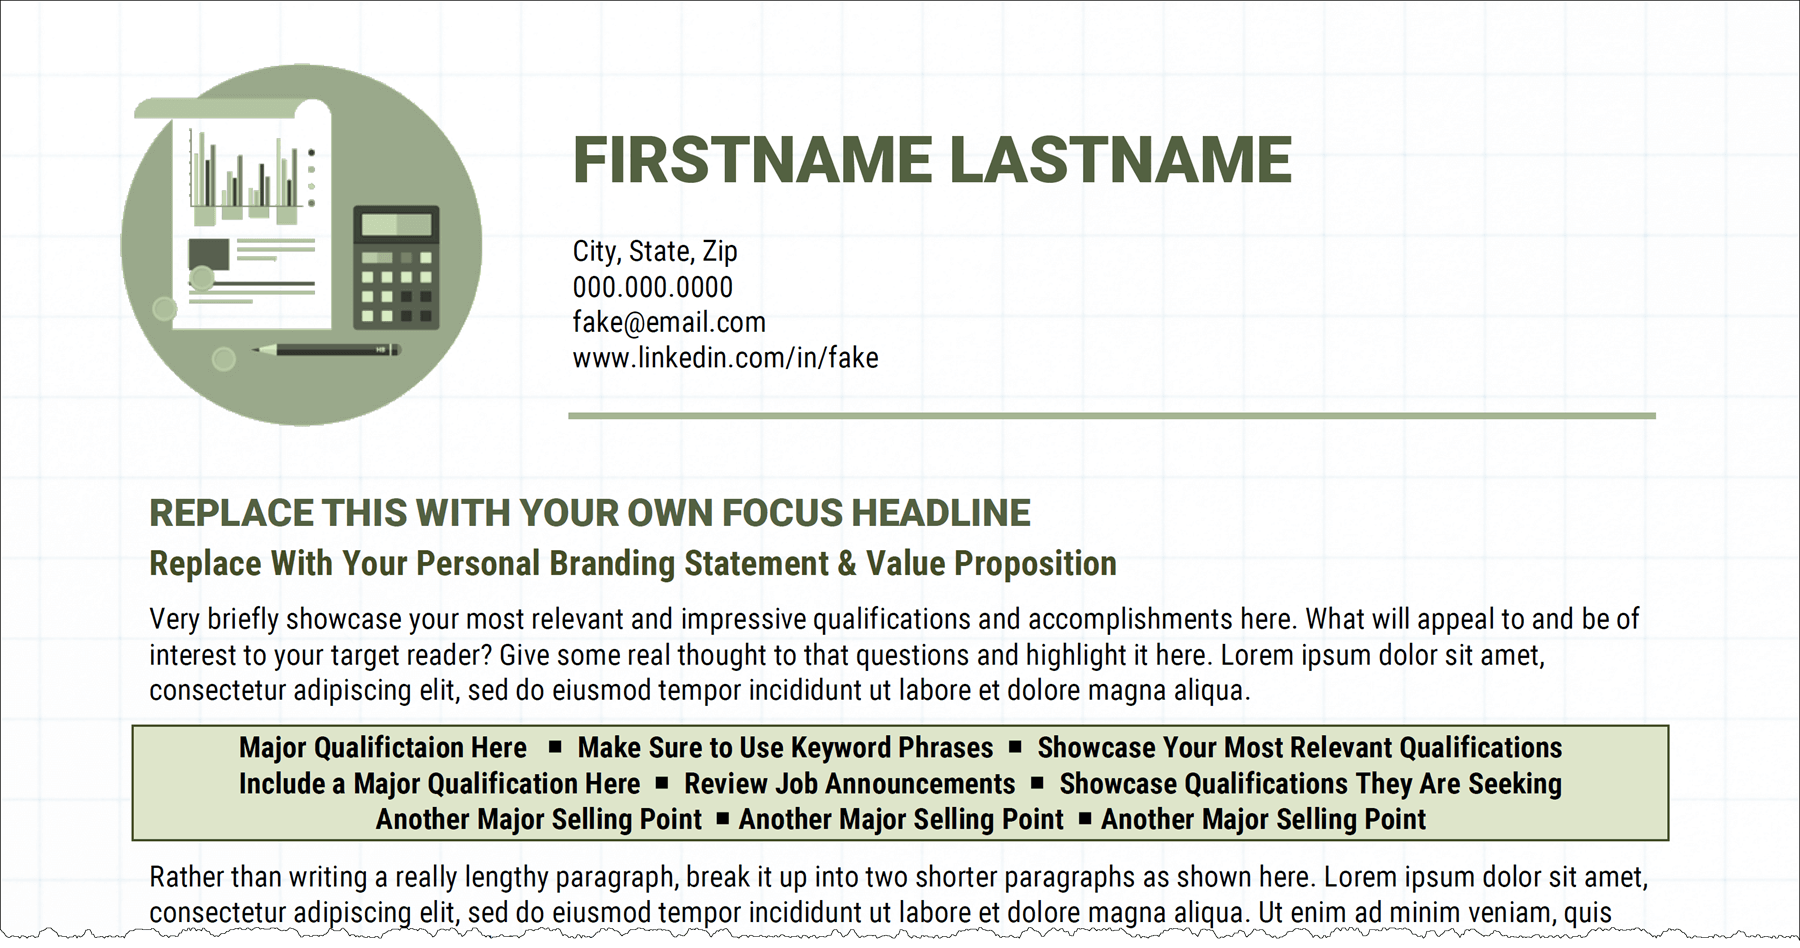
To add a watermark, navigate to the ‘Design’ tab in the Ribbon and choose ‘Watermark’ in the ‘Page Background’ group. You can either select one of the pre-designed watermarks available in Word or click on ‘Custom Watermark’ to create your own.
If you choose ‘Custom Watermark,’ you will be given options to insert a picture or a text watermark. Here you can adjust the size, text, font, layout, and color to match your desired design. Once you’re done customizing your watermark, click ‘Apply’ to insert it into your resume.
Remember to preview your document and print a test page before finalizing, as watermarks can look different on screen compared to when they’re printed. By using a watermark strategically and effectively, you can give your resume a distinct aesthetic advantage.
Leveraging Tables in Your Resume
Tables are a powerful tool in Word that can help you organize your resume content effectively. They are particularly useful for creating clear sections and making sure all your information aligns nicely. However, while they can help make your resume more visually appealing and organized, they should be used sparingly and wisely due to concerns with Applicant Tracking Systems (ATS).
Microsoft Word Tips for Using Tables in a Resume
How to Insert Tables in Word
- 1
Go to the ‘Insert’ tab in the Ribbon and choose ‘Table.’ You can then choose the number of columns and rows for your table. For a resume, a simple two-column or three-column table can be effective. (Be very cautious about using any multi-row, multi-column table in our resume, as this has an impact on ATS).
- 2
Enter your data into the table. You can adjust the size of the cells by clicking and dragging the edges.
- 3
To remove the border, select the table, go to the ‘Design’ tab under ‘Table Tools’ in the Ribbon, and choose ‘No Border’. You will find many other pre-set formatting options here as well.
Using Tables and ATS Compatibility
While tables can be great for organization and visual appeal, it’s essential to remember that Applicant Tracking Systems don’t handle complex tables well. A complex table will usually result in your table content getting entered into the ATS as jumbled, unreadable text. To avoid this issue, limit your use of tables to simple ones.
Incorporating SmartArt for Enhanced Visual Appeal
Microsoft Word’s SmartArt tool offers a dynamic way to highlight your key skills or personal brand traits in an infographic-style format. This eye-catching approach can make your resume stand out and quickly communicate your core strengths to potential employers. For example, you might use a horizontal process layout to list your key skills or a cycle layout to describe the steps you take in a project management process.
To add a SmartArt graphic to your resume:
- 1
Go to the ‘Insert’ tab.
- 2
Click on ‘SmartArt’.
- 3
A dialog box will appear where you can browse through a variety of layouts. Choose one that best fits your content.
- 4
You can then customize your SmartArt by adding text, changing colors, and adjusting the size to fit your resume layout.
While SmartArt can help your resume visually pop, it’s essential to remember that most ATS view SmartArt as a graphic. This means that the text contained within the SmartArt may not be read or considered by the ATS during the evaluation process. Consequently, vital information could be missed.
Therefore, if you choose to use SmartArt in your resume, ensure that any critical skills, qualifications, or traits included within the SmartArt are also present elsewhere in the text of your resume. This redundancy ensures your vital skills are still identified by the ATS.
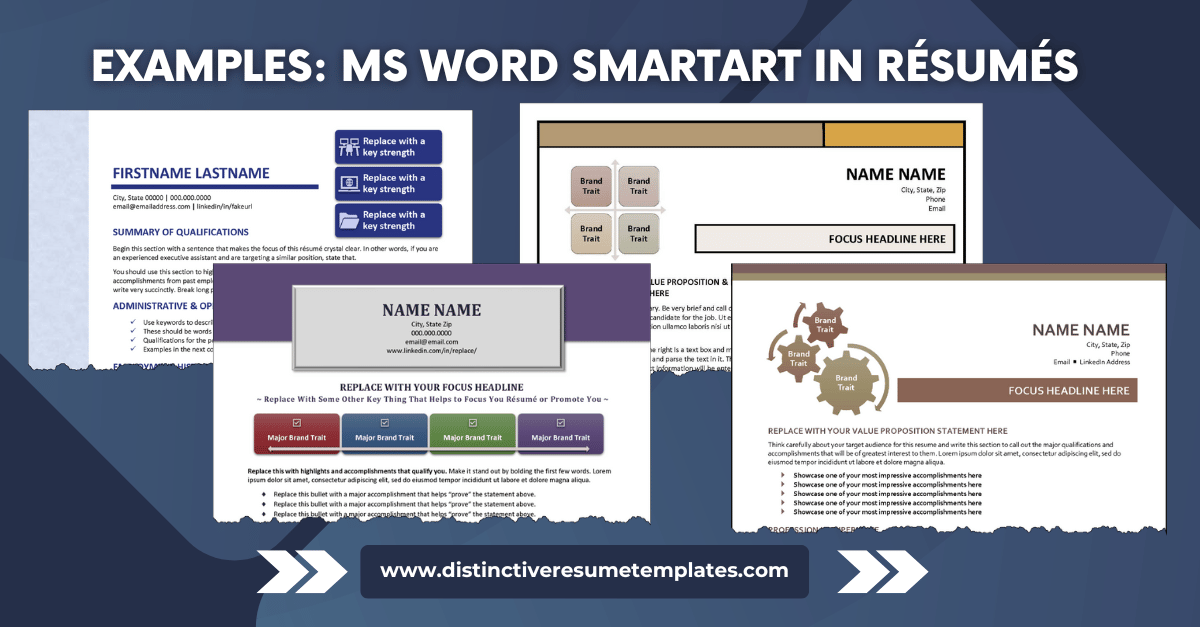
The MS Word resume templates with included SmartArt, shown above, include the administrative resume template that is part of our Administrative Works Collection, the C-suite resume template from our Executive Rule Collection, the Connexion Collection‘s resume with social media links, and the resume from the Authentic Elements Collection which provides an especially versatile resume format.
Using Charts and Graphs to Graphically Convey Numerical Data
Charts and graphs can be a powerful tool in your resume, allowing you to present complex data in a visually appealing and easy-to-understand format. These graphical representations can make it much simpler for potential employers to grasp your achievements, especially if they involve numerical data.
For example, a bar graph can effectively illustrate a steady increase in annual sales or profits, while a pie chart can show the percentage of a target goal that you’ve achieved. Alternatively, a line graph could vividly illustrate the consistent improvement in customer satisfaction scores over time.
Here are the steps to add a chart or graph to your resume:
- 1
Go to the ‘Insert’ tab.
- 2
Click on ‘Chart.’
- 3
In the dialog box that appears, select the chart type that best represents your data.
- 4
An Excel-like worksheet will open where you can enter your data.
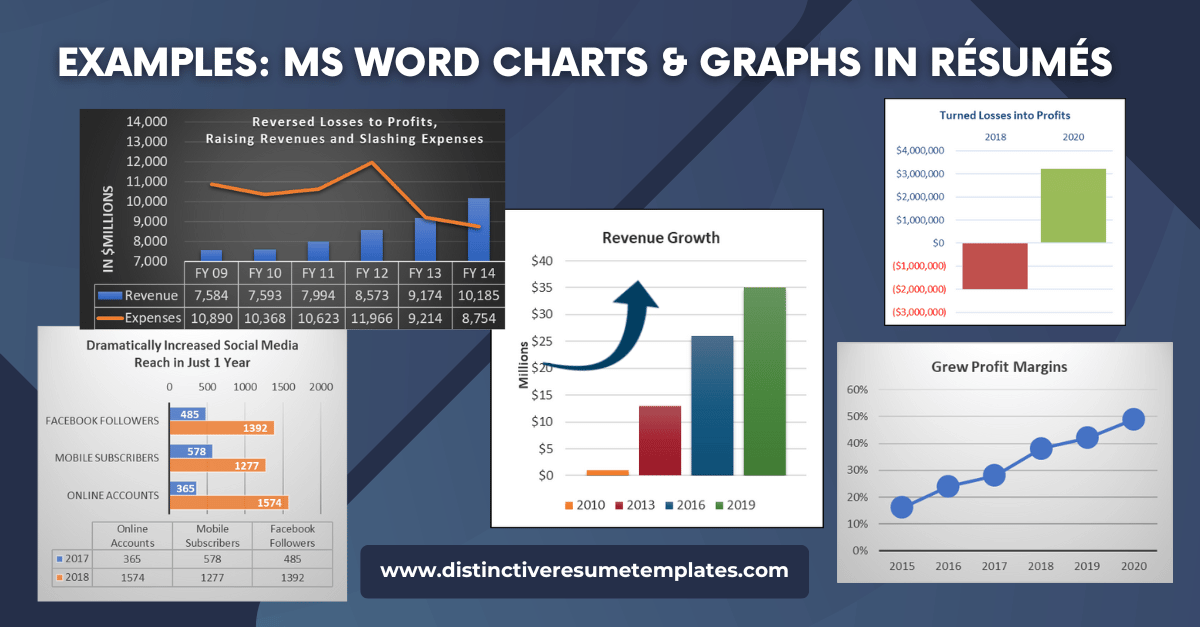
After entering your data, close the worksheet, and the chart or graph will appear in your Word document. Customize the size, color, and style of your chart to match the rest of your resume’s formatting.
Though charts and graphs can be visually impressive and simplify data representation, as we’ve already mentioned many times, remember that most Applicant Tracking Systems view these elements as images, potentially skipping the information they contain. This means that essential data within your chart or graph may not be read or evaluated.
As a workaround, consider including the same data in a text format elsewhere in your resume, like in your achievements or experience section. This way, the ATS can still capture your accomplishments, and the human readers can appreciate the visual representation of your success.
Using Text Boxes for Emphasis and Visual Appeal
Text boxes in Microsoft Word can serve as powerful tools to highlight key information and create visual interest in your resume. They can be used to draw attention to details such as an excerpt from a reference letter, awards, and honors, or standout achievements.
Here’s how to create a text box and adjust text wrapping:
- 1
Go to the ‘Insert’ tab.
- 2
Click on ‘Text Box.’
- 3
Select a predefined text box or choose ‘Draw Text Box’ to create a custom one.
- 4
Insert your desired text into the box.
- 5
With the text box selected, click on the ‘Format’ tab to adjust the color, border, and other visual aspects.
To control how text and other elements on the page wrap around your text box:
- 1
Right-click on the text box and choose ‘Wrap Text.’
- 2
Select the style of wrapping that best suits your layout.
Remember, if you want your text box to blend into the rest of your resume, you can remove its outline and background color.
However, a word of caution: many Applicant Tracking Systems (ATS) may not correctly interpret the text inside text boxes. ATS often treats these boxes as graphic elements and may bypass the enclosed text. While text boxes are a visually engaging element for human readers, any crucial information or keywords in the box should be included in the body of your resume as well.
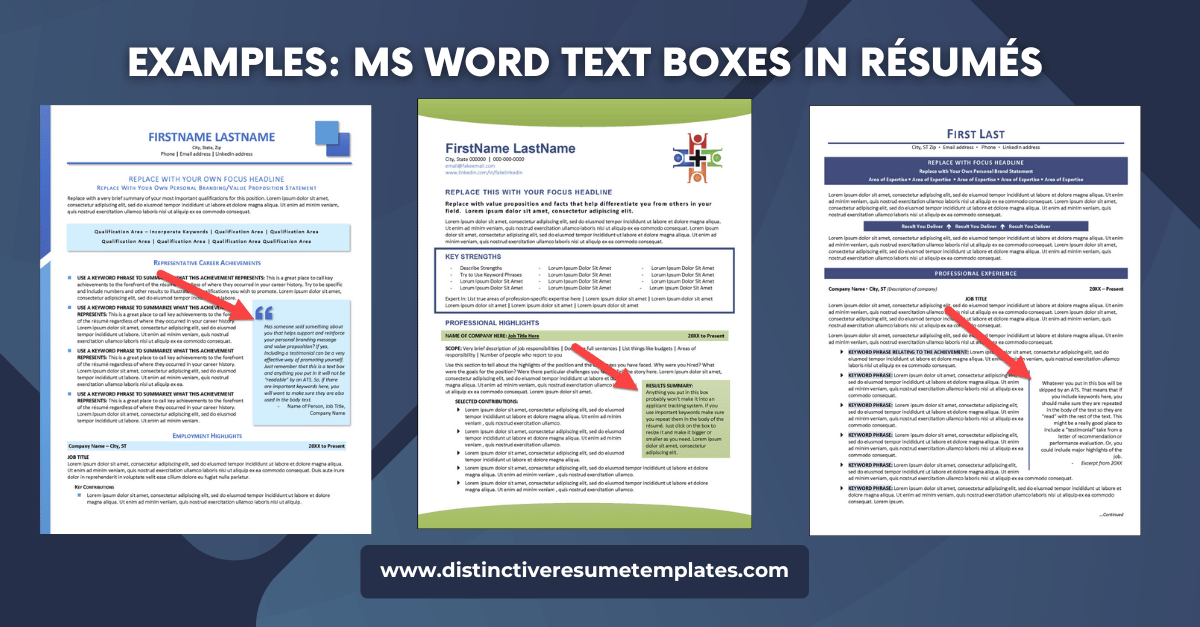
The MS Word resume templates with included text boxes, shown above, include the New Horizons Collection resume template for experienced professionals, the healthcare industry resume template from the Healthcare Edge Collection, and the powerful resume template from our Midnight Vista Collection.
Utilizing Predefined and Custom Styles in Resumes
Leveraging Styles and Themes
Styles and themes are an excellent way to ensure consistency in your resume’s formatting. These tools offer a unified look and feel across the entire document, enhancing readability and visual appeal.
Using Styles
Styles in Microsoft Word are predefined sets of formatting specifications that you can apply to text within your resume. They can help ensure consistency throughout your resume, leading to a more professional and organized appearance. Here’s how to use them: For example, styles can be applied to specific pieces of text, such as headings, subheadings, or body text. By consistently applying styles, you can ensure that similar elements of your resume (like job titles or company names) are formatted identically, making your document easier to navigate.
Here is how you can use styles:
- 1
Click on the text that you want to apply a style to. This can be a heading, subheading, job title, company name, or paragraph.
- 2
Once your text is selected, navigate to the Home tab in the toolbar at the top of your screen.
- 3
In the Styles group, you’ll see a list of different text styles. Hover over each to see a preview of the style on your selected text.
- 4
Click on the style that you wish to apply. Your text will immediately change to reflect this style.
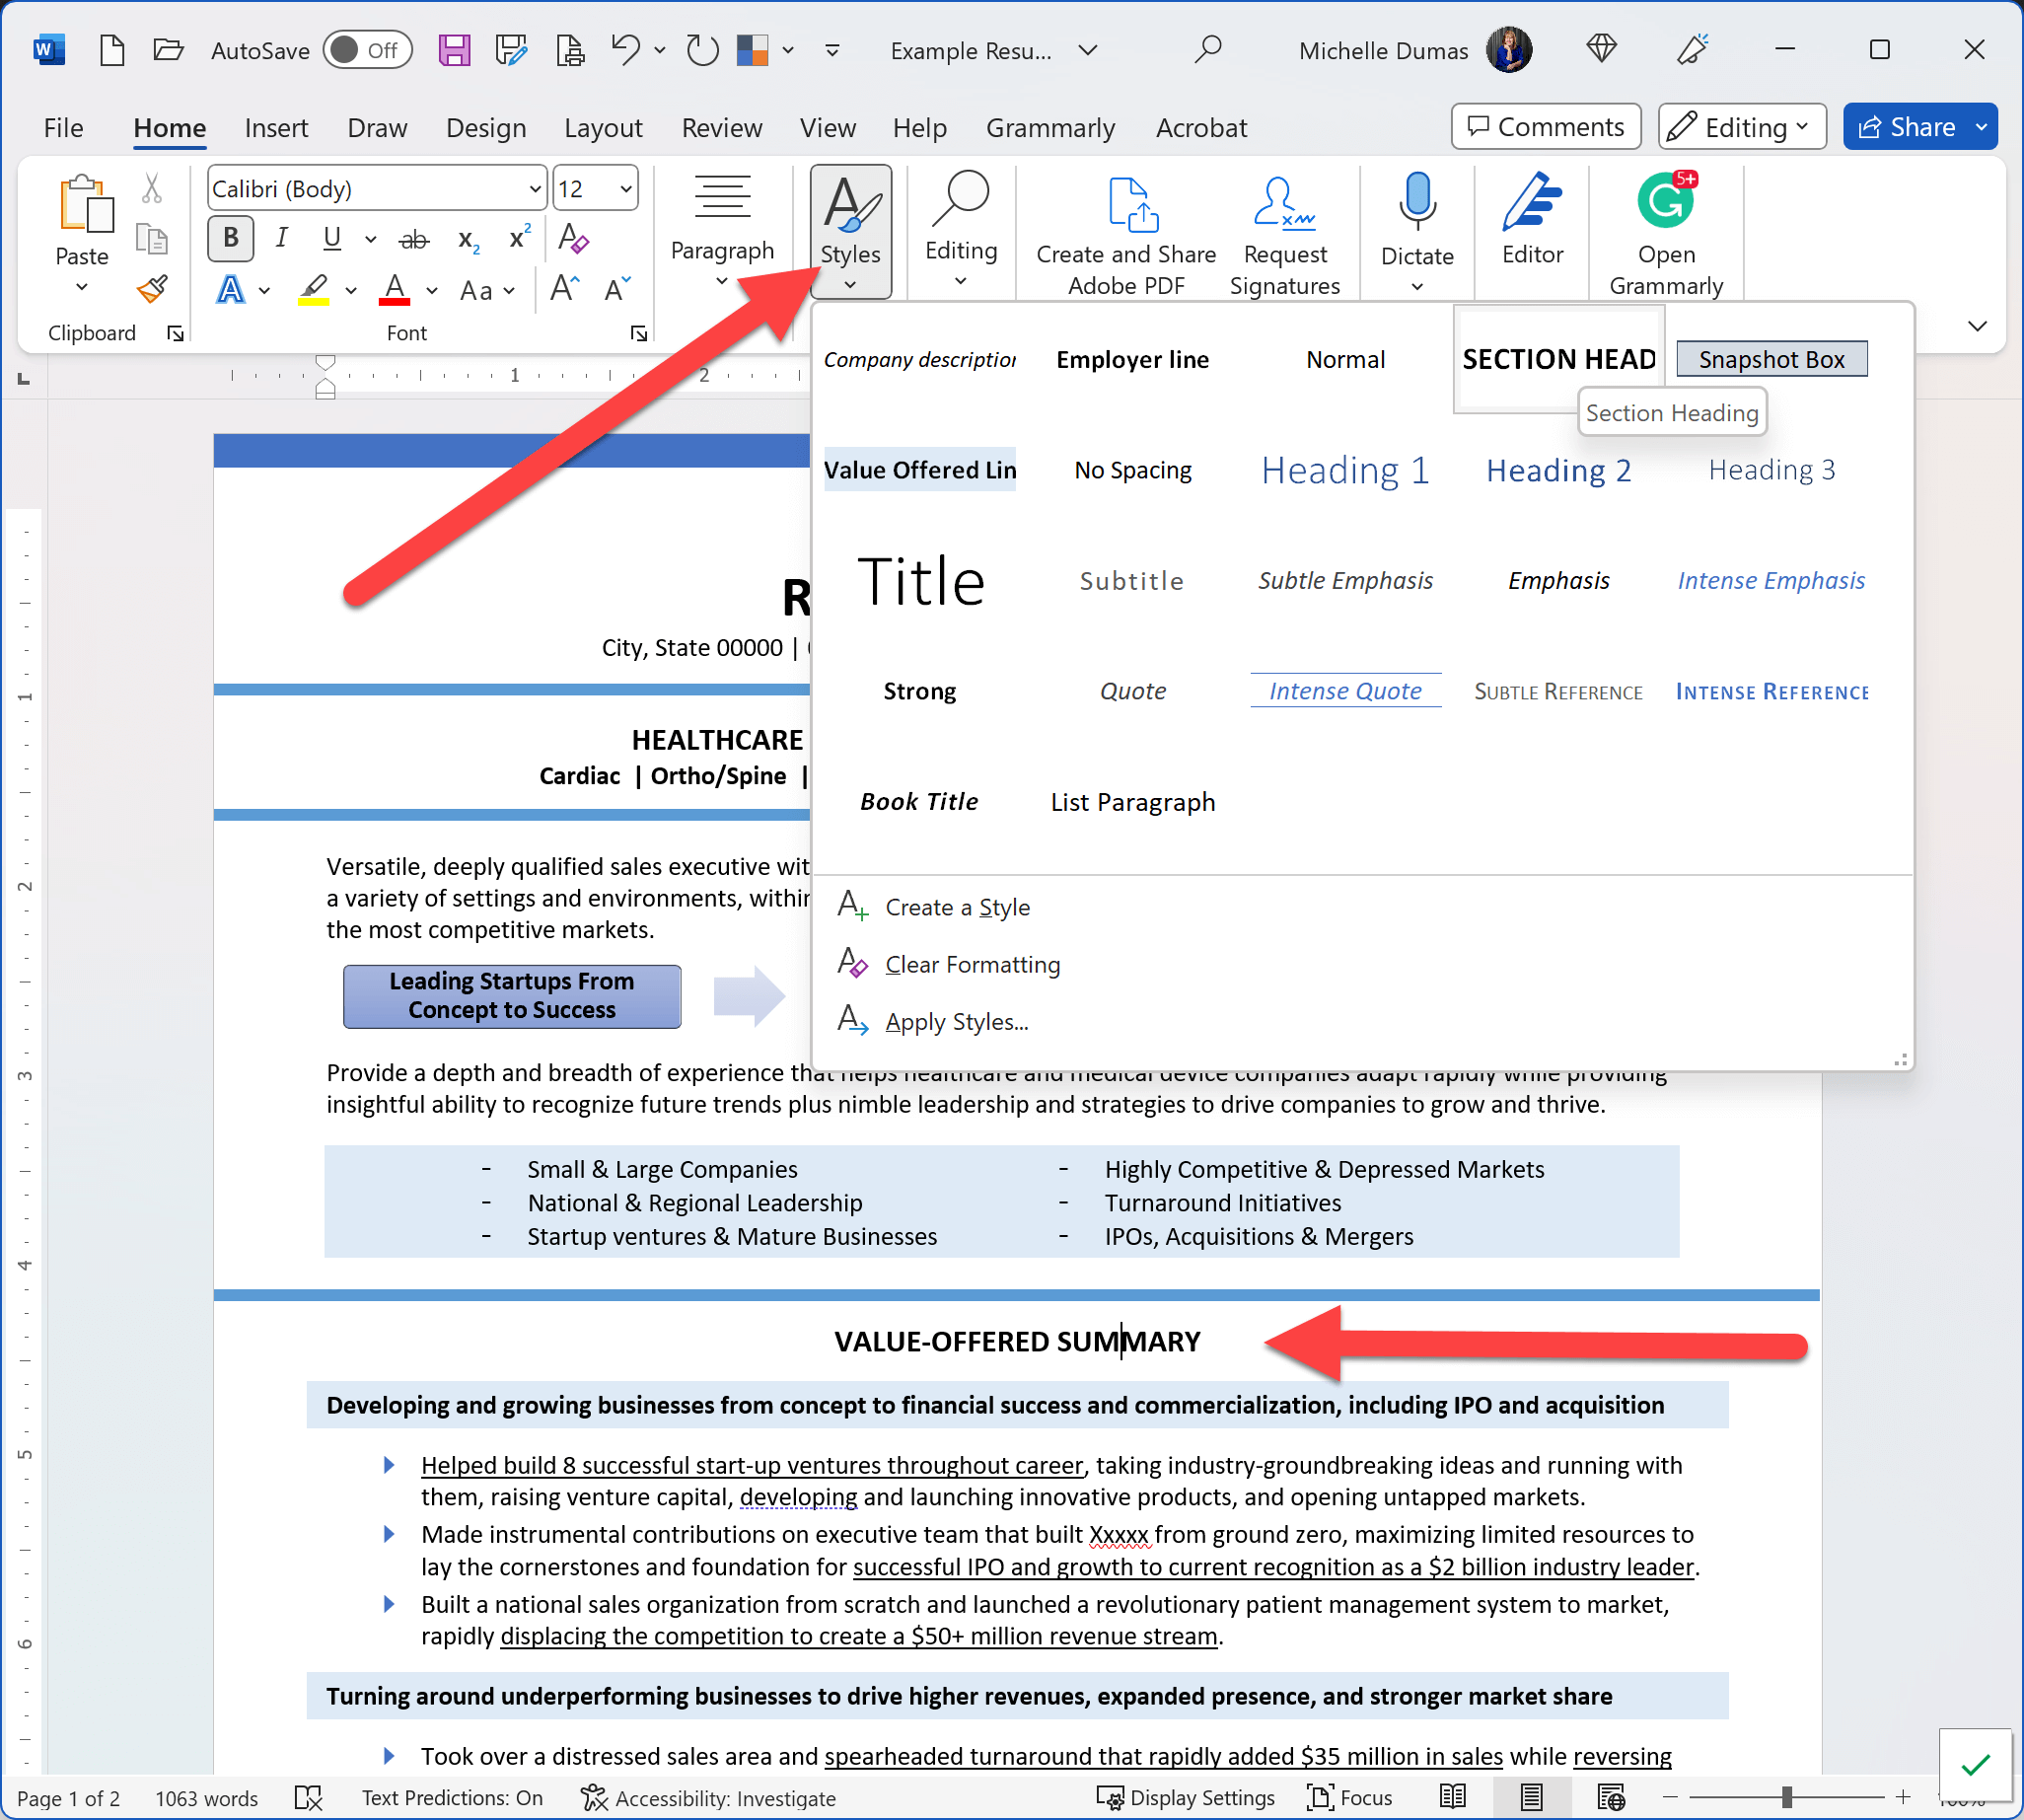
If you wish to create your own style, format a section of text as you wish, then highlight it and open the dropdown menu. Select “Create a Style” and give your new style a name. For example, you might create a style named “Resume Headline,” one named “Job Description,” and another named “Job Title.”
Remember, consistency is key in a resume. Ensure that you apply the same style to similar pieces of text. For instance, if you use a specific style for job titles, apply that style to all job titles in the document.
Applying Themes
Themes are a great way to control the overall visual impact of your resume. They ensure a consistent color scheme, font selection, and graphic effect across your entire document. Here’s how to apply a theme:
- 1
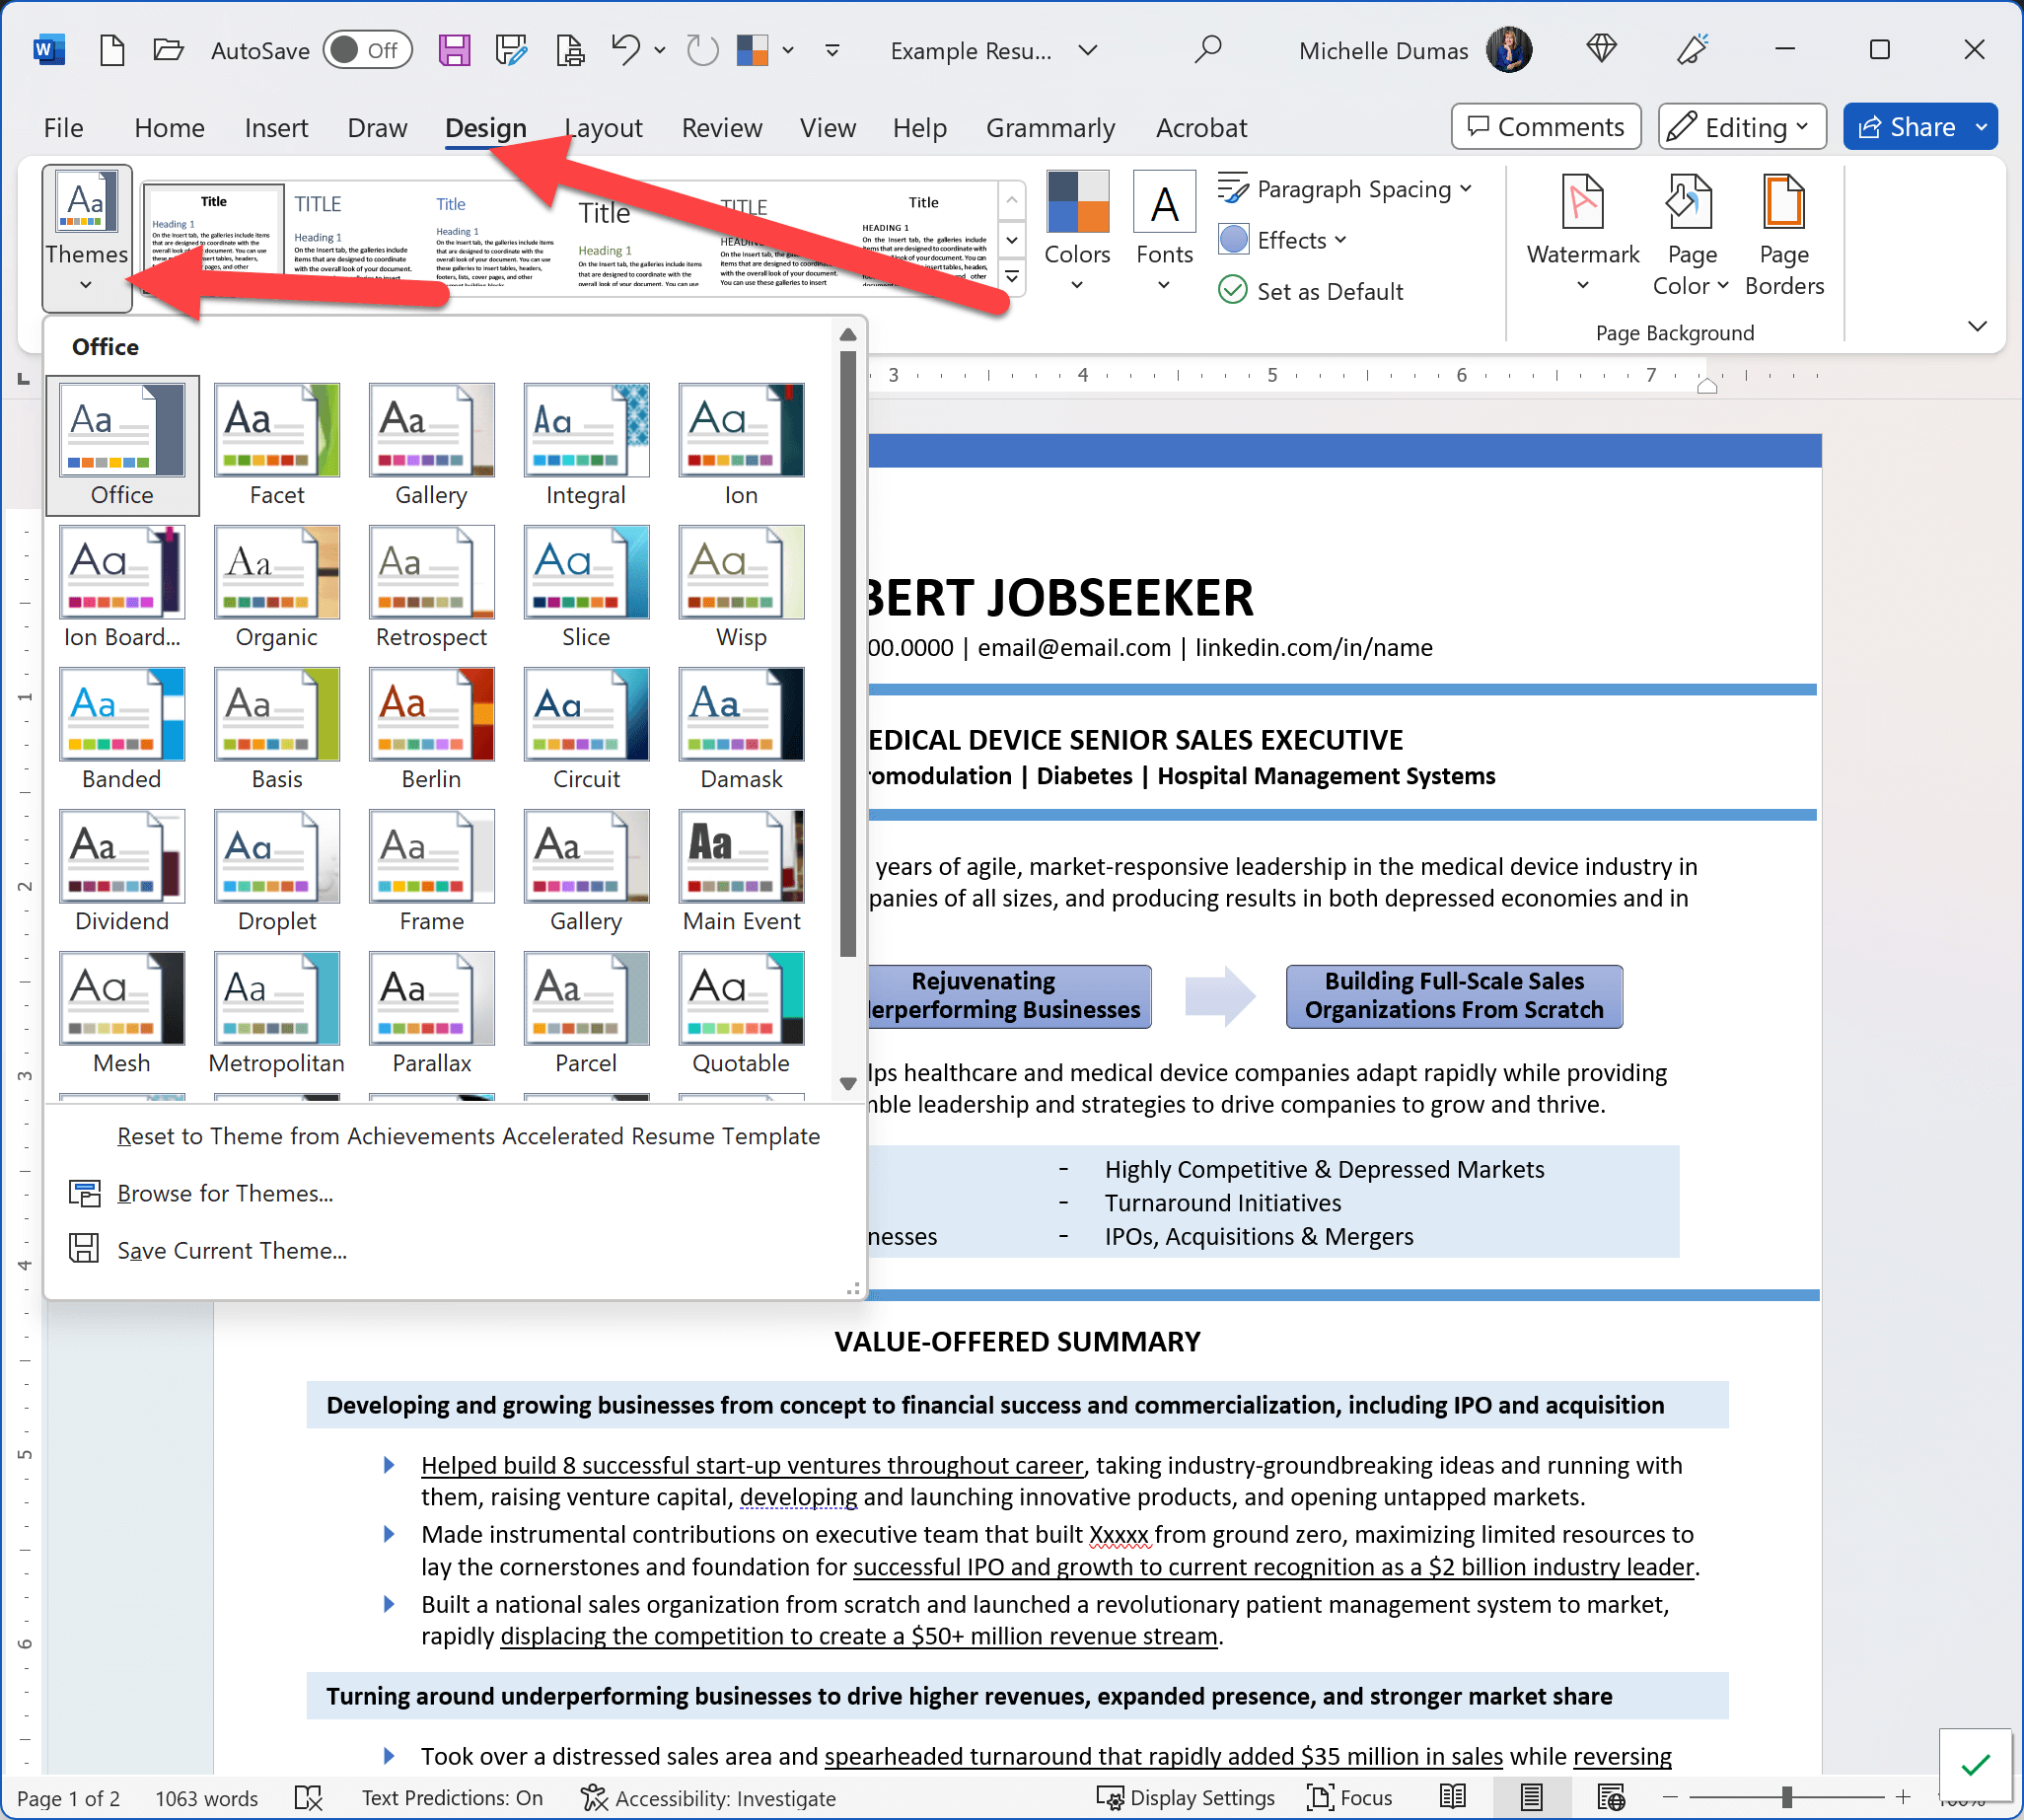
Navigate to the Design tab in the toolbar at the top of your screen.
- 2
Click on the Themes button. A drop down menu will appear, displaying a variety of different themes.
- 3
Hover over each theme to see a preview of how it will look on your document.
- 4
Once you’ve found the theme that best suits your resume, click on it to apply the theme.
Consider the role and industry you’re applying for when choosing a theme. For more creative roles, you might choose a modern, visually striking resume theme. For more traditional roles, a simple, professional resume theme might be more suitable.
Once you have chosen a theme that you like, you can customize it further using the options on the Design tab. For example, you can change the colors or the fonts using the options on those two menu items.
Leveraging Professional and Custom Resume Templates
Resume templates are an invaluable tool for most job seekers, offering both an aesthetically pleasing layout and a structured guide to organizing your professional history. Using a resume template can save you considerable time, ensure consistency, and allow you to focus on tailoring your resume content to each role.
Distinctive Resume Templates
Distinctive Resume Templates offers a comprehensive suite of professionally designed resume templates for MS Word that cater to a broad range of career stages, from new graduates to C-suite executives, and in both chronological and functional formats. Each resume template design is not only visually compelling to catch the hiring manager’s attention but is also ATS-compatible, meaning it’s been designed to be easily read and parsed by ATS.
With hundreds of unique resume templates to choose from, you’re sure to find a resume format and design that suits your personal style and professional needs for your own resume. You can focus on what you’re saying, knowing that how you’re saying it looks polished and professional, and your job application will stand out in a sea of standard resumes.
Creating a Custom Resume Template
In addition to using professional resume templates, you may want to create a custom resume builder template that truly reflects your personal brand. This is particularly useful for job seekers who frequently tailor their resumes for different roles.
- 1
Create a new document and set up your preferred formatting for text, headings, bullets, and sections.
- 2
Once you’re satisfied with your layout, navigate to ‘File > Save As.’
- 3
In the dialog box that appears, choose ‘Word Template’ from the ‘Save as type’ dropdown menu.
- 4
Give your new resume template a name and save it.
If you wish, include all the basic content for your resume, such as writing your resume summary, listing transferable skills in a resume skills section, including your job history, and an education section.
The next time you need to create a tailored resume for a specific job, you can start with your personalized resume template:
- 1
Go to ‘File > New.’
- 2
Click on ‘Personal’ to access your saved templates.
- 3
Select your custom resume template and click ‘Create.’
This will open a new resume builder document based on your template, allowing you to adjust the content for each job description and other key parts of your resume such as a resume skills section, without having to format and write a resume from scratch each time. Tailor your content for your desired job, such as customizing the soft and hard skills with relevant skills for the specific job. This ensures consistency across your resumes while giving you flexibility where you need it most.
Final Touches for Your Resume and Other Considerations
Adding Page Borders to Your Resume
Page borders can be a distinctive touch to your resume, creating a clear visual boundary that can help your document stand out. Whether simple or ornate, they should be used judiciously to complement your resume’s content without overpowering it. Here’s how you can add a page border in Word:
- 1
Click on the ‘Design’ tab on the ribbon at the top of Word.
- 2
Click on ‘Page Borders’ in the ‘Page Background’ group. This will open the ‘Borders and Shading’ dialog box.
- 3
In the ‘Page Border’ tab, select the style, color, and width of the border you want to use.
- 4
Under ‘Apply to’, select ‘Whole document’ to apply the border to every page. If you want the border only on the first page, select ‘First page only’.
- 5
Once you’re satisfied with your settings, click ‘OK’ to apply the border to your resume.
Remember, while a page border can make your resume visually distinctive, it’s important to ensure that it doesn’t distract from the most crucial element of your document: the content. Keep it simple and professional. For example, a thin, single-line border in a muted color can add a touch of elegance without being distracting.
Adding Page Color or Fill for On-screen Visual Appeal
Page color or fill can add a subtle and sophisticated layer of design to your resume when viewed on screen. These visual enhancements can create a more personalized look and feel, even making your digital resume look as though it’s been printed on premium textured paper. Here’s how to do it:
- 1
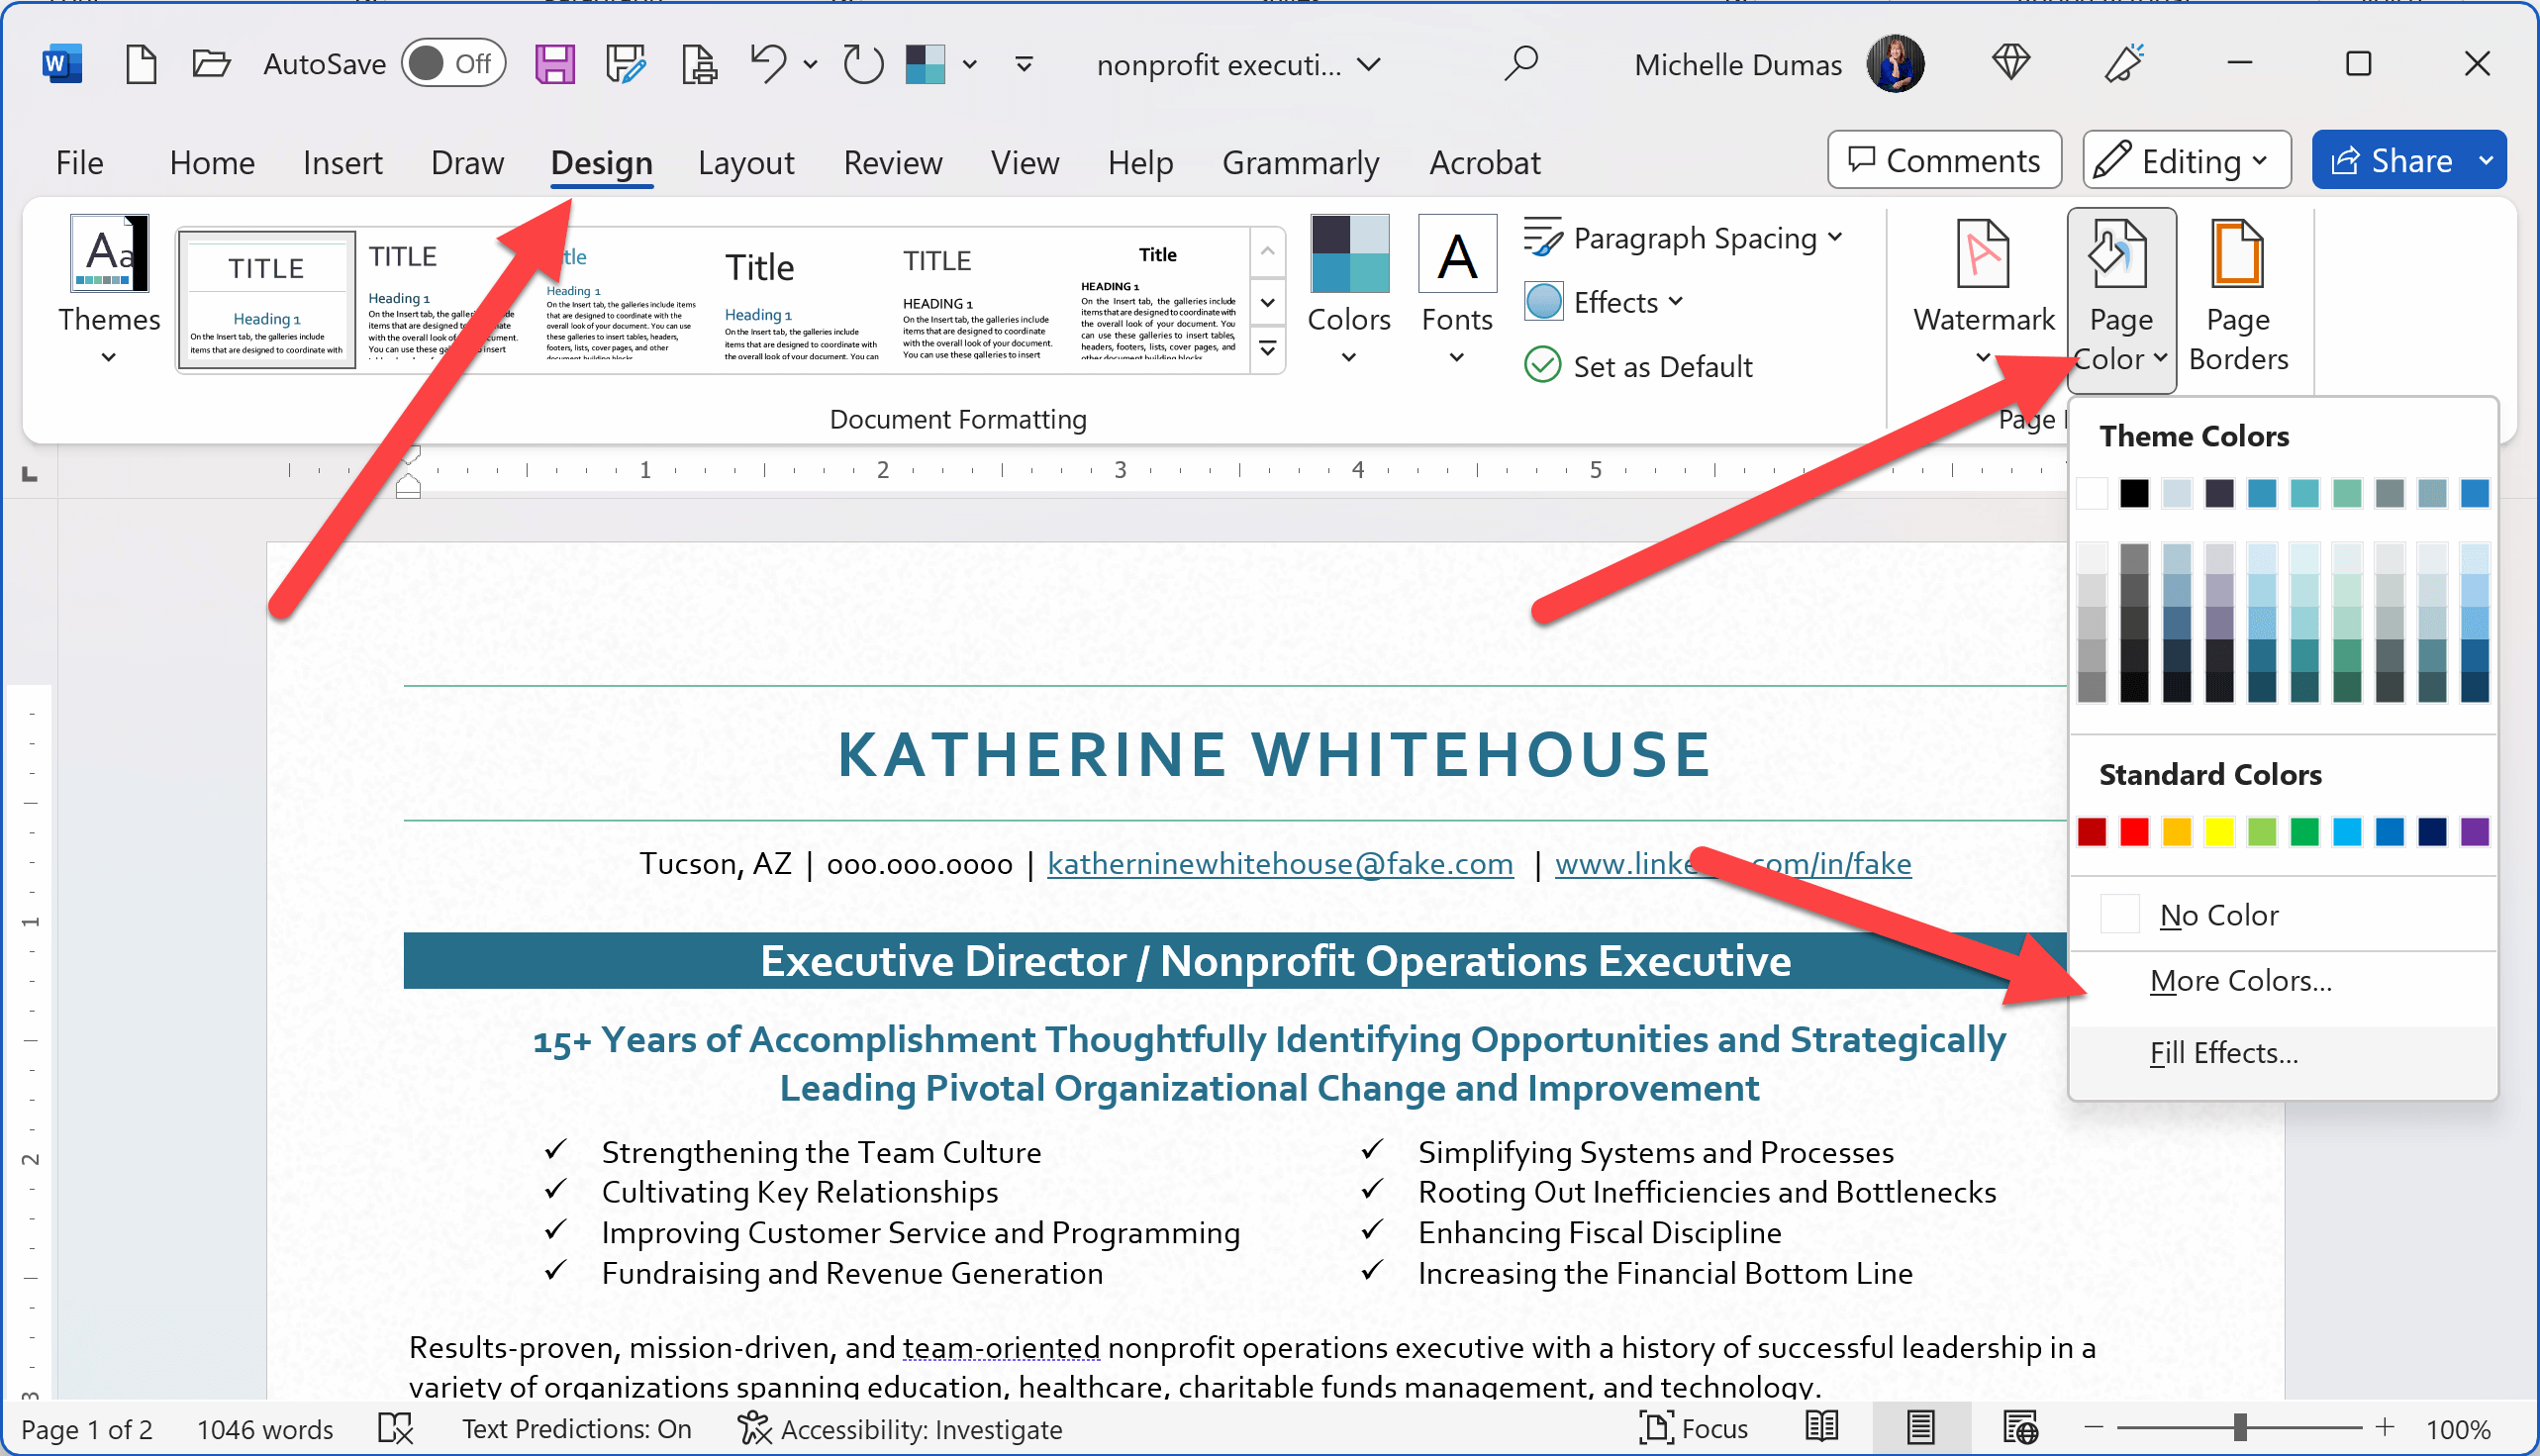
Navigate to the ‘Design’ tab on the ribbon at the top of Word.
- 2
Click on ‘Page Color’ in the ‘Page Background’ group.
- 3
From the dropdown menu, you can choose from a selection of standard colors, or you can customize a color. For a textured look, select ‘Fill Effects.’
- 4
In the ‘Fill Effects’ dialog box, you can select ‘Texture’ to choose from a variety of preset textures, or you can select ‘Pattern’ to choose a two-color pattern.
Remember, when using page color or fill, subtlety is key. You want to enhance your resume’s visual appeal without drawing attention away from the content. Very light colors and very subtle textures or patterns usually work best for this purpose.
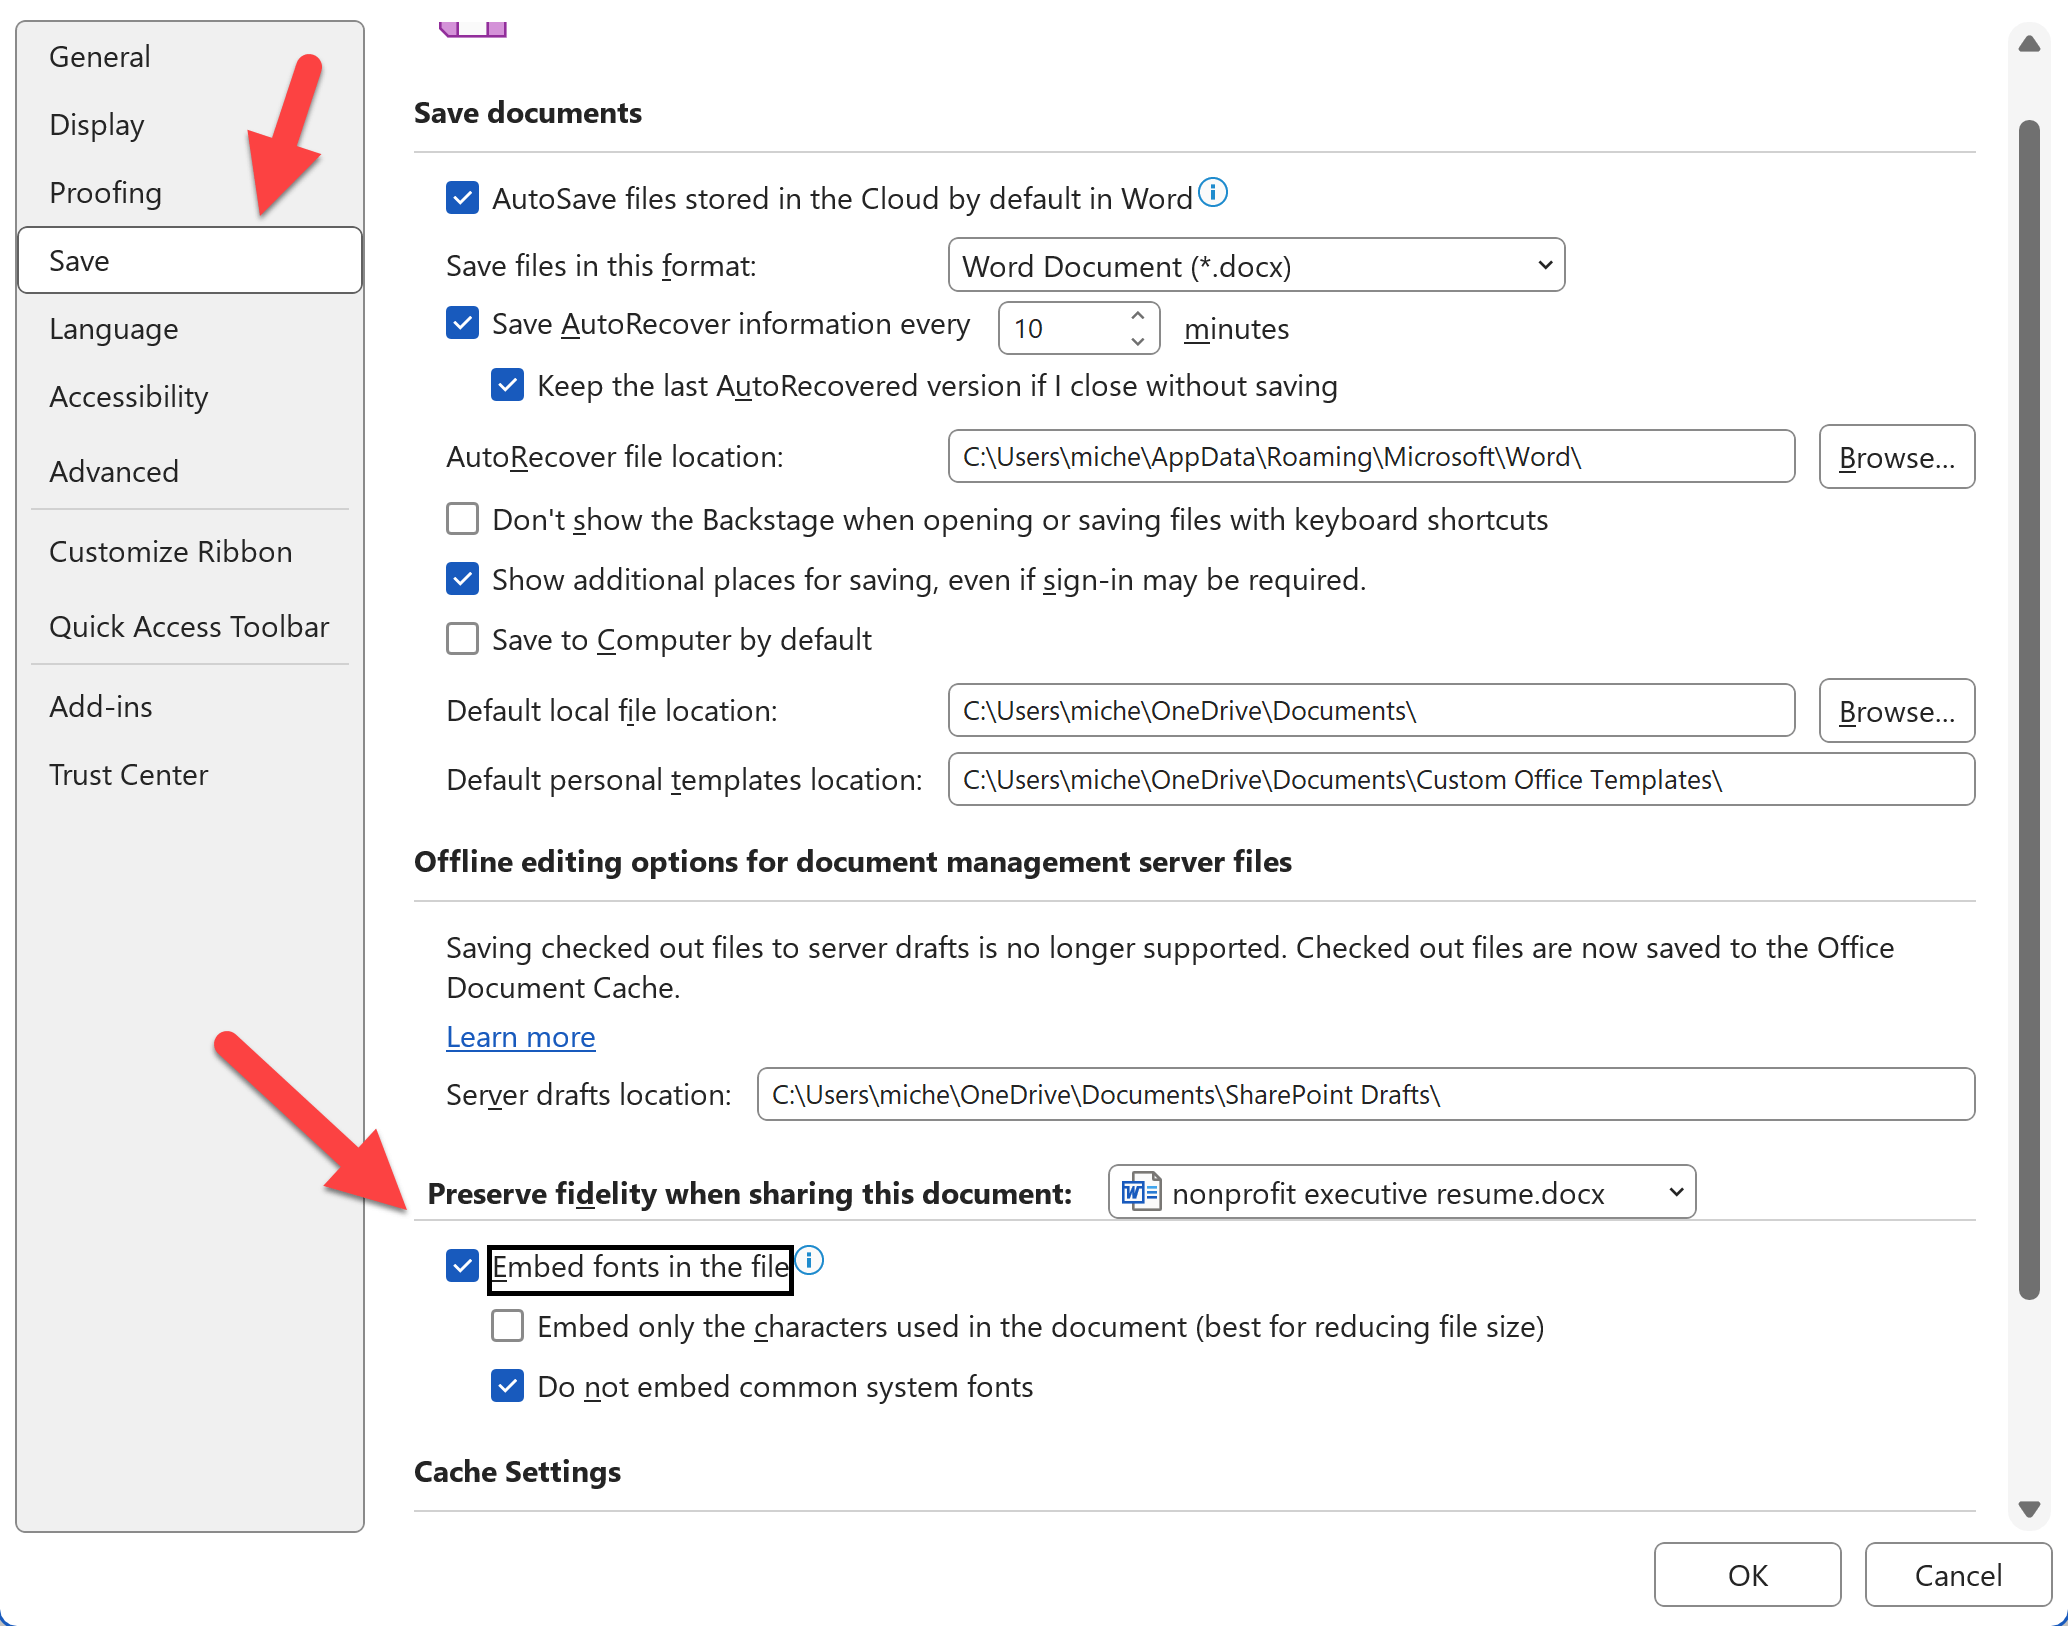
Embedding Fonts for Consistency Across Systems
Embedding fonts in your Word document resume is crucial to maintaining the visual consistency of your resume format when it’s viewed on different computers. If you’ve used a less-common font that’s not likely to be installed on all computers, embedding the font will ensure that your recipient sees the resume exactly as you designed it, preserving your chosen typography.
Here’s how to do it:
- 1
Click on the ‘File’ tab.
- 2
Select ‘Options.’
- 3
In the ‘Word Options’ dialog box that appears, click on ‘Save’ on the left-hand side.
- 4
In the ‘Save’ section, locate the ‘Preserve fidelity when sharing this document’ section.
- 5
Check the box next to ‘Embed fonts in the file.’
- 6
To reduce file size, also check ‘Embed only the characters used in the document (best for reducing file size).’ However, this option should be used carefully, as it may prevent future editing.
Remember, while this is a valuable tool for ensuring a consistent resume format, it’s not always necessary and should be used judiciously. Standard fonts like Times New Roman, Arial, or Calibri are typically installed on most computers, so embedding these can unnecessarily increase the size of your document. This can make your resume file harder to transmit digitally and may cause slow loading times when opened.
However, by taking the extra step to embed your less-common chosen fonts, you can confidently share your resume, knowing that its typography will appear just as you intended, no matter where or how it’s viewed.
Microsoft Word Tips for Using Artificial Intelligence (AI) for Your Resume
At the time of publishing this article, Microsoft is planning to introduce a new AI-powered feature called Copilot to subscription versions of Word. Copilot will leverage OpenAI’s ChatGPT, a powerful language model, to assist users in generating, editing, and summarizing content.
With the Copilot button, users will be able to access ChatGPT’s capabilities directly within Word, making it easier to draft, edit, and refine resumes and other documents. The AI can help with tasks such as generating text based on prompts, suggesting alternative phrasings, summarizing long passages, and even answering questions about the content.
The Copilot feature is expected to be a valuable addition to Word, enhancing the user experience and making it even more powerful and versatile for both personal and professional use.
However, at this time, the Copilot feature is still in development, and its release date and specific capabilities haven’t yet been announced.
Mastering Microsoft Word for Creating a Resume: Final Thoughts
Microsoft Word, an integral tool in our daily professional lives, is laden with powerful features that can streamline and augment the process of crafting a stellar resume. As you delve deeper and familiarize yourself with these Microsoft Word tips and functionalities, you unlock the potential to elevate your resume and set it apart from the rest.
It’s important to note that a polished, well-formatted resume is more than just an aesthetically pleasing document. It serves as a potent tool that articulates your professional journey in a compelling manner to prospective employers, thereby enhancing your chances of securing your dream job. So, take these Microsoft Word tips to heart and get started on creating a resume that truly tells your unique professional story.
As you embark on your journey to write a resume, bear in mind that the exact location of some features might slightly differ based on the version of Microsoft Word you are using. However, the core functionalities remain largely unchanged, and you’ll be able to apply most of these tips across different versions.
We wish you success and joy in your resume-crafting endeavors. Here’s to creating a document that not only captures your career highlights but also embodies your unique professional brand!


